VDH9600
OWNER’S MANUAL/INSTALLATION GUIDE WARNING! THE CLARION VDH9600 VIDEOCASSETTE PLAYER IS DESIGNED FOR REAR SEAT VIEWING OF VIDEOCASSETTES ONLY. THIS PRODUCT IS NOT INTENDED FOR VIEWING BY THE DRIVER WHILE THE VEHICLE IS IN MOTION SINCE SUCH USE MAY DISTRACT THE DRIVER OR INTERFERE WITH THE DRIVER’S SAFE OPERATION OF THE VEHICLE AND MAY RESULT IN SERIOUS INJURY OR DEATH. SUCH USE MAY ALSO VIOLATE STATE LAW.
VDH9600 VIDEOCASSETTE PLAYER/RECORDER INTRODUCTION • 2-speed playback of SP and SLP videocassettes The Clarion VDH9600 is a full-featured VHS videocassette player/recorder specifically created for the mobile environment. It is designed to work through Clarion Multimedia devices and ClarionVideo Monitors for a complete video solution for your vehicle.
OWNER’S MANUAL/INSTALLATION GUIDE PRECAUTIONS AND VIDEOCASSETTE USE Installation Precautions • This unit operates on an automotive 12-volt negative ground power source and requires additional mobile audio and video components for proper operation. • Before installation, disconnect the (–) negative lead from the vehicle’s battery. • Use only supplied screws and hardware. Make sure all connections and components are fastened securely.
VDH9600 VIDEOCASSETTE PLAYER/RECORDER • Do not force a videocassette upside down into the unit. Videocassette Use • Do not place heavy objects on the unit or remote control. • Use only VHS-type (T-30, T-60, or T-120) videocassettes. • Do not drop or excessively jar the unit or remote control. • Do not repeatedly load or unload a videocassette without interim playback; doing so may cause the tape to slack and become damaged. • Do not use liquid cleaners on any surfaces.
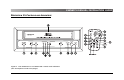
OWNER’S MANUAL/INSTALLATION GUIDE DESCRIPTION OF CONTROLS AND INDICATORS Figure 1. The VDH9600’s and IR Remote controls and indicators (see descriptions on the next page).
VDH9600 VIDEOCASSETTE PLAYER/RECORDER 1 POWER Button Press to power the unit ON or OFF. 2 EJECT Button Press to eject a videocassette from the compartment. 3 CASSETTE Compartment Insert a videocassette which automatically loads the tape. 4 RECORD Button Engages the RECORD mode. 5 POWER Indicator Illuminates when the player is powered up. 6 RECORD Indicator Illuminates when RECORD mode is ON. 7 DEW/HEAT Indicator When illuminated and flashing the PLAY mode is disabled.
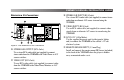
OWNER’S MANUAL/INSTALLATION GUIDE DESCRIPTION OF CONNECTORS i STEREO L/R INPUT (RCA Jacks) Use a stereo RCA audio cable (not supplied) to connect stereo audio from an alternate A/V source to record using the VDH9600. o VIDEO INPUT (RCA Jack) Use an RCA video cable (not supplied) to connect video signals from an alternate A/V source to record using the VDH9600. p DC IN 12V (4-Pin Molex) Figure 2. The VDH9600’s rear connections.
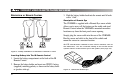
VDH9600 VIDEOCASSETTE PLAYER/RECORDER DESCRIPTION OF REMOTE CONTROL 3. Slide the battery holder back into the remote until it locks with a “click”. Description of Remote Eye The VDH9600 is supplied with a Remote Eye sensor which allows you to access all the features on the credit card sized Remote Control when the VDH9600 is mounted in another location away from the front panel sensor opening. Simply plug the sensor cable into the rear of the VDH9600.
OWNER’S MANUAL/INSTALLATION GUIDE Using The IR Remote Control Inside the vehicle, simply aim the Remote Control directly at the VDH9600’s faceplate and press any desired button. When direct line of sight is impossible, install the remote mount IR sensor in the front of the vehicle. For best results, also note the following: • Aim the Remote Control from no further than 7 feet away and no more than 3 feet on either side of the VDH9600 faceplate or remote mount sensor.
VDH9600 VIDEOCASSETTE PLAYER/RECORDER DESCRIPTION OF ON-SCREEN PROGRAMMING ** MAIN MENU ** MENU Button Push the MENU button to enter into the On-Screen programming mode. Press the MENU button again to turn off the Main Menu display. (See Figure 5 below.) SHIFT Button Press the SHIFT button to scroll down the Main Menu.
OWNER’S MANUAL/INSTALLATION GUIDE ENTER Button Press the ENTER button to toggle through the choices for that setting. ** MAIN MENU ** Record Speed (SP or SLP) The VDH9600 can record at standard speed (SP) or a slower tape speed (SLP). Tapes recorded at standard speed provide a clearer picture, while the slower speed (SLP) allows more material on the tape.
VDH9600 VIDEOCASSETTE PLAYER/RECORDER Using Manual Tracking Using the Remote Control, you can adjust the picture tracking manually (see Figure 8). • Automatic tracking is initiated when you first insert a videocassette in the CASSETTE Compartment. • Manual tracking may be used when auto tracking does not fully correct picture tracking noise. Press TRACKING + (or –) to increase (or decrease) manual tracking. Figure 8. Auto and Manual Tracking functions are located on the Remote Control.
OWNER’S MANUAL/INSTALLATION GUIDE Using Rewind And Fast Forward Using Forward And Reverse Search • To rewind the tape, first press STOP and then press REW (see Figure 10). The VDH9600 includes a 2-step forward/reverse picture search for quick location of a desired video segment at 5- or 7-times SP speed. • To fast forward the tape, first press STOP and then press FF (see Figure 10). To cancel FF or RWD, press PLAY or the STOP button.
VDH9600 VIDEOCASSETTE PLAYER/RECORDER INSTALLATION AND WIRING Installing The VDH9600 The VDH9600 can be mounted horizontally or vertically, as shown in Figures 1 and 2. NOTE: For best results, Clarion recommends horizontal mounting, since vertical mounting may produce increased picture jitter while the vehicle is moving. Figure 11. Vertical mounting of VDH9600. 14 Figure 12. Horizontal mounting of VDH9600.
OWNER’S MANUAL/INSTALLATION GUIDE Wiring The VDH9600 Videocassette Player Figure 13. Wiring diagram for VDH9600.
VDH9600 VIDEOCASSETTE PLAYER/RECORDER TROUBLESHOOTING Symptom Cause Solution Symptom Cause Solution Unit does not work. No power. Verify power wiring to unit (see page 14). Picture is noisy Videocassette is worn. Eject videocassette and play another. Check the Remote for a good battery. Tracking is not set optimally. Adjust tracking (see page 12). Another tape is already in unit. Eject first videocassette and insert a second tape. Video heads are dirty.
OWNER’S MANUAL/INSTALLATION GUIDE SPECIFICATIONS Audio Output: 300 mv General Specifications Video Input: 1.0 Vpeak to peak, 75 ohms 300 mv, 50K ohms Power Requirement: 12 volts dc Audio Input Level: Power Consumption: 10 watts, Power On 0.15 watts, Power Off FCC STATEMENT Weight: 5.3 lb (2.4 kg) Dimensions (w x h x d): 10.5 x 3.64 x 10.5 in. (265 x 92.
Clarion Corporation of America ©2000 Clarion Corporation, Gardena, CA 661 West Redondo Beach Blvd Gardena, CA 90247 800-Go-Clarion www.clarion-usa.com 2000-VDH9600-10 Rev.