
Owner's manual


VMA6593 7
4. Installing the VMA6593
The VMA6593 is designed for custom installation. While a
basic flush-mount bezel is supplied, you may need parts that
are not included (depending on your installation). Clarion
also offers optional mounting kits - the ZMT003 is a flexible
“gooseneck” mount, and the PQE023 positions the monitor
on the back of a vehicle headrest.
Note:
• The Clarion HRM100 and HRM150 headrest mounting kits are not
compatible with this monitor.
Flush mounting
The included trim bezel can be used to flush-mount the
monitor.
Before cutting the opening for the trim bezel, ensure that you
will have sufficient clearance for the monitor and its rear-
located wiring harness.
After you cut the opening, route the DIN-connector end of the
wiring harness into the opening from the rear out the front.
Insert the trim bezel and route the wiring harness through the
opening in the rear.
Firmly attach the bezel to the mounting surface and/or to the
interior of the mounting surface.
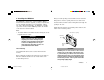
Mounting
screw
holes
Wire harness opening
Mounting
tabs
CAUTION!
NEVER press on the surface of the screen!
Gently press on the edges of the monitor case.
If you find that you cannot insert the monitor
without excessive force, you may need to check
your wire harness position for interference with
the insertion process. You may also need make
the opening slightly larger.
WARNING!
Always use great care when attaching
anything to a vehicle! Visually inspect
all sides of any potential screw location,
to insure no damage will occur. If you
have questions about this process, see
your authorized Clarion dealer.
VMA 6593 122302.p65 12/23/02, 10:36 PM7