English 7" WIDE LCD MONITOR AFFICHEUR À CRISTAUX LIQUIDES (LCD) COULEUR LARGE DE 7" PANEL LCD A COLOR PANTALLA ANCHA DE 7" VMA8582 Français Owner's manual & Installation manual Mode d'emploi et manuel d'installation Manual del usuario y de instlactión Español Thank you for purchasing the Clarion VMA8582. Nous vous remercions d’avoir acheté le Clarion VMA8582. Muchas gracias por la adquisición del VMA8582 Clarion. 1999/2 (D/M) All Rights Reserved. Copyright © 1999:Clarion Co., Ltd.
English Español English Owner’s Manual * Please read this Owner’s manual & Installation manual in its entirety before proceeding with wire connection and installation. * Antes de pasar a la conexión de los cables y a la instalación, lea detenidamente este manual del usuario y de instalación. * After reading this manual, be sure to keep it in a handy place (e.g., glove compartment). * Después de haber leído este manual, guárdelo a mano (p. ej., en la guantera).
8. Do not let lit cigarettes or other hot objects touch the set. Doing so may damage or deform the cabinet. 9. Do not let the set become hot. If the temperature in the car is high or if the set has been exposed to direct sunlight and is hot, lower the temperature before using it. (The LCD panel will work properly within a temperature range of 0 to 40 ˚C.) 10.In extremely cold temperatures, the movement of the picture may be slow and the picture may be dark, but this is not a malfunction.
CAUTION English USE OF CONTROLS, ADJUSTMENTS, OR PERFORMANCE OF PROCEDURES OTHER THAN THOSE SPECIFIED HEREIN, MAY RESULT IN HAZARDOUS RADIATION EXPOSURE. THE COLOR LCD MONITOR SHOULD NOT BE ADJUSTED OR REPAIRED BY ANYONE EXCEPT PROPERLY QUALIFIED SERVICE PERSONNEL. Owner’s Manual INFORMATION FOR USERS: CHANGES OR MODIFICATIONS TO THIS PRODUCT NOT APPROVED BY THE MANUFACTURER WILL VOID THE WARRANTY AND WILL VIOLATE FCC APPROVAL.
For a longer service life, be sure to read the following cautions. • Don’t allow any liquids on the set from drinks, umbrellas etc. Doing so may damage the internal circuitry. • Do not hold on the LCD panel when adjusting the angle of the LCD panel. Doing so may damage it. • Do not let cigarettes burn the display. Doing so may damage or deform the cabinet. Cleaning • Cleaning the cabinet Use a soft, dry cloth and gently wipe off the dirt.
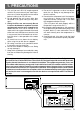
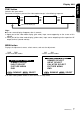
English 4. Names of the Parts and their Functions Display Unit POWER button Owner’s Manual Turns the power on and off. WIDE button Switches the screen display mode. POWER FUNC WIDE MENU FUNC button Switches the input source. MENU button Displays the adjustment screen, selects menus, and sets the adjustment. In normal mode: Increases and decreases the volume of the built-in speaker (on the back panel). In menu setting mode: Selects a menu.
Display Unit English FUNC button Switches the input source. Each time this button is pressed, the video mode changes in the following sequence. AV 1 AV 1 FUNC AV 2 AV 2 RGB AV 1 FUNC RGB AV 2 FUNC Note: ● The on screen display disappears after 3 seconds. ❈ Upper part of the video mode display (pink color): Input source appearing on the screen of this monitor. ❈ Lower part of the video mode display (yellow color): Input source outputting to the expansion AV output terminal (second monitor).
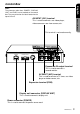
Display Unit English STAND BY (R), ON(G) Dimmer sensor When the power is turned off..........red color When the power is turned on..........green color When AUTOMATIC DIMMER is selected in dimmer setting, the brightness of the screen is adjusted automatically according to the ambient brightness. Owner’s Manual Receiver for remote control unit Built-in speaker (on the back panel) Terminal to which cables from the control box are connected.
Control Box English Note: The characters other than “POWER”, “DISPLAY UNIT” and “RGB” are not marked on the control box. They are printed on the label located on the top of the unit. Owner’s Manual AV INPUT (AV1) terminal This is used to connect a car video player, video camera or rear view camera, etc. This terminal is not used currently. POWER DISPLAY UNIT RGB Expansion AV output terminal This is used to connect a second monitor.
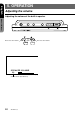
English 5. OPERATION Adjusting the volume Adjusting the volume of the built-in speaker Owner’s Manual POWER FUNC WIDE MENU Increases the volume. Decreases the volume.
Selection of the screen mode (size) • If you reduce or enlarge an image using the screen display mode switching function (full wide, cinema, etc.) of this monitor with profit in mind or for any purpose of making the public watch it or listen to it, it may infringe the rights of the author who is protected under the copyright law.
Dimmer English In case of auto mode The factory default setting is auto mode. This mode adjusts the screen brightness automatically according to the ambient brightness. Owner’s Manual POWER FUNC WIDE 1. Press the MENU button. Confirm that “AUTOMATIC DIMMER” is selected. MENU 3. Adjust the screen brightness using the ▼ and ▲ buttons so that you can see the screen with great ease at night time.
Dimmer English In case of manual mode The screen brightness can be adjusted manually. FUNC WIDE 1. Press the MENU button. Select “DIMMER SELECT” using the ▼ and ▲ buttons. Press the MENU button to execute the setting. AUTOMATIC DIMMER DIMMER SELECT INPUT SELECT PICTURE MENU END DOWN/UP MENU SELECT 2. Select “MANUAL” using the ▼ and ▲ buttons. Press the MENU button to execute the setting. Owner’s Manual POWER MENU 3. Select “BRIGHTNESS” using the ▼ and ▼ buttons.
Dimmer English When switching the dimmer mode from manual mode to auto mode Owner’s Manual POWER FUNC WIDE 1. Press the MENU button. Select “DIMMER SELECT” using the ▼ and ▲ buttons. Press the MENU button to execute the setting. MENU 2. Select “AUTOMATIC” using the ▼ and ▲ buttons. Press the MENU button to execute the setting. Refer to the section “In case of auto mode”.
Picture Adjustment FUNC WIDE Owner’s Manual POWER MENU Example: Adjusting the black level 1. Press the MENU button. Select “PICTURE MENU” using the ▼ and ▲ buttons. Press the MENU button to execute the setting. 3. Adjust the black level using the ▼ and ▲ buttons. AU TO M AT I C D I M M E R DIMMER SELECT INPUT SELECT PICTURE MENU END DOWN/UP MENU SELECT 2. Select “BLACK LEVEL” using the ▼ and ▲ buttons. Press the MENU button to execute the setting.
Picture Adjustment English Selecting picture adjustment items The picture adjustments available on the monitor differ depending on each video mode. Press the FUNC button to select the video mode. Owner’s Manual RGB RGB The “black level” and “contrast” adjustments are possible. B L AC K L E V E L CONTRAST END DOWN/UP MENU SELECT AV1 AV2 The “black level”, “contrast” and “color” adjustments are possible.
Picture Adjustment English Points of adjustment (The picture adjustment can be performed in each screen.) BLACK LEVEL B L AC K L E V E L +15 ❈ In connection to the installation location of the display unit and the eye level, when the light and darkness of the screen is reversed or the screen becomes whitish, adjust the black level. Set the black level to the “–” side. Set the black level to the “+” side. CONTRAST CONTRAST –15 Normally set this adjustment to the center.
Television Broadcast System: PAL/NTSC Setting English When a car video player, video camera or TV tuner is connected to the AV INPUT terminal (AV1 or AV2) of the control box to input video signal, you can select the broadcast system (PAL/NTSC). Owner’s Manual Note: Since the factory default setting is “NTSC”, use the following procedure to set the broadcast system to PAL. POWER FUNC WIDE 1. Press the FUNC button to switch the video AV1 AV2 mode to AV1 and AV2 . Press the MENU button.
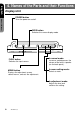
English 6. CONNECTION OF EXTERNAL EQUIPMENT Connection Example Rear view camera (back-eye camera), car video player or video camera Video POWER DISPLAY UNIT Second monitor Expansion AV output RGB TV tuner, car video player or video camera Notes: • For the connection method, refer to page 29 of the “Installation / Wire Connection Manual”. • When a video camera monitor is connected to the control box and a howling noise is heard, one of the following countermeasures should be taken.
Setting Example English The “INPUT SELECT” item must be set depending on external equipment connected to the RGB terminal or the AV INPUT terminal (AV1 or AV2) of the control box. Owner’s Manual POWER FUNC WIDE MENU [RGB INPUT SELECT] 1. Press the MENU button. Select “INPUT SELECT” using the ▼ and ▲ buttons. Press the MENU button to execute the setting. AUTOMATIC DIMMER DIMMER SELECT INPUT SELECT PICTURE MENU END DOWN/UP MENU SELECT 2. Select “NAVIGATION” or “OTHER” using the ▼ and ▲ buttons.
Setting Example 4. Select “VIDEO” or “TV TUNER” using the ▼ and ▲ buttons. Press the MENU button to execute the setting. [When a rear view camera (back-eye camera) is connected] [When a TV tuner is connected] AV 1 I N P U T S E L E C T AV2 INPUT SELECT VIDEO CAMERA VIDEO TV TUNER DOWN/UP MENU SET Owner’s Manual [AV2 INPUT SELECT] 3. Select “VIDEO” or “CAMERA” using the ▼ and ▲ buttons. Press the MENU button to execute the setting.
English Troubleshooting Please recheck the following points. Owner’s Manual Symptom Remedy Red dots, blue dots or green dots are found on the panel. This symptom is peculiar to a LCD panel. This is not a malfunction. Reference page The LCD panel has been designed and manufactured using a highly developed precision technology and has a 99.99 % or more effective pixels. However, note that 0.01 % of pixels are defective and always light. 8 Sound is heard but no picture appears.
English 8. SPECIFICATIONS Display Unit Model No.: VMA8582 (with TV stand) Type: Liquid crystal color monitor unit Power supply voltage: DC 13.2V (exclusively for a 12-volt car) Power consumption: 12 W (1.
English 9. WARRANTY CERTIFICATE AND AFTER-SERVICE • First consult the store of purchase about the repair, handling and maintenance of this product. Owner’s Manual • When you encounter problems because you have just relocated or this product was received as a gift, consult the “repair service center” on its repair. For other inquiries, consult the “customer service center”.