VRX938R Owner’s manual & Installation manual Mode d’emploi et manuel d’installation Bedienungs- & Installationsanleitung Manuale d’Istruzioni e d’Installazione Gebruiksaanwijzing en installatie-aanwijzingen Manual de instrucciones y de instalación Bruksanvisning- och installations Manual do proprietário e manual de instalação VRX938R 7.
CAUTIONS: This appliance contains a laser system and is classified as a “CLASS 1 LASER PRODUCT”. To use this model properly, read this Owner’s Manual carefully and keep this manual for your future reference. In case of any trouble with this player, please contact your nearest “AUTHORIZED service station”. To prevent direct exposure to the laser beam, do not try to open the enclosure.
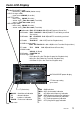
: TP (Traffic programme) indication : INFO (Information) indication : DAB indication : REG (Regional programme) indication : PTY (Programme type) indication : TA (Traffic announcement) indication Preset channel indication Disc number indication ∗The disc numbers corresponding to the discs in the CD or MD or DVD changer light. : Volume indication Operation status indication ∗The frequency, PTY, play time, CT (clock), etc. are displayed. : Search indication : Mute indication 1. PRECAUTIONS ................
[OPEN] VRX938R Deutsch [DISP] [RELEASE] Italiano [Q] [DIRECT] [BAND] [SEARCH] Note: • Be sure to read this chapter referring to the front diagrams of chapter “2. CONTROLS” on page 5 (unfold). [VOL] button [FUNC] button • Use this button to increase/decrease the volume. • Press this button to turn on the power. Press and hold this button for 1 second or longer to turn off the power. • Press this button to switch the modes such as radio.
English Color LCD Display Owner’s manual •Radio/RDS/DAB/TV mode : PROGRAM BBC OXFD (Station name) •CD/CD changer mode : USER TITLE SHINE (User title) •CD TEXT mode : DISC TITLE SHINE (Disc title) : TRACK TITLE Time has come (Track title) : ARTIST Time has come (Artist) •MD changer mode : DISC TITLE SHINE (Disc title) : TRACK TITLE Time has come (Track title) •Radio mode : FM1 87.50MHz Pch 1(Band/Frequency/Preset No.) •RDS mode : FM1 CLASSICS Pch 1(Band/PTY name being received /Preset No.
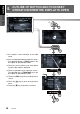
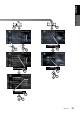
English 5. OUTLINE OF BUTTON AND TOUCHKEY OPERATION WHEN THE DISPLAY IS OPEN Owner’s manual ∗1 ∗2 DISPLAY ∗3 ∗1: An example screen indication in the radio mode ∗2: Press an operation button to switch the screen. The operation button is [FUNC] button in the description of operation per mode. ∗3: Touch the screen and the menu corresponding to the play mode is displayed. ∗4: Touch an operation key to switch the screen. The operation key is [FUNCTION] key in the description of operation per mode.
English Owner’s manual ∗6 ∗7 PTY LANGUAGE Z-ENHANCER TYPE 2 ENGLISH VRX938R 11
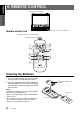
English 6. REMOTE CONTROL When the panel is open Owner’s manual Receiver for remote control unit Remote control unit Operating range: 30˚ in all directions Signal transmitter 1 3 @ 5 4 2 7 6 8 9 ! 0 Inserting the Batteries 1. Turn the remote control unit over, then slide the rear cover in the direction of the arrow. 2. Insert the AA (SUM-3, IECR-6/1.5V) batteries that came with the remote control unit facing in the directions shown in the figure, then close the rear cover.
Mode Button Radio (RDS) CD CD changer MD changer DVD changer TV Switches among radio, DAB, CD, DVD, CD changer, MD changer, DVD changer, TV and VISUAL. 2 BAND DISC UP TOP Switches reception band. 3 VOLUME Increases and decreases volume (in all modes). 4 SEARCH Moves preset channels up and down. Moves tracks up and down. When pressed and held for 1 second: Fast-forward/ fast-backward. Moves tracks up and down. When pressed and held for 1 second: Fast-forward/ fast-backward.
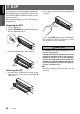
English 7. DCP Owner’s manual The control panel can be detached to prevent theft. When detaching the control panel, store it in the DCP (DETACHABLE CONTROL PANEL) case to prevent scratches. We recommend taking the DCP with you when leaving the car. Removing the DCP 2. Press the left side of the DCP carefully to fit it in place. DCP 1. Turn the power off. 2. Slide the [RELEASE] lever rightward to release the DCP/Operation Panel. RE LE AS E 3. Press the [FUNC] button to turn on the power.
English 8. CAUTIONS ON HANDLING For a longer service life, be sure to read the following cautions. • Be sure to store the LCD panel inside the main unit when parking the car outdoors for long period of time. The LCD panel will operate properly in a temperature range of 0 to 60˚C. • Don’t allow any liquids on the set from drinks, umbrellas etc. Doing so may damage the internal circuitry. • Do not disassemble or modify the set in any way. Doing so may result in damage.
English Handling Compact Discs Use only compact discs bearing the mark. Owner’s manual Do not play heart-shaped, octagonal, or other specially shaped compact discs. Some CDs recorded in CD-R mode may not be usable. Even when recorded in CD-RW mode, some CDs not be usable. Handling Storage • New discs may have some roughness around the edges. If such discs are used, the player may not work or the sound may skip. Use a ballpoint pen or the like to remove any roughness from the edge of the disc.
Basic Operations Note: Be sure to read this chapter referring to the front diagrams of chapter “2. CONTROLS” on page 5 (unfold). ACC or engine ON position Turning on and off the power Note: • Be careful about using this unit for a long time without running the engine. If you drain the car’s battery too far, you may not be able to start the engine and this can reduce the service life of the battery. 1. Press the [FUNC] button. 2. The illumination and display on the unit light up.
English Basic Operations Showing a mode display Owner’s manual When the panel is open: Touch the menu screen switching touchkey when the main screen is being displayed to show the menu screen. Touch the Title List Select key (--- SELECT) on the menu screen to show the Title List display. In the Title List display, the titles of items stored in the [DIRECT] buttons 1 to 6 are listed. ∗ In the RDS tuner mode, a PS name is displayed. ∗ In the DAB mode, a service label is displayed.
When the way the liquid crystal panel is mounted hinders the operation of the air conditioner, the position of the panel can be turned horizontal temporarily. 1. Press and hold the [OPEN] button when the liquid crystal panel is upright, and release the button when a beep is heard. 2. The liquid crystal panel turns horizontal. ∗ Press the [OPEN] button again when the liquid crystal panel is in the horizontal position, and the panel returns to the original position.
English Basic Operations Owner’s manual Adjusting the Z-enhancer Adjusting the balance and fader Note: • This function is enabled only when the panel is open. 1. Press the [A-M] button to change into the AUDIO-MODE display. Note: • This function is enabled only when the panel is open. 1. Press the [A-M] button to change into the AUDIO-MODE display. 2. Touch the [Z-EHCR LV] key when the AUDIOMODE screen is being displayed to show the Z-ENHANCER level adjustment screen. 3.
[DISP] button to switch to CT display. Switching to the navigation display Press the [NVG/AV] button to switch to the navigation display that allows you to listen to the audio of TV, etc. ∗ Press and hold the button and you can listen to the audio of TV, etc. with the display indication turned off. Changing the setting of the display background WARNING Perform the setting of this function the car is stopped with the parking break applied. 1. Press the [DISP] button to show the background setup menu. 2.
English Radio Operations Owner’s manual ● LOCAL SEEK If you press and hold the right (d) or (a) left side of the [SEARCH] button for 1 second, local seek tuning is carried out. Broadcast stations with good reception condition are selected. ∗ When local seeking starts, “LO SEEK” appears in the display. Manual tuning There are 2 ways available: Quick tuning and step tuning. When you are in the step tuning mode, the frequency changes one step at a time.
RDS (Radio Data System) ∗ RDS interrupt does not function during AM radio reception or in TV mode. AF function The AF function switches to a different frequency on the same network in order to maintain optimum reception. ∗ The factory default setting is “ON”. Display the RDS menu Touch the MENU display switching touchkey when the MAIN display is showing and the MENU display appears. ●Switching OFF the AF function Touch the [RDS MODE] key in the MENU display and the [AF] key appears in the display.
English RDS Operations Manually tuning a regional station in the same network Owner’s manual Note: • This function can be used when a regional broadcast of the same network is received. 1. This function is valid when the AF function is ON and the REG function is OFF. 2. Press any one of the [DIRECT] buttons to call out a regional station. 3. Each time you press the same [DIRECT] button, the unit switches from a local station to the other on the same network.
PTY item ENGLISH Contents News News Affairs Current Affairs Info Information Sport Sport Educate Education Drama Drama Culture Culture Science Science Varied Varied Pop M Pop Music Rock M Rock Music Easy M Easy Listening Music Light M Light Classical Music Classics Serious Classical Music Other M Other Music Weather Weather Finance Finance Children Children’s Programmes Social Social Affairs Religion Religion Phone in Phone In PTY preset memory Travel Travel 1.
English Owner’s manual RDS Operations CD Operations 5. When “ITEM SELECT” is selected, PTY selection is carried out. Touch the [w] key or [z] key to select PTY ITEM. Touch the [PTY ITEM] key to set the selected PTY ITEM. 6. After adjustment is finished, touch the [RTN] key to return to the STANDARD display. Loading a CD Emergency broadcast If an emergency broadcast is received, all the function mode operations are stopped. “ALARM” appears in the display and the emergency broadcast can be heard.
play to show SUB MODE. Touch the [TRACK REPEAT] key. “TRACK REPEAT” lights in the display and current track is repeated. 2. To cancel the repeat play, touch the [TRACK REPEAT] key again. “TRACK REPEAT” goes off from the display and the normal play resumes. Fast-forward/fast-backward Random play ●Fast-forward Press and hold the right (d) side of [SEARCH] button for 1 second or longer. ●Fast-backward Press and hold the left (a) side of [SEARCH] button for 1 second or longer.
English CD Operations Owner’s manual ● Scrolling a CD-text title Note: • This function is enabled only when the panel is open. When a CD-text title is longer than 10 characters, you can scroll the display as follows. When the panel is open: 1. Display the CD-TEXT TITLE (disk & track & artist). 2. Touch the [SCROLL] key to scroll the disc title. 3. To scroll the track title, touch the [TRACK TITLE] key. (SCROLL key appears in the right side of the TRACK TITLE.
Scrolling titles (MD) Note: • This function is enabled only when the panel is open. When a title is longer than 10 characters, the same operation can be performed on a CD. Notes: • When the disc title is within 10 characters, the title is scrolled immediately. • If the track title is shorter than 10 characters, the track titles does not scroll. Selecting an MD When the panel is closed: Each of the [DIRECT] button corresponds to an MD loaded into the MD changer.
English CD/MD Changer Operations Top function (MD) Owner’s manual The top function plays from the first track (track No. 1) of the disc. Press the [DIRECT] button (1 to 6) with the same number that the MD playing. ∗ If an MD is not loaded in a slot of the MD changer, pressing the [DIRECT] button corresponding to its disc number is invalid. Scan play The scan play locates and plays the first 10 seconds of each track on a disc automatically.
• DVD changer functions ∗ If “NO MAGAZINE” appears in the display, insert the magazine into the DVD changer. “DISC CHECKING” appears in the display while the player loads (checks) the magazine. ∗ If “NO DISC” appears in the display, eject the magazine and insert discs into each slot. Then, reinsert the magazine back into the DVD changer. Pausing Play 1. Press the [s] button for 1 second or longer to pause play. “PAUSE” appears in the display. 2.
English DVD Changer Operations Chapter repeat playback Owner’s manual This operation plays back chapters recorded on the DVD-Video repeatedly. 1. Press the [RPT] button. 2. Press the [RPT] button again and repeat playback is turned off. Title repeat playback This operation plays back titles recorded on the DVD-Video repeatedly. 1. Press and hold the [RPT] button for 1 second or longer. 2. Press the [RPT] button again and repeat playback is turned off. Watching a video CD Skipping a track (searching) 1.
Scan playback Repeat playback This operation plays back one track recorded on the CD repeatedly. 1. Press the [RPT] button. 2. Press the [RPT] button again and repeat playback is turned off. Disc repeat playback This operation plays back all tracks on the disc repeatedly(with music CDs only) 1. Press and hold the [RPT] button for 1 second or longer. 2. Press the [RPT] button again and repeat playback is turned off. Random playback This operation plays back all track on the disc in no particular order. 1.
English TV Operations Owner’s manual TV functions Seek tuning When an optional TV tuner is connected through the CeNET cable, this unit controls all TV tuner functions. To watch TV requires a TV tuner. 1. Press the [BAND] button and select the desired TV band (TV1 or TV2). WARNING For your safety, the driver should not watch the TV or operate the controls while driving. Please note that watching and operating the TV while driving are prohibited by law in some countries.
Recalling a preset station ∗ Press and hold one of the [DIRECT] buttons for 2 seconds or longer to store the current station into the preset memory. Switching the VTR system between NTSC and PAL ∗ This function is enabled only when the panel is open. Switch to the VTR/VISUAL/DVD video/DVD changer mode you use. 1. Press the [ADJ] button to switch to the adjustment selection display. 2. Touch the [z] key to select “VTR N/P”. Touch the [VTR N/P] key, [NTSC] key and [PAL] key appears in the display. 3.
English TV Operations Adjusting the brightness and tone of color Owner’s manual Notes: • This operation is available only when the car is stopped and the parking brake is applied. • This function is not available when the display is stored. • The HUE setting can be adjusted only when the NTSC mode is selected. • Switch to the VTR/VISUAL/DVD video/DVD changer mode you see. 1. Press the [ADJ] button to switch to the adjustment selection display. 2.
Manual tuning The Digital Audio Broadcasting (hereinafter referred to as “DAB”) system transmits several programmes on one frequency simultaneously, by compressing audio signals. 1. Press the [FUNC] button to select DAB mode. 2. Press and hold the [BAND] button for 1 second or longer. 3. Select right (d) or left (a) to select a station using the [SEARCH] button. ∗ The group of programmes, which is transmitted on a single frequency is called “ensemble”.
English Digital Radio/DAB Operations Programme scan Owner’s manual This function scans through each receivable programme in a DAB station being received for 10 seconds sequentially. This is useful when you want to search for a desired programme. 1. Press the [FUNC] button to receive a DAB station. 2. Press the [SUB MODE] key in the MENU display and press the [SERVICE SCAN] key. The unit starts scanning each programme for 10 seconds sequentially. 3.
Information select ∗ This function is enabled only when the panel is open. 1. Touch the MENU display switching touchkey when the MAIN display is showing and the MENU display appears. Press the [ADJ] button in the MENU display and the [INFORMATION SELECT] key appears in the display. 2. Touch the [INFORMATION SELECT] key to select a desired INFORMATION. 3. Touch the [ON] or [OFF] key to select ON or OFF and to set it. 4. When the setting is finished, touch the [RTN] key to return to the STANDARD display.
English Digital Radio/DAB Operations Owner’s manual 3. When “PRESET” is selected, PTY preset memory can be called for and stored. 4. Touch the preset No.1 to 6 key to call for the preset PTY ITEM. Touch the preset No.1 to 6 key for 2 seconds to store the PTY ITEM currently selected to any Preset No. selected. 5. When “ITEM SELECT” is selected, PTY selection is carried out. Touch the [w] key or [z] key to select PTY ITEM. Touch the [PTY ITEM] key to set the selected PTY ITEM. 6.
NAVI functions ∗ If the operation of this unit is interrupted by a NAVI operation, audio is switched to OFF. ∗ If the operation of this unit is interrupted by a NAVI operation when the panel is closed, the sub-LCD display is turned to “ACCS”. Setting Clarion NAVI as external input equipment Be sure to perform this setting after connecting Clarion NAVI. ∗ The factory default setting is “Clarion”. 1. When the panel is open, press the [ADJ] button to show the adjustment selection display. 2.
English Connecting other company’s image equipment Owner’s manual RGB type or composite type images from other company’s equipment can be displayed on this unit Be sure to perform this setting after connecting the RGB type or composite type image equipment to the RGB terminal. 1. When the panel is open, press the [ADJ] button to show the adjustment selection display. 2. Touch the [z] key to select “NAVI SELECT”.
Title list play You can display a list of titles, then select the disc or broadcast station to listen to from that list. ∗ You can not display a title list with the unit in Seek, Preset Scan, Auto store (Tuner, TV or DAB mode). Cancel those operation modes before to display a title list. 1. With the unit in radio, CD/MD changer, TV or DAB mode, touch the [P. CH SELECT], [DISC SELECT] key. A title list is displayed. The following functions can be carried out in a title list display.
English Other Functions 4. Press the [ADJ] button again to return to the STANDARD display. Owner’s manual Anti-theft indicator The red Anti-theft indicator is a function for preventing theft. When the DCP is removed from the unit, this indicator blinks. ∗ The factory default setting is “OFF”. 1. When the panel is open, press the [ADJ] button to display the adjustment selection display. 2. Touch the [BLINK LED] key to select “ON” or “OFF”. 3.
DSP control function ∗ DSP control can all be operated only when the panel is open. DSP functions There are 2 modes available in DPH913, standard mode and professional mode. Choose one of them and adjust the sound field and the sound quality. ●Functions common to each mode: Such as auto loudness, subwoofer etc. ●Standard mode: Adjustment using the graphic equalizer function and the DSF (Digital Sound Field) function.
English DSP operations turn to the STANDARD display. Entering titles Owner’s manual You can give a title to the user memory of the G.EQ, DSF, VSE and P.EQ that you have adjusted yourself. 1. Press the [A-M] button to select the adjustment mode in which you want to give a title. 2. Touch the [USER] key to select the “USER”. 3. Touch the [USER TITLE] key to select the user memory to which you want to give a title. 4.
Calling G.EQ BASIC Pattern/USER Pattern ∗ After selecting the G.EQ pattern, touch the [MEMO] key to copy the selected pattern to the USER pattern. ∗ Touch the [EDIT] key to show G.EQ adjusting display, in which the properties of currently selected pattern can be adjusted. ∗ By pressing the [BAND] button in BASIC pattern selecting display or USER pattern selection/memory display you can switch between the two patterns, BASIC and USER. 4.
English DSP operations Owner’s manual ∗ By pressing the [BAND] button in BASIC pattern selecting display or USER pattern selection/memory display you can switch between the two patterns, BASIC and USER. Professional mode/VSE operations 4. After the setting, press the [A-M] button again or touch the [RTN] key two times to return to the STANDARD display. Note: • The adjustment made in professional mode is not reflected in the adjustment in standard mode.
Setting and storing VSE Properties/ Memory into USER Pattern ∗ For title inputting method, refer to the section “Entering titles”. 8. Press the [A-M] button to change into the STANDARD display. Professional mode/P.EQ operations P.EQ effect ON/OFF ∗ The factory default setting is “ON”. 1. Press the [A-M] button to show the AUDIOMODE display. 2. Touch the [P.EQ ON/OFF] key to select “on” and “off”. Calling P.EQ BASIC Pattern/USER Pattern 1. Press the [A-M] button to show the AUDIOMODE display. 2.
English Owner’s manual DSP operations DVD Operations The P.EQ adjustment contents are as follows: ●“FRONT/REAR” ●“BAND” Select the channel to be compensated (front or rear). ●“FREQUENCY” Select the center frequency that you want to compensate from the range of 20 Hz to 20 kHz. (1/3 octave step, 31 points) ●“GAIN” Adjust the gain (output level) in the range of 12 dB to +12 dB. (1 dB step, 25 points) ●“Q” Set the sharpness of the Q-curve to one of the parameters: 1, 3, 5, 7 and 20. 5.
English VISUAL Operations This function is available when a VTR, etc. is connected to the visual/input or CCD/visual 2 terminal. Owner’s manual ∗ The visual 1 mode is not available when a TV tuner is connected to the visual/input. ∗ The visual 2 mode is not available when a CCD camera is connected to the CCD/visual 2 termial. ∗ If both the TV tuner and the CCD camera are connected, this function is not available. Switching the band Press the [BAND] button or touch the [BAND] key.
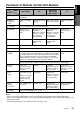
English 10. IN CASE OF DIFFICULTY Problem Cause Measure Owner’s manual Power does not turn on. (No sound is produced.) Fuse is blown. Replace with a fuse of the same amperage. If the fuse blows again, consult your store of purchase. Incorrect wiring. Consult your store of purchase. Nothing happens when buttons are pressed. The microprocessor has malfunctioned due to noise, etc. Turn off the power, then press the RELEASE lever 6 and remove the DCP.
Measure The image is not displayed. The parking brake is not pulled. Check that the parking brake is applied. The display is dark. The brightness control is too low. Adjust the brightness properly. The operating condition is not good. The temperature inside the vehicle may be 0˚C or less. Set to an appropriate temperature (25˚C or so) and check it again. The headlight of the vehicle is lit.
If an error occurs, one of the following displays is displayed. Take the measures described to eliminate the problem. CD CD CHANGER Owner’s manual Error Display MD CHANGER English 11. ERROR DISPLAYS Cause Measure ERROR 2 A CD is caught inside the CD deck and is not ejected. This is a failure of CD deck’s mechanism and consult your store of purchase. ERROR 3 A CD cannot be played due to scratches, etc. Replace with a non-scratched, non-warped-disc.
English 12. SPECIFICATIONS General Frequency range: 87.5 MHz to 108 MHz (0.05 MHz steps) Power source voltage: 14.4 V DC (10.8 to 15.6 V allowable) Ground: Negative Current consumption: 4.0 A (1 W) Auto Antenna Rated Current: 500 mA less Dimensions of the Main Unit: 178 mm Width × 50 mm Height × 165 mm Depth Dimensions of the Tuner Amp Unit: 178 mm Width × 37.5 mm Height × 209.5 mm Depth Weight of the Main Unit: 2.0 kg Weight of the Tuner Amp Unit: 1.