English Owner’s manual VT800B VT1000B VT1000T VT1500B OVERHEAD MONITOR SYSTEM WITH DVD PLAYER OHM875VD / OHM1075VD / OHM1575VD 1
English Thank you for purchasing this Clarion product. • Please read this owner’s manual in its entirety before operating this equipment. • After reading this manual, keep it handy, such as in your glove compartment. • Save your sales receipt. The warranty at the end of this manual and your sales receipt are essential for warranty service.
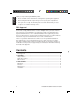
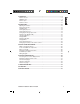
English 3. CONTROLS............................................................................................................. 8 Monitor closed ......................................................................................................... 8 DVD drive slot.......................................................................................................... 9 Monitor open .........................................................................................................
English 1. FEATURES WARNING The Clarion VR800B / VR1000B / VR1000T / VR1500B overhead monitor players are designed strictly for rear-seat entertainment. Viewing the monitor while operating a motor vehicle can result in serious injury and/or property damage. Clarion is not responsible for any injury and/or property damage as a result of the improper use or viewing of the monitor.
Wide viewing angle (up/down/left/right) for all models: English • VT800B and VT1000B / VT1000T: 45/55/65/65 VT1500B: 10/30/40/40 • Manual display angle adjustment: vertically adjustable up and down with a maximum angle of 150 degrees • Adjustable color, contrast brightness, and hue (PAL) or tint (NTSC) • On-screen display (OSD) of configuration options DVD video features • DVD drive that supports the following formats: • Playback of CDs with two recorded sessions (one audio and one data).
English 2. PRECAUTIONS Failure to observe these precautions may damage your car, the monitor, or the video source, and may void the warranty. For questions or problems not covered in this manual, contact your local Clarion Dealer. Operating • Do not operate this product in ways other than those described in this manual. Failure to follow instructions may void the warranty. • Do not use the unit with the ignition off. This could drain the car’s battery.
Do not pour liquid into the unit or poke foreign objects into the DVD drive slot. Water, humidity, and foreign objects may damage internal circuitry. • If the unit becomes wet, turn off all power and ask your authorized Clarion Dealer to clean or service the unit. • Do not drop the unit or hit the LCD panel with a hard object. You may cause permanent damage. • If the LCD breaks, avoid touching the glass and fluid.
English 3. CONTROLS Monitor closed Dome light switch Release button Increase button Previous button Decrease button Next button A/V input source button Stop button Menu button Play or pause button Power button Dome light Eject button ON OFF DOOR Dome light IR window 3.5 mm AUX In 3.
English Note: The dome light switch works only when the green dome light wire is connected to the door sensor and the polarity switch is set correctly. See the vehicle’s wiring manual for connection details. Eject button (EJECT) Ejects the disc. Increase button (+) Increase a value in a menu, such as the volume. IR window Receives infrared (IR) signals from the remote control and sends IR signals to the headphones. Menu button (MENU) Opens the Display menu.
ON OFF DOOR Screw hole Reset button Screw hole RESET English Monitor open LCD off switch Screw hole Screw hole Looking up from directly below at the player with the LCD panel open Quick reference to controls with monitor open LCD off switch Turns off the LCD screen. Reset button Press with a pencil or other narrow-tipped tool to return all setup options to their factory default values. Screw holes Used to attach the player to the mounting plate.
English Remote control Setup Mute POWER SETUP MUTE 1 2 3 4 5 6 7 8 9 0 DISPLAY GOTO Power Eject Numbers VOL AUDIO > Previous Play or pause Goto Display Stop Next Volume Audio MENU > Menu navigation ENTER > Menu SUBTITLE > Random A-B RANDOM A-B REPEAT TITLE SRC RETURN ANGLE ZOOM Source Return Subtitle Fast forward Title Repeat Zoom Angle Remote control Quick reference to remote control A-B Repeats playback from previously identified points A to B.
English ENTER Accepts settings selected using the arrow keys. Eject Ejects the current disc in the slot. Fast forward Speeds playback forward at 2x, 4x, 8x, 16x and 32x speeds. Goto Starts playback at the selected chapter, track or time. Menu Displays the DVD’s main menu. Press and hold to view the Display menu. Mute Disables and enables sound. Next Jumps to next chapter on a DVD or to next track on a CD. Numbers Used to directly enter track numbers and to configure some options.
English Opening the monitor 1. Press the release button to open the overhead monitor screen. Release button ON OFF DOOR Looking up at the monitor from directly below 2. Gently swing the LCD down and adjust the angle for viewing. 150° maximum angle Monitor open CAUTION The LCD opens to a maximum angle of 150 degrees. Do not attempt to open it further. The monitor turns on automatically when you fully open it (assuming the ignition switch is on or in the ACC position).
English Handling discs • To keep a disc clean, do not touch the play side (non-label side). • Do not attach sticky notes to or put tape on a disc. • Keep discs away from direct sunlight and heat. • Store discs in a protective disc case. • Before playback, wipe the disc outwards from the center with a clean cloth. Turning the player on 1. Turn the ignition to either ACC or ON. OFF ACC 2. Press the power button ( ) on the player or on the remote.
English Playing a disc (DVD or CD) 1. Put the headphones on your head and turn the headphone power on. 2. Assuming the power is on, insert a DVD into the player. The player displays “Loading.” 3. Aim the remote control directly at the IR receiver on the player and press the play/ pause button ( ) or press ENTER (on the remote). Using the remote control • Use the remote control only inside the vehicle. • Use the remote control no further than five feet (three meters) from the sensor.
POWER Power light VOLUME Power switch OFF--ON English Headphone components Volume dial Headphones Installing batteries in the headphones If this is the first time you’re using the system, install batteries in the headphones. Change the batteries when you begin to hear distorted audio that cuts in and out. 1. Rotate the left earpiece so the battery cover is accessible. Battery cover 2. Slide the battery cover down. 3. If replacing the batteries, remove the discharged batteries.
English Direct sunlight and temperature extremes Do not leave the headphones in direct sunlight or extreme temperatures. Playing DVDs Accessing the root menu A DVD is divided into titles and chapters. The root menu shows the contents of the disc. Some DVDs only allow you to select disc playback options from the DVD root menu. To access the root menu of the DVD, press the MENU button during playback.
English Sample language option • To cycle through all available languages, continue pressing the AUDIO button. The audio information disappears automatically if you wait three seconds. Using subtitles Language subtitles are normally off. Note: Subtitles must be on the DVD. Some DVDs only allow subtitle access through the DVD menu. • To turn subtitles on, press the SUBTITLE button.
English Repeating DVD chapters and titles To repeat a chapter, title or both, during playback continue pressing REPEAT to alternate among options. Sample repeat option • Chapter repeats the current chapter. • Title repeats the current title. • All repeats all chapters and titles. • Off resumes normal playback. Repeating favorite sections To repeat a favorite section you must first mark where it begins and ends. 1. Play back the DVD. 2.
English Sample angle options • To change the angle, press the ANGLE button again. • To return to normal viewing, press the ANGLE button again. Zooming in and out • To zoom in (enlarge) the image when watching a DVD, press ZOOM during playback. As you press ZOOM on the remote, the player alternates among the available zoom settings (2x, 3x, 4x, 1/2x, 1/4x and normal).
Adjusts the intensity of the color when in NTSC mode (to play back DVDs recorded in the United States). Wide Screen Selects the aspect ratio (width vs. height) of the image. Options are Wide (16:9) and Normal (4:3) for the VT800B and VT1000B/VT1000T. The VT1500B provides two additional options: Panorama and Zoom. English Tint Wide stretches images horizontally so they fit the entire screen. This may distort the images slightly.
English To repeat this section, press the A-B button on the remote. To cancel the repeat playback and resume normal playback, press the A-B button again. Playing MP3s MP3, a format for storing digital audio, compresses each audio track with little loss of audio quality. The result takes up much less disc space than the track would without MP3 compression. The VT800B/VT1000B/VT1000T/VT1500B player supports CD-R /RW and DVD-R discs that contain music MP3 files.
English Folder contents 5. To select the MP3 file, press the up and down buttons on the remote. 6. To play the file, press the ENTER button on the remote. MP3 controls • To play back to the next MP3 file, press the next button ( • To play back the previous MP3 file, press the previous button ( ). ) Repeating MP3s To repeat a single MP3 file, press the REPEAT button on the remote. To cycle through all the following settings, continue to press REPEAT. • Repeat single repeats the current file.
English CAUTION! Changes or modifications to this product not approved by the manufacturer will void the warranty and will violate FCC approval. Cleaning the remote control Use only a clean, soft, damp cloth to clean the remote control. Do not use lighter fluid, methyl alcohol or other solvents. Cleaning discs Before playing a disc, wipe it outwards from the center with a clean, soft cloth.
English 4. Place the new lithium battery in the slot with the plus (+) side up. 5. Push the battery holder back into the slot until it locks in place. Battery with the plus side up Battery holder Inserting the holder with the battery into the remote control 5. INSTALLATION AND WIRING Do not attempt to install or service your player yourself. Installation and servicing require experience in electronic equipment and automotive accessories.
English Tools and additional components You will need a Phillips-head screwdriver when mounting the player in the vehicle. Before you begin 1. Verify that the vehicle electrical components function, including: power windows, power door locks, air conditioning, lights, etc. 2. Identify the polarity of the dome light circuit and set the switch on the bottom of the overhead monitor housing. 3.
When routing RCA cables, keep them away from the power cables and output speaker wires, engine, exhaust system, etc. Heat may damage wires. • If the fuse should blow, make sure that all connections are correct, the cables have not caused a short circuit, and no wires are damaged. Then replace the fuse with a new fuse of the same amperage value as the original fuse. When replacing a fuse, never let the battery side touch any metal part or any other wire.
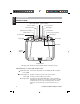
English CAUTION Make sure the switch is fully to one side or the other. Do not attempt to configure this switch once the player is in position. 4. Cut a one-inch hole in the headliner along the backside of the ceiling bracket for the cables to pass through. Install the ceiling bracket and cables 1. Disconnect and remove the original dome light. 2. Screw the metal mounting plate to the beam or plywood using the six ST4.2 x 16 screws.
4. Identify the dome light wires in the vehicle and connect them to the corresponding dome light wire on the overhead monitor system. 5. Plug in any audio/video source cables. 6. Plug in the power harness into the overhead monitor system in the following order: ground wire, battery wire, ACC wire and door wire. Note: Do not forget to connect the red ACC wire to the ignition switch. If you do not connect this wire, the battery charge may drain off prematurely. Install the monitor 1.
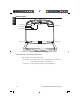
Wiring diagram AV IN 2 AV OUT English B+ (YELLOW) ACC (RED) GND (BLACK) DOOR (GREEN) AV 1 IN Polarity switch Top of the unit showing cable connections 6. SETTING PREFERENCES Accessing the on-screen display menus 1. Press SETUP on the remote to access the OSD menus. The main Display menu appears.
English 2. Press (left arrow) and (right arrow) to alternate among three option pages: GENERAL SETUP PAGE, SPEAKER SETUP PAGE and PREFERENCE PAGE. Note: To access the PREFERENCE PAGE the DVD slot must be empty. Eject any DVD or CD in the drive. 4. Press ENTER to select the option you wish to change. 5. Press ENTER to confirm your selection. 6. Press SETUP to exit the on-screen display menus. Example: Setting parental control 1. Press SETUP, then press (right arrow) to display the PREFERENCE PAGE.
English General setup page This page controls standard DVD options. General setup page Setting Value and Description ANGLE MARK Turns multiple-angle feature on and off. Multiple angles must be pre-recorded on the DVD. To determine if the DVD supports multiple angles, look for the multiple-angle symbol on the disc jacket ( ). OSD LANG ON Enables the use the ANGLE button to select a different angle for the current scene. OFF Disables the ANGLE button.
English Speaker setup page This page controls speaker options. Speaker page DOWNMIX Applies to Dolby digital sound. You cannot change this option, which is permanently set to output stereo signals, that is the player outputs audio to both the left and right channels of the output RCA jacks. Preference page This page controls system-wide preferences. Preference page TV TYPE AUDIO Selects the TV system. Changing this option also changes the RCA AV output.
Selects the language to display the contents of the current disc. ENGLISH, FRENCH, SPANISH PARENTAL Restricts movie viewing to appropriate ages. 1 (KID SAF) Material is safe for children. 2 (G) Material is safe for general audiences. 3 (PG) Parental guidance suggested. 4 (PG 13) Some material unsuitable for children under 13. 5 (PGR) Some material unsuitable for children under 17. 6 (R) Some material unsuitable for children under 17. 7 (NC 17) Not recommended viewing for children under 17.
There may be condensation in the player. Wait for about one hour or until the condensation evaporates. • A fuse may be blown. Check the fuses at the end of the monitor installation cables and on the vehicle. • The player may be disconnected. Check all connections. See the installation instructions. • The remote control battery may require changing. • Dirt may be covering the remote’s infrared lens. Clean the lens with a soft damp cloth.
English The picture is very dark • The temperature in the car is very low. At low temperatures LCD screen display dark pictures. The picture will improve as the temperature rises. • The brightness is set too high. Adjust it lower. Press the MENU button on the remote or on the player. No sound can be heard from the IR wireless headphones • The headphones are not turned on. • The battery in the headphones is low. Replace the battery.
Active matrix: A flat panel display technology that produces a brighter and sharper display and a broader viewing angle than passive matrix panels. Each pixel has its own thin film transistor (TFT) and is sometimes called a “TFT screen.” Aspect ratio: The comparison of the width to the height of an object. Audio/video (A/V) source: Any additional audio and/or video device that has a composite RCA output, such as a game player, VCR, digital camera, etc. CD: Compact Disc. CD-R/RW: CD Read/Read and Write.
English 9. SPECIFICATIONS VT1000B VT1000T VT800B Power supply (car batter y) 12V DC (10V-16V) Test voltage Operating current 14V, negative ground <1.3A <1.5A Current consumption Max current consumption <6mA <1.8A <2A Mechanism Manual open and close Video system Screen Auto, NTSC and PAL 8” diagonal Resolution Display angle Viewing angle (up/down/left/right) Weight 10.2” diagonal 1280x800 Ver tical adjustable up and down; maximum angle 150° 45/65/65/65 10/30/40/40 4.959 lbs (2.
English Clarion Corporation of America All Rights Reserved. Copyright © 2009: Clarion Corp.