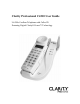
Clarity Professional C4210 User Guide 2.
Table Of Contents Safety Instructions Getting Started Choosing a Location Installation Battery Installation Handset Battery Charging Low Battery Battery Life Headset Jack Belt Clip Hearing Aid Compatibility Feature Set Up Handset Set Up Mode Digital Clarity Power Boost Clarity Power On/Off Volume Control Tone Switch Handset Ringer Telephone Base Ringer Volume Ringer Style Visual Ringers Boost On/Off Pulse/Tone Flash Mute Redial/Pause Battery Backup Telephone Operations Battery Back-up Placing a Call Answeri
Deleting a Stored Number 16 Deleting All Stored Numbers 16 Changing a Memory Number 16 Adding the Emergency Number 17 Dialing the Emergency Number 17 Deleting the Emergency Number 17 Caller ID Operations 18 Saving Caller ID Information to Phonebook 19 Callback from Caller ID Information 20 Delete Caller ID Information 21 Maintenance and Care 21 Troubleshooting 22 Regulatory Compliance 24 Warranty and Service 27 3
Important Safety Instructions When using your telephone equipment, basic safety precautions should always be followed to reduce the risk of fire, electric shock and injury to persons including the following: 1. Read and understand all instructions. 2. Follow all warnings and instructions marked on the telephone. 3. Do not use this telephone near a bath tub, wash basin, kitchen sink or laundry tub, in a wet basement, near a swimming pool or anywhere else there is water. 4.
16. Never install telephone jacks in wet locations unless the jack is specifically designed for wet locations. 17. Never touch uninsulated telephone wires or terminals unless the telephone line has been disconnected at the network interface. 18. Use caution when installing or modifying telephone lines. 19. Use only the power cord and batteries indicated in the manual. Do not dispose of batteries in a fire. They may explode. Check with local codes for possible special disposal instructions. 20.
2. Plug the AC Adapter directly into outlet. 3. Do not plug other appliances into the same outlet or have outlet controlled by a wall switch. 4. Choose a location that is out of the way of normal activities. ! CAUTION: USE ONLY WITH CLASS 2 POWER SOURCE 9V DC, 400mA. Always connect the AC Adapter to the phone before you connect it to the AC power. When you finish, disconnect the AC power before you disconnect it from the phone.
The base unit may be mounted on a standard wall plate. 1. Plug one end of the supplied short modular telephone line cord into the TEL jack located on the back of the base of the phone. 2. Insert the plug of the AC adapter into the jack marked DC 9V 400mA located on the back of the telephone base. 3. Align the mounting bracket on the back of the base so that the black rubber feet are towards the bottom of the phone. Insert the bracket’s tabs into the slots and secure the bracket by sliding it upward. 4.
2. After the batteries are fully charged, check for dial tone by pressing TALK on the handset. Low Battery When the handset battery gets low, there will be two (2) beeps every thirty (30) seconds and the LCD screen will show battery low. If the battery becomes low while you are on a call, you will be disconnected after about two (2) minutes. Terminate the call and recharge the battery. To recharge the battery pack, place the handset in the base.
Feature Set-up TELEPHONE HANDSET Set-up Mode The C4210 handset goes into setup mode automatically when the battery is connected. Or press and hold MODE button for 3 seconds to enter setup mode. If there is no input within 30 seconds, the language will be set to the last selected one and go back to standby mode. Setting Language 1. After entering setup mode, the LCD display will show SEL LANGUAGE and then 1.ENG 2.SPA alternately with a tick mark against the selected language. 2.
Setting Easy Mode 1. After setting LDS Code, press UP (▲) button to set the Easy Mode. 2. The LCD display will show EASY MODE and 1.ON 2.OFF. 3. Press 1 or 2 to change the mode. The tick mark will move against the selected mode. 4. Press the UP (▲) or DOWN (▼) button to change the mode. Setting Voicemail Number 1. After setting Easy Mode, press UP (▲) button to set VOICEMAIL Number. 2. The LCD display will show VOICEMAIL NO and XXX-XXX-XXXX with the last digit blinking. 3.
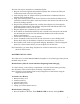
WARNING: When the TALK button is lit ORANGE volume may be at a high level. To protect hearing, lower the volume control to minimum before using. Volume Control The dial controls the level of volume the handset and headset receive. The volume dial provides up to 15 dB of volume before the CLARITY POWER button is activated. Once the CLARITY POWER button is pressed, the C4210 will provide up to 40 dB of amplification. Tone Switch Adjusting the TONE switch allows you to customize your hearing experience.
ON – When the BOOST ON/OFF switch is set to ON, the Boost function will be ON every time a call starts, and will default to ON every time the phone hangs up. During a call, the BOOST Clarity Power button can toggle the Clarity Power ON or OFF according to the user’s needs. OFF – When the BOOST ON/OFF switch is set to OFF, the Boost function will be OFF every time a call starts, and the user will need to press the BOOST Clarity Power button in order to gain the extra level of amplification.
TELEPHONE OPERATIONS To Install Battery Back-up Batteries 1. Disconnect telephone line cord and remove desk/wall mount bracket from telephone base 2. Disconnect battery back-up connector from the telephone base 3. Install four (4) AA Alkaline batteries with negative (-) end of battery touching the spring 4. Connect battery back-up connector to terminal on bottom of telephone base 5. Install desk/wall mount bracket to telephone base To Replace Battery Backup Batteries 1.
Answering a Call If the handset is out of the cradle, press the TALK button. If the handset is in the cradle with Auto-Connect Mode ON, lift the handset. The handset will be in receiver mode. If the handset is in the cradle with AutoConnect mode OFF, lift the handset. The handset will be in standby mode. Press TALK button to receive the call. Refer to BOOST Clarity Power and Volume Control for information on adjusting volume controls on Pages 13-19.
to the base or press any button to cancel the page. Channel Operation The C4210 cordless telephone automatically searches and selects the clearest of 40 channels when it is being used. If interference develops on the line, pressing this button will move to another channel. Security Code The security code prevents your cordless phone conversations from being accessed by a phone on a different line.
8. Enter name up to 21 characters using key 2 to 9. • Press 2 once for A and twice for B. • Press # to insert # or punctuation marks. • Use RD/P key to insert a space between alphabets. • Press DEL/CH key to erase any mistake. • The cursor will move forward one space automatically. 9. Press ENTER to confirm name. The LCD will display NUMBER STORED. Then it displays the just entered information. Dialing a Phonebook Entry 1. Locate the phonebook record you wish to call. 2.
Press DEL/CH key to move the cursor to the digit 7. Then press other numeric key to replace 7. 7. Press ENTER after finishing the digits. 8. The display shows ABC with the cursor blinking after the character C. 9. Press any numeric key 2 to 9 to add extra characters. Or Press DEL/CH key to move the cursor back to character C. Then press any other numeric key to change this character. 10. Press ENTER to finish. The modified characters and numbers will replace the original phone record. 11.
CALLER ID OPERATIONS Visual Message Waiting Indicator (VMWI) NOTE: This is a service that is provided through your local telephone company. If the C4210 finds that there is voice message to be retrieved, it will turn on the Message Waiting Indicator (the ENTER key). To retrieve the voice message, press the ENTER key while the indicator is on. The handset will go off-hook and dial the stored Voicemail number. CALLER ID Information This function is turned off when EASY MODE is set to ON during setup.
CALLER ID Review If there is new call information, the MODE button will flash RED. During standby mode, press MODE button once. LCD will display CID MODE and then the last Caller ID information. Press UP (▲) or DOWN (▼) again to view the Caller ID content. Press DOWN (▼) to scroll the caller ID information from the most recent record. Or, press the UP (▲) button to scroll the Caller ID information from the oldest record.
Callback from CALLER ID Information To callback from incoming call information, the base T/P switch should be set at T. While reviewing the incoming call list, press ENTER and the UP (▲) or DOWN (▼) key will format the number with the following dialing variations: 7 digits without a 1 prefix: If the area code of the Caller ID number matches to the setting of the stored area code, the dialed numbers can be 7 digits only.
3. Pressing the UP (▲) key will show blinking 1-4134567890. Press TALK or ENTER key will dial out 14134567890. OR 4. Press UP (▲) key will show blinking 413-456-7890 again. DELETE CALLER ID INFORMATION Delete One Caller ID Information While reviewing the Caller ID, press DEL/CH button to delete the displayed caller information. LCD will flash DELETE ?. Press DEL/CH to confirm. CID DELETED will be displayed for 2 seconds. The next record is shown automatically or - NO CALLS - if the list is empty.
Troubleshooting The unit will not operate/no dial tone: • Verify the TALK Button is lit. • Verify the AC Adapter is securely plugged into AC outlet, the base and the telephone. • Verify the telephone line cord is securely plugged into the wall jack and the telephone. • Make sure the base antenna is in an upright position. • Make sure the handset battery is fully charged. • Verify the telephone is in the correct dialing mode, tone (touch) or pulse (rotary).
• Reset code by placing the handset back on the base for 5-10 seconds. (See Security Code Section) • Make sure you have selected the correct dialing mode, tone or pulse. • Make sure the AC Adapter is not plugged into a wall outlet with other appliances. Disconnect for 5-10 seconds then reconnect. Place the handset back on the base and reinsert the AC Adapter. • Make sure the handset battery is fully charged.
Regulatory Compliance Part 68 of FCC Rules Information a) This equipment complies with Part 68 of the FCC rules and the requirements adopted by the ACTA. On the bottom of this equipment is a label that contains, among other information, a product identifier in the format US:AAAEQ##TXXXX. If requested, this number must be provided to the telephone company.
i) If your home has specially wired alarm equipment connected to the telephone line, ensure the installation of this telephone equipment does not disable your alarm equipment. If you have questions about what will disable alarm equipment, consult your telephone company or a qualified installer. j) This telephone equipment is hearing aid compatible. Customer-Owned Coin/Credit Card Phones: To comply with state tariffs, the telephone company must be given notification prior to connection.
aware that compliance with the above conditions may not prevent degradation of service in some situations. Repairs to certified equipment should be made by an authorized Canadian maintenance facility designated by the supplier. Any repairs or alterations made by the user to this equipment, or equipment malfunctions, may give the telecommunications company cause to request the user to disconnect the equipment.
Warranty and Service The party responsible for regulatory compliance: Clarity, a Division of Plantronics, Inc. 4289 Bonny Oaks Drive Chattanooga, TN 37406 Phone: 1-800-552-3368 The following warranty and service information applies only to products purchased and used in the U.S. and Canada. For warranty information in other countries, please contact your local retailer or distributor. Limited Warranty Clarity, a division of Plantronics, Inc.
How to Obtain Warranty Service To obtain warranty service, please prepay shipment and return the unit to the appropriate facility listed below.
©2005 Clarity, a Division of Plantronics, Inc. All rights reserved. Clarity, Clarity Professional Clarity Power and Amplifying Your Life are trademarks or registered trademarks of Plantronics, Inc. PM051205_Rev.