
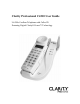
User's Manual


9
Feature Set-up
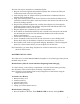
TELEPHONE HANDSET
Set-up Mode
The C4210 handset goes into setup mode automatically when the battery is connected.
Or press and hold MODE button for 3 seconds to enter setup mode. If there is no input
within 30 seconds, the language will be set to the last selected one and go back to standby
mode.
Setting Language
1. After entering setup mode, the LCD display will show SEL LANGUAGE and then
1.ENG 2.SPA alternately with a tick mark against the selected language.
2. Press 1, 2 or 3 button once to change the language. The tick mark will move against
the new selection.
3. Press UP (▲) to go to the next menu.
Setting Contrast
There are 3 contrast levels and the default is set to level 2.
1. After setting the language, press UP (▲) key to begin setting contrast.
2. The LCD display will show LCD CONTRAST and 1 2 3.
3. Press the 1, 2 or 3 key to change the level. The current selected level will be
highlighted.
4. Press the UP (▲) or DOWN (▼) button to go to the next menu.
Setting Area Code 1
1. After setting Contrast, press UP (▲) button to set Area Code 1.
2. The LCD display will show AREA CODE 1 and XYZ with X digit blinking.
3. Enter the area code number using the numeric keys on the handset.
4. Press the UP (▲) or DOWN (▼) button to go to the next menu.
Setting Area Code 2
1. After setting Area Code 1, press UP (▲) button to set Area Code 2.
2. The LCD display will show AREA CODE 2 and XYZ with X digit blinking.
3. Enter the area code number using the numeric keys on the handset.
4. Press the UP (▲) or DOWN (▼) button to go to the next menu.
Setting Long Distance Service (LDS) Code
1. After setting Area Code 2, press UP (▲) button to set LDS Code.
2. The LCD display will show LDS CODE and X with X digit blinking.
3. Enter the LDS number using the numeric keys on the handset.
4. Press the UP (▲) or DOWN (▼) button to go to the next menu.