
Operating instructions
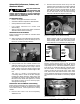
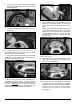
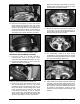
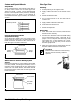


Figure 26 - Remove Drop Center Tools
11. Demount lower bead. In most cases when
demounting performance tires, the lower
bead will be less difficult. Use help to lift,
position, and hold tire. Pay close attention to
sensor/transmitter location, and position it
directly below the demount tool when
starting the lower bead demount procedure.
Figure 27 - Use Help on Lower Bead, Watch Sensor
Performance Tires and Wheels - Mounting
1. Lubricate both tire beads liberally.
Performance tires will require more
lubrication than standard passenger car tires.
2. Mount the lower bead. In most cases, the
lower bead will mount easily.
Figure 28 - Mount Lower Bead, Use Lifting Tool
3. Position the valve stem directly across from
the mount/demount tool for top bead
mounting. Lift the top bead over the rear of
the mount head. Use the lifting tool to help
push and keep the top bead in the drop
center during mounting, or use an optional
drop center tool to help hold the bead in the
drop center (Figure 28 & 29). Rotate the
wheel in short steps to mount lower bead.
NOTE: Mounting the top bead can be very
difficult when mounting new tires on many
performance and custom wheels.
Figure 29 - Mount Top Bead
4. Mount the top bead using short rotations of
the wheel. As the wheel progresses, a
second drop center tool should be added to
keep the bead in the drop center.
Figure 30 - Add Second Drop Center Tool
5. On extremely tight tire and wheel
combinations, it may be necessary to use the
hooked end of the bead lifting tool to flip the
tire over the rim flange (Figure 31).
Figure 31 - Use Hooked End of Bead Lifting Tool
6. After beads are mounted, unclamp wheel, lift
it slightly, and move the clamps to the center
of the table top. With the tire/wheel loose on
the table top, follow the detailed instructions
provided in the Inflation section of this
manual for bead sealing, bead seating, and
inflation.
RC100 Rim Clamp Tire Changer • 11