
Operating instructions
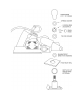

DISASSEMBLY OF THE DEPTH ADJUSTMENT MECHANISM
It is important that you remember the position of each part for re-assembly. It might be a
good idea to write down the position of each part. The unit will not work properly if a part is
missing. (There is also a diagram later in this manual.)
Unscrew the large knob, remove the spring washer, loosen the Allen Screw, and remove the
DOUGHNUT. Next remove the Teflon washer and drop the front plate assembly out of the
planer’s plastic housing. There will be some very important washer shims that go between
the screw assembly and the plastic housing. Be sure these are kept intact. The foam piece
should be removed. If there is a maximum cut depth collar installed remove it. This is as far
apart as the unit will go as the rest of the depth adjustment unit is glued together.
SERVICING THE DEPTH ADJUSTMENT SCREW
Use hot water or a solvent and compressed air to clean the screw mechanism. This may take
several applications or soaking. When clean, carefully dry the unit.
Due to Teflon coating normally no lubrication is required.
If you feel lubrication is required we recommend a light coat of Triflow lubricant.
Experience has shown that a heavy oil or grease will turn into a solid in the presence of foam
dust. If you feel there will be no foam dust present then grease can be used.
SERVICING THE FOAM FILTER
Without the foam filter and three 1/2" plastic plugs in the front of the green housing the
depth adjustment mechanism will gradually fill with foam dust and debris making the unit
perform poorly.
To clean the foam filter wash it with warm water and soap. Then rinse it and dry it well. If
there is any damage to the foam replace the filter.
If you run the planer without the foam filter or plugs you should service the depth adjust-
ment mechanism main screw every 100 blanks.
We feel that with the foam filter and plugs in place there is no need for service for the life of
the planer.