
Operating instructions


DEPTH ADJUSTMENT MECHANISM ASSEMBLY AND ADJUSTMENT
During assembly the following three very important adjustments are made:
1. The direction of the depth adjustment indicator knob is set in the position preferred by the
shaper.
2. The depth adjustment knob tension or ease of turning is set. This is dependent on how
hard the DOUGHNUT is pressing against the planer housing. This same adjustment is
used to eliminate the backlash or play caused by a space between the housing and the
DOUGHNUT.
3. The position where the depth adjustment knob starts cutting foam is set. This is done
with washer shims. The factory setting is with the front base plate indexed to the rear
base plate. This can be changed with shims.
It also might be necessary to make this
adjustment due to wear.
The method used for adjusting the planer is not obvious so carefully follow the steps below:
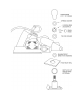
1. Position the foam filter on the base. If you are using the maximum depth adjustment
collar put it in place. Make sure the plastic plugs are in the three holes on the main green
plastic housing.
2. Carefully replace the shim washers on the adjusting screw so they will be next to the
green plastic body on the base plate side. Less shim will raise the front base plate. More
shim will lower it. Extra shims are available from Clark Foam.
3. Carefully put the front base plate in position. Make sure everything is perfectly aligned.
Set the back base plate of the planer on a flat surface.
4. Put the Teflon washer in position and place the DOUGHNUT in position.
5. Turn the depth adjustment stud coming through the planer counterclockwise as far as it
will go.
6. Position the depth indicator where you want it to point when the planer is making the
minimum cut or no cut. This will be the far left or counterclockwise position.
7. With the stud pulled up as far as it will go tighten the Allen Screw on the DOUGHNUT.
Be sure to pull up as hard as you can before tightening the Allen screw. Also, the stud
coming out of the planer must be turned counterclockwise as far as it will go
8. The next step is to take out all the play between the DOUGHNUT and the lower
depth adjustment mechanism by squeezing it tight against the Teflon washer and the
planer’s plastic housing. The force it takes to operate the depth adjustment mechanism is
also set at this time.
This operation cannot be done by hand. Place the spring washer on
the DOUGHNUT. Next screw down the big knob and compress the spring washer. Using
the Allen wrench loosen the DOUGHNUT. The spring washer will then automatically
force it down. Tighten