Classic Cast Iron Stove BOXWOOD & BOXWOOD DELUXE PART NOS: 6910065 & 6910070 USER GUIDE GC0710
INTRODUCTION Thank you for purchasing this CLARKE Classic Cast Iron Stove. Before attempting to install or use the stove, please read this manual throughout and follow the instructions carefully. Thoroughly familiarise yourself with this stove & it’s operation in order to ensure the safety of yourself and others around you. Henceforth, you can look forward to the stove giving you long and satisfactory service.
INSTALLATION OF THIS PRODUCT WARNING! AN ACCREDITED HEATING ENGINEER MUST CARRY OUT THE INSTALLATION OF THIS STOVE. ALTERNATIVELY, SHOULD A NONACCREDITED ENGINEER UNDERTAKE THE INSTALLATION, YOUR LOCAL BUILDING CONTROL OFFICER WILL BE REQUIRED TO APPROVE THE COMPLETED INSTALLATION. IT IS AN OFFENCE UNDER UK LAW, NOT TO COMPLY WITH THIS MANDATARY REQUIREMENT. IF THE STOVE IS NOT FITTED CORRECTLY BY AN APPROVED PERSON, IT COULD RESULT IN A HOUSE FIRE OR CARBON MONOXIDE POISONING.
THIS STOVE MUST BE CONNECTED TO A SUITABLE FLUE OUTLET. Due to high temperature this stove should be located well away from furniture and curtains. Children and adults should be alerted to the hazards of hot surfaces. Young children should be carefully supervised when they are in the same room as the stove. Do not place clothing or other flammable material on or near the stove. Keep the stove area clear of combustible materials, flammable liquids or vapours. CARBON MONOXIDE POISONING CAN BE FATAL.
UNPACKING & ASSEMBLY Before assembling, please check contents against the following list and advise your dealer immediately if any parts are missing. See Parts Diagram & Component Parts list on pages 22 & 23.
5. Attach the chimney connector as shown in Fig 2 using three short bolts, ensuring the fireproof gasket is correctly seated around the base. Fig 2 6. Install the top plate and cooking lids in position on the top of the stove as shown in Fig 3. 7. Place stove in the desired location as shown in POSITIONING AND INSTALLATION. 8. Place the optional grate for coal or charcoal burning into position in the stove if required. (items sold separately;- please refer to ACCESSORIES on page 21.
For specific guidance when cast iron stoves are being installed in boats or homes with thatched roofs, please refer tothe SOLIFTEC website at; www.soliftec.com/installation.htm SUPPORTING FLOORS The stove must only be installed on floors with an adequate load bearing capacity and if the existing construction is not suitable, additional measures such as a load distributing plate must be provided.
The stove can be recessed in a suitable sized fireplace but a permanent free air gap of at least 200mm must be left around the sides and top and at least 50mm at the back of the stove to obtain maximum heat output and for access to the rear of the stove. MINIMUM DISTANCE TO COMBUSTIBLE MATERIALS Note: combustible material refers to any material that will degrade when subjected to heat e.g. plaster. Due to the heat of a hot stove, a suitable fire guard should always be used to provide additional protection.
THIS STOVE MUST NOT BE INSTALLED INTO A CHIMNEY THAT SERVES ANY OTHER HEATING APPLIANCE. THERE MUST NOT BE AN EXTRACTOR FAN FITTED IN THE SAME ROOM AS THE STOVE, AS THIS CAN CAUSE THE STOVE TO EMIT FUMES INTO THE ROOM. FLUE HEIGHT The chimney height and the position of the chimney should conform to the Building Regulations document “J”. Flues should be high enough to clear the products of combustion.
BENDS IN FLUES Openings for inspection & cleaning should be formed using purpose factorymade components compatible with the flue system, having an access cover that has the same level of gas-tightness as the flue system and an equal level of thermal insulation. Offsets in flues are only acceptable if the following rules are respected: a) The chimney system shall have no more than 4 bends in total; - 2 bends in the chimney and 2 bends in the flue pipe connection.
AIR FOR COMBUSTION Any room or space containing a stove should have a permanent air vent opening of at least the sizes shown in the table below. For stoves designed to burn a range of different solid fuels, the air supply should be designed to accommodate burning the fuel that produces the highest heating output. There must always be a permanent means of providing air for combustion into the room in which the fire is installed.
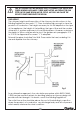
Fig 6: Horizontal register plate with top flue connection Fig 7: Horizontal register plate with optional vertical rear flue connection There are different ways of connecting the stove to the flue as shown in Figures 6-7. If a vertical rear flue is used, the chimney may be swept through the appliance. If it is not possible to pass the sweeps brush through the stove, a soot door will be necessary. This may be either in the actual brickwork of the chimney or fitted in the register plate.
A non-combustible register plate minimum 1.5 mm thick should be fitted to all installations between the flue and the building structure. It’s suitability and fit should be checked by a qualified stove installation engineer against the current Building Regulations. Fig 8 CLEANING THE FLUE Access for cleaning the flue should be incorporated in the system other than through the appliance (e.g. a soot door or access through a register plate).
CARBON MONOXIDE ALARMS Due consideration should be given to the dangers of carbon monoxide poisoning following incomplete combustion of solid fuels in an enclosed space. Carbon monoxide detectors to BS EN 50291 are available for use in domestic premises and details are available in the official HETAS guide that can be viewed on their website at www.hetas.co.uk.
USING YOUR STOVE THE CONTROLS The amount of heat emitted by the stove is regulated using the following air controls: A) The primary air supply is controlled using the air regulator built into the front door. This controls the burn rate and is opened to enable the stove to create more heat. B) The cooking lid rests on top of the stove and will affect the airflow drawn across the top of the fire if removed for cooking.
This stove will function with wood or coal, but in general all fuel should be dry and timber should be well seasoned so as to have a moisture content below 20%. The use of damp wood will result in more soot and tar deposits being left in the chimney, flu and stove, and will not release heat if thermal energy is being used to drive out moisture from the fuel. Other fuels can be used in conjunction with wood, provided the base of the fire remains as wood or compressed block fuels.
3. Keep the fire burning for three hours or so, gradually increasing the size of the fire using larger logs which will burn naturally but slowly, keeping the stove on a low setting. 4. After a couple of days burning at this level, increase the brightness & intensity of the fire gradually over the next 10 days. Full strength fires should not be used until completion of approx 20 days of mild use. Only from this time will the stove have been properly seasoned.
• The rate of refuelling and heat available are dependant upon individual requirements based upon the user’s experience. When re-loading, it is normally necessary to burn the stove fast initially, to drive off any gasses and moisture, before closing the air vents to control the burn rate. • Ensure the doors are kept closed to contain fumes except when lighting up, re-fuelling or removing ash.
TROUBLESHOOTING PROBLEM CAUSE SOLUTION Fire difficult to start. Wood green, too damp or poor quality. Use recommended fuel. Logs are too large. When lighting, use small, dry kindling. To maintain the fire use split logs. Air starvation. Open upper and lower air controls. Insufficient draught. Check that flue is not obstructed, sweep flue if necessary. Too much draught. Ensure that the lower air control is closed. Partially close the top air control. Excessive draw.
MAINTENANCE CLEANING The inside of the stove may require regular cleaning, especially during periods of peak use, the frequency of this being indicated by experience. It is advisable to wear a dust mask, protective gloves and safety glasses when cleaning. Use a stiff brush and industrial type vacuum cleaner to dislodge and remove as much material as possible, starting at the top of the stove and working down to the bottom.
BAFFLE (DE-LUX ONLY) This should be removed & cleaned at least once a month to prevent any buildup of soot or fly ash that could lead to blocked flu-ways and dangerous fume emission. If the baffles are removed, the chimney/flue way can be swept through the appliance. CHIMNEYS AND FLU-WAYS It is important that the chimney, flu-ways and any connecting flue pipe are swept regularly. This means at least once a year for smokeless fuels and at least twice a year for wood and other fuels.
PARTS DIAGRAM Boxwood ‘Deluxe’ Lid Components Boxwood Stove common components IMPORTANT: The use of parts other than CLARKE replacement parts may result in safety hazards, decreased appliance performance and may invalidate your warranty.
COMPONENT PARTS LIST No Parts List No Parts List 1 Bottom Plate 16 Baffle (Deluxe only) 2 L/H Side Plate 17 Hinge Pin (x 2) 3 R/H Side Plate 18 Rope Door Surround 4 Back Plate 19 Rope Top Surround (standard) 5 Door Frame 20 Rope Lid Surround (standard) 6 Top Plate (Delux only) + 21 Top Plate (Standard) + 7 Door 22 Top Panel (Standard) + 8 Top Plate/Lid Support (Deluxe only) 23 Brass Nut 9 Leg (x 4) 24 Straight Fire Rope (Deluxe only) 10 Chimney Connection with Damper 25 Curved
DECLARATION OF CONFORMITY 24
DECLARATION OF CONFORMITY 25
NOTES ___________________________________________________________________________________ __________________________________________________________________________ __________________________________________________________________________ __________________________________________________________________________ __________________________________________________________________________ __________________________________________________________________________ _________________________________________
NOTES ___________________________________________________________________________________ __________________________________________________________________________ __________________________________________________________________________ __________________________________________________________________________ __________________________________________________________________________ __________________________________________________________________________ _________________________________________