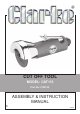
CUT OFF TOOL MODEL: CAT113 Part No: 3120135 ASSEMBLY & INSTRUCTION MANUAL LS0309
INTRODUCTION Thank you for purchasing this CLARKE product Before attempting to use the product, it is essential that you read this manual thoroughly and carefully follow all instructions given. In doing so you will ensure the safety of yourself and that of others around you, and you can also look forward to the product giving you long and satisfactory service. GUARANTEE This CLARKE product is guaranteed against faulty manufacture for a period of 12 months from the date of purchase.
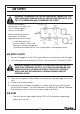
SAFETY PRECAUTIONS WORK ENVIRONMENT • Keep the work area clean and tidy. • Dress appropriately - Do not wear loose clothing or jewellery. • Tie long hair out of the way. • Do not operate the cut off tool where there are flammable liquids or gases. • Keep the air supply hose away from heat, oil and sharp edges. • Do not fit the cut off tool to any stand or clamping device.
SAFETY PRECAUTIONS • Always disconnect from the air supply when: a) Performing any maintenance b) The cut off tool is not in use. c) The cut off tool will be left unattended. d) Moving to another work area. e) Passing the cut off tool to another person. • Quick change couplings should not be located at the tool. They add weight and could fail due to vibration. • DO NOT force or misuse the tool. It will do a better and safer job at the rate for which it was designed. • DO NOT remove any labels.
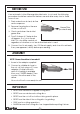
AIR SUPPLY WARNING: COMPRESSED AIR CAN BE DANGEROUS. ENSURE THAT YOU ARE THOROUGHLY FAMILIAR WITH ALL PRECAUTIONS RELATING TO THE USE OF COMPRESSORS AND COMPRESSED AIR SUPPLY. The recommended procedure to connect this tool to an air supply, is shown on the right. We recommend that an automatic in-line filterregulator-lubricator is used. • It will keep the tool in good condition. The in-line lubricator should be regularly checked and filled with air tool oil adjusted to 2 drops per minute.
BEFORE USE If an automatic in-line filter-regulator-lubricator is not used, the following procedure should be carried out before use and after every two to three hours of use. 1. Drain water from air tank, air line and compressor. 2. Remove the plug from the rear of the cut off tool. Gauze Filter (located here) 3. Check and clean the air inlet gauze filter. 4. Pour 2-3 drops of Clarke air line oil (approx. 3 cc), into the air inlet.
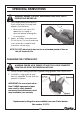
OPERATING INSTRUCTIONS WARNING: ENSURE YOU READ, UNDERSTAND AND APPLY SAFETY INSTRUCTIONS BEFORE USE. 1. Push safety lever (mounted on the throttle lever) forward and depress throttle lever. • Allow tool to run up to full speed for a couple of seconds before offering disc to work piece. 2. Apply a steady, even pressure. Do not force. Too much pressure can cause disc to break and may even cause injury. NOTE: DO NOT allow tool to free run for an extended period of time as this will shorten its life.
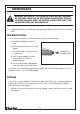
MAINTENANCE WARNING: DISCONNECT TOOL FROM AIR SUPPLY BEFORE CHANGING ACCESSORIES, SERVICING OR PERFORMING MAINTENANCE. REPLACE OR REPAIR DAMAGED PARTS. USE GENUINE CLARKE PARTS ONLY. NONAUTHORISED PARTS MAY BE DANGEROUS 1. Lubricate the air tool daily by placing a few drops of air tool oil into the air inlet. TROUBLESHOOTING. Loss of power or erratic action may be due to the following: a. Excessive usage on the air line. b. Moisture or restriction in the air pipe. Gauze Filter (located here) c.
TECHNICAL SPECIFICATION Please note that the details and specifications contained herein, are correct at the time of going to print. However, CLARKE International reserve the right to change specifications at any time without prior notice. Cutting disc diameter 3" (76mm) No load speed 18000rpm Air consumption 4 cfm Operating pressure 90 psi (6.2 bar) Weight 0.8 kg Air inlet size 1/4" BSP A weighted sound pressure level 96.9 dB(A) Sound power level 107.9 dB(A) Vibration in the handle 2.
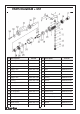
PARTS DIAGRAM + LIST No D e s c r ip t io n Part No No Description Part No 1 Ho us i ng RONCAT11301 18 Bearing RONCAT11318 2 Va lve Ste m S e a t RONCAT11302 19 Back Plate RONCAT11319 3 Tri g g e r RONCAT11303 20 Steel Ball RONCAT11320 4 Tri g g e r P i n RONCAT11304 21 Rotor RONCAT11321 5 Sp ri ng RONCAT11305 22 Rotor Blade RONCAT11322 6 Pin RONCAT11306 23 Cylinder RONCAT11323 7 Tri g g e r P i n RONCAT11307 24 Bushing RONCAT11324 8 O Ri ng RONCAT11308 25 Washer
DECLARATION OF CONFORMITY 11