AIR IMPACT WRENCH MODEL NO: CAT131 & 132 PART NO: 3120145 / 3120146 OPERATING & MAINTENANCE INSTRUCTIONS GC0614
INTRODUCTION Thank you for purchasing this CLARKE Impact Wrench. The CAT131 and CAT132 are identical wrenches, the CAT132 being supplied in a moulded plastic storage case which contains the following: • 1 x Mini-Oiler • 1 x Extension Bar • 1 x Hex Key • Snap Connector fitting • Oil Bottle • 10 Impact Sockets, (9, 10, 11, 13, 14, 17, 19, 22, 24 & 27mm sizes) IMPORTANT Please read all of the safety and operating instructions carefully before using this product.
GENERAL SAFETY RULES CAUTION: FAILURE TO FOLLOW THESE PRECAUTIONS COULD RESULT IN PERSONAL INJURY, AND/OR DAMAGE TO PROPERTY. WORK ENVIRONMENT 1. Keep the work area clean and tidy. 2. Dress appropriately - Do not wear loose clothing or jewellery. Tie long hair out of the way. 3. Keep children and visitors away - Do not let children handle the tool. 4. Do not operate the tool where there are flammable liquids or gases. USE OF POWER TOOLS 1.
• Moving to another work area. • Passing the tool to another person. 13. Never use the tool if it is defective or operating abnormally. 14. This tool should be serviced at regular intervals by qualified personnel. 15. Avoid damaging the tool for example by applying excessive force of any kind. 16. Always maintain the tool with care. Keep it clean for the best and safest performance. 17. Quick change couplings should not be located at the tool. They add weight and could fail due to vibration. 18.
10. Always store this product in a dry, secure place out of reach of children or untrained users. 11. Always use both hands to control the impact wrench. 12. Always ensure the wrench has stopped before putting it down after use. TRANSPORT & STORAGE 1. Never carry the tool by the air hose. 2. Never carry the tool with your finger on the trigger. 3. When not in use the tool must be disconnected from the air supply and stored in a dry place out of the reach of children (preferably in a locked cabinet). 4.
COMPRESSED AIR REQUIREMENTS WARNING: COMPRESSED AIR CAN BE DANGEROUS. ENSURE THAT YOU ARE FAMILIAR WITH ALL PRECAUTIONS RELATING TO THE USE OF COMPRESSORS AND COMPRESSED AIR SUPPLY. • Use only clean, dry, regulated compressed air as a power source. • Air compressors used with the tool must comply with the appropriate European Community Safety Directives. • A build-up of moisture or oil in the air compressor will accelerate wear and corrosion in the tool.
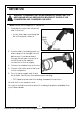
BEFORE USE WARNING: COMPRESSED AIR CAN BE DANGEROUS. ENSURE THAT YOU ARE FAMILIAR WITH ALL PRECAUTIONS RELATING TO THE USE OF AIR COMPRESSORS AND COMPRESSED AIR SUPPLY. NOTE: Ensure the compressor is turned off. 1. If required, connect an in-line mini oiler to the tool. • A mini oiler helps to prolong the life of the impact wrench. 2. If a mini-oiler is not being used, run a few drops of oil through the tool before use.
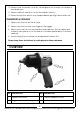
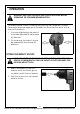
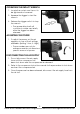
OPERATION WARNING: WAIT UNTIL THE ANVIL HAS STOPPED ROTATING BEFORE OPERATING THE FORWARD/REVERSE BUTTON. Forward/Reverse rotation is selected by pushing the combined Forward/ Reverse knob/power regulator in the direction shown by the arrow on the back of the wrench. 1. For normal tightening, the wrench should be operated in the forward (F) direction. 2. For loosening, the wrench should be operated in the reverse (R) direction. FITTING THE IMPACT SOCKET WARNING: NEVER USE STANDARD SOCKETS.
OPERATING THE IMPACT WRENCH 1. Locate the socket over the nut to be tightened or loosened. 2. Squeeze the trigger to start the wrench. 3. Release the trigger switch to stop the wrench. • The square drive shaft will continue to rotate very briefly after the trigger has been released. ADJUSTING THE POWER 1. To adjust the power, set the air regulator to one of the 3 settings available. (Setting 1-Low, 3 -High) • These numbers are only for reference and do not denote a specific amount of power.
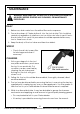
MAINTENANCE WARNING: MAKE SURE THAT THE AIR TOOL IS DISCONNECTED FROM THE AIR SUPPLY BEFORE STARTING ANY CLEANING, OR MAINTENANCE PROCEDURES. DAILY 1. Before use, drain water from the airline filter and compressor. 2. Pour a few drops of Clarke air-line oil, into the tool air inlet. This should be carried out regardless of whether or not an in-line mini oiler is used. If an inline mini oiler is not used, this procedure should be repeated after every two to three hours of use. 3.
TROUBLESHOOTING SYMPTOM PROBLEM SOLUTION Tool runs at normal speed but slows down under any load. 1. Motor parts worn. Tool runs slowly. Air flows weakly from exhaust. 1. Motor parts jammed with gum/dirt. 2. Air-line regulator in closed position. 3. General airflow blocked by dirt. 1. Examine inlet air filter for blockage. Drip a few drops of air tool lubricating oil into air inlet. 2. Adjust in-line regulator to open position. 3. Operate tool in short bursts. Tool will not run.
STORAGE If the tool is to be stored, or is idle for longer than 24 hours, run a few drops of Clarke air line oil into the air inlet, and run the tool for 5 seconds in order to lubricate the internal parts. When not in use, disconnect from air supply, clean & store in a safe, dry place. SPECIFICATION Model Number CAT131/CAT132 Part Number(s) 3120145 / 3120146 Min. Hose Size (ID) 3/8” BSP Max Operating Pressure 90 psi (6.2 bar) Air Consumption 18 cfm (max @90psi) average 6.
PARTS LIST No Description No Description 1 Main Housing 23 Circlip 2 Trigger Sleeve 24 Rear Rotor Bearing 3 Trigger 25 Rear Plate 4 Trigger Shaft 26 Cylinder 5 Screw 27 Rotor 6 Forward/Reverse Valve Knob 28 Rotor Blade 7 Valve Bushing 29 Front Plate 8 O-Ring 30 Bearing 9 Valve 31 Washer 10 Spring 32 Washer 11 Steel Ball 33 Hammer 12 Forward/Reverse Valve Knob 34 Hammer Cage 13 Valve Seat 35 Hammer Pin 14 Throttle Valve 36 Square Drive Shaft 15 Val
PARTS DIAGRAM 14 Parts & Service: 020 8988 7400 / E-mail: Parts@clarkeinternational.com or Service@clarkeinternational.
DECLARATION OF CONFORMITY 15 Parts & Service: 020 8988 7400 / E-mail: Parts@clarkeinternational.com or Service@clarkeinternational.