ANGLE DIE GRINDER SET MODEL NO: CAT65 PART NO: 3110725 OPERATING & MAINTENANCE INSTRUCTIONS GC0614
INTRODUCTION Thank you for purchasing this CLARKE Angle Die Grinder Set. Before attempting to use this product, please read this manual thoroughly and follow the instructions carefully. In doing so you will ensure the safety of yourself and that of others around you, and you can look forward to your purchase giving you long and satisfactory service. Your tool kit has been designed to give long and trouble free service.
GENERAL SAFETY RULES CAUTION: FAILURE TO FOLLOW THESE PRECAUTIONS COULD RESULT IN PERSONAL INJURY, AND/OR DAMAGE TO PROPERTY. WORK ENVIRONMENT 1. Keep the work area clean and tidy. 2. Dress appropriately - Do not wear loose clothing or jewellery. Tie long hair out of the way. 3. Keep children and visitors away - Do not let children handle the tool. 4. Do not operate the tool where there are flammable liquids or gases. PERSONAL SAFETY 1.
8. Do not carry out any alterations or modifications to the tool. 9. Always disconnect from the air supply when: • Performing any maintenance. • The tool is not in use. • The tool will be left unattended. • Moving to another work area. • Passing the tool to another person. 10. Never use the tool if it is defective or operating abnormally. 11. The tool should be serviced at regular intervals by qualified service personnel. 12. Avoid damaging the tool by applying excessive force of any kind. 13.
OVERVIEW The CAT65 Die Grinder Set includes the accessories shown. When opening the case for the first time, check against the following list that all the items are present. Any damage or deficiency should be reported to your CLARKE dealer immediately. NO DESCRIPTION NO DESCRIPTION 1 Die Grinder Tool 4 10 Grinding Stones 2 2 x Wrenches 5 2 x Collets (1 already fitted to tool) 3 Male Snap Connector 5 Parts & Service: 020 8988 7400 / E-mail: Parts@clarkeinternational.
SPECIFICATIONS Model Number CAT65 Angle Die Grinder Weight 0.5 kg Air Inlet Size 1/4“BSP (female) Collet Sizes 1/8” and 1/4” Operating Pressure 90 psi (6.2 bar) Air Consumption 8 cfm average No Load Speed 18000 rpm @ 90psi Sound Pressure Level (LpA dB) 93 dB(A) Sound Power Level (LwA dB) 105 dB(A) Vibration Levels 2.5 m/s2 Please note that the details and specifications contained herein are correct at the time of going to print.
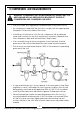
COMPRESSED AIR REQUIREMENTS WARNING: COMPRESSED AIR CAN BE DANGEROUS. ENSURE THAT YOU ARE FAMILIAR WITH ALL PRECAUTIONS RELATING TO THE USE OF COMPRESSORS AND COMPRESSED AIR SUPPLY. • Use only clean, dry, regulated compressed air as a power source. • Air compressors used with the tool must comply with the appropriate European Community Safety Directives. • A build-up of moisture or oil in the air compressor will accelerate wear and corrosion in the tool.
BEFORE USE WARNING: COMPRESSED AIR CAN BE DANGEROUS. ENSURE THAT YOU ARE FAMILIAR WITH ALL PRECAUTIONS RELATING TO THE USE OF AIR COMPRESSORS AND COMPRESSED AIR SUPPLIES. NOTE: Ensure the compressor is turned off. 1. Remove the blanking plug from the inlet connection of the tool. 2. If required, connect an in-line mini oiler to the tool. • A mini oiler helps to prolong the life of the air tool. 3. If a mini-oiler is not being used, run a few drops of oil through the tool before use.
FITTING THE GRINDING STONE INTO THE DIE GRINDER IMPORTANT: Never use chipped or cracked grindstones. Never use grindstones not rated to operate at a speed equal to, or greater than, the full operating speed of the air tool. 1. Slip the shank of the chosen stone into the collet and tighten the screw cap finger tight. 2. Place the smaller of the two wrenches over the collet seat to stop the tool from rotating. 3. Use the larger wrench to fully tighten the collet and grip the stone in position as shown.
GRINDING TIPS • The key to efficient grinding is to control the pressure and surface contact between the grinding tool and the workpiece. • Allow the tool to reach full speed before grinding. • Avoid overloading the die grinder. If it becomes hot during use, rest for a few minutes while it cools down. DISCONNECTING THE AIR SUPPLY 1. Do not disconnect the air supply hose until the compressor has been shut down and the compressed air released. 2.
WEEKLY 1. Check the air inlet strainer for blockage and clean if necessary. 1. Keep the body of each tool clean and free from debris. 2. Grit or gum deposits inside the tool may also reduce its efficiency. This condition can be corrected by cleaning out the air strainer and flushing out the tool with gum solvent or oil, or failing this, the motor may require dismantling. This is better left to your Clarke dealer.
TROUBLESHOOTING SYMPTOM PROBLEM SOLUTION Tool runs at normal speed but slows down under any load. 1. Excessive pressure on 1. Reduce the force tool. applied to the tool. 2. Motor parts worn. 2. Return to Clarke dealer for repair. 3. Worn or sticking 3. Drip air tool lubricating mechanism due to oil into air inlet. Allow oil lack of lubricant. to soak moving parts before using. Tool runs slowly. Air flows weakly from exhaust. 1. Motor parts jammed with gum/dirt. 2. Regulator in closed position. 3.
PARTS DIAGRAM - DIE GRINDER 13 Parts & Service: 020 8988 7400 / E-mail: Parts@clarkeinternational.com or Service@clarkeinternational.
PARTS LIST - DIE GRINDER No Description No Description 1 Main Body 22 Steel Ball 2 ////////////////////////////////// 23 /////////////////////////////////// 3 End cap 24 Ball Bearing 4 ////////////////////////////////// 25 //////////////////////////////////// 5 Strainer 26 //////////////////////////////////// 6 Throttle Lever 27 /////////////////////////////////// 7 Hinge Pin 28 Collet 8 Bush 29 Collett Chuck 9 Valve 30 Spanner 10 O-Ring 31 Spanner 11 Spring 32
DECLARATION OF CONFORMITY 15 Parts & Service: 020 8988 7400 / E-mail: Parts@clarkeinternational.com or Service@clarkeinternational.