
Instruction manual


BLADE GUIDES
Blade guides should be inspected regularly for wear
or chipping. When replacing guides replace all guides
at the same time, both upper and lower.
BEARINGS
All bearings used in the construction of your bandsaw
and its motor are sealed and lubricated for life.
TIPS ON USING YOUR
BANDSAW
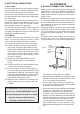
For all cutting operations, the upper guide block and
blade guard assembly should be adjusted to be just
clear of the work being cut. Not only does this provide
the best safety for the operator, but it also brings the
blade guides closer to the work giving more accurate
results and easier control.
Use both hands to feed the workpiece in to the blade.
The work must be held flat on the table at all times to
prevent binding of the blade. Use a steady even
pressure just sufficient to keep the blade cutting.
Always use a rip fence or mitre guide where possible
to eliminate any sideways slip of the work. This is
most important when the table is tilted to an angle.
Always plan your work ahead. The tradesmans’ rule
is “measure twice, cut once”. It is best to finish a cut in
one continuous operation, but frequent backtracking
may be necessary.
Turn off the motor and allow the blade to come to a
complete stop before backing the blade out of the cut.
Remember that the blade removes material during
the cut. This gap created by the blade is called the
‘kerf’, and must be allowed for when cutting to exact
sizes. Plan your cut so that the kerf is the scrap side
of the lines you wish to cut. If necessary, allow a little
more for finish sanding.
RIP SAWING
This term refers to the cutting of the timber with the
grain, rather than at a right angles to the grain. You
can rip wood freehand to a previously drawn line, but
best results are obtained by using the rip fence. If the
table is set at a level angle, set the rip fence to the left
hand side of the blade, allowing you to use your right
hand to hold the work firmly against the fence.
CROSS CUTTING
This term refers to cutting timber at right angles to the
grain. This type of cut can also be made freehand, but
the mitre guide is used to ensure accurate results.
The mitre guide can be adjusted to a 45° angle to
produce mitre cuts, or with the table tilted as well -
compound mitre cuts. Make sure the work is held
firmly against the table and against the face of the
mitre guide. Be careful to keep your fingers away from
the blade, particularly at the end of the cut.
FREEHAND SAWING
The ease with which many different and varied
shapes can be cut is one of the most important
features of the bandsaw. Select a blade suitable for
cutting the smallest radius in the work you have
planned. See your CLARKE dealer for replacement
or alternative blades.
When freehand cutting, always feed the work slowly
so that the blade can follow the line you wish to saw.
Make sure not to drag the work off line, forcing the
blade sideways, or twisting it.
In many cases, it is helpful to rough cut about 6mm
away from the line. For difficult curves which may be
too tight for the blade, make relief cuts onto the face
of the curve so that these scraps will fall as the final
radius is sawn.
CONSUMABLES
A range of bandsaw blades, is available for your
Bandsaw to help you get maximum use from your
machine.
Consumables are obtainable from your CLARKE
Dealer. If you have any difficulty in obtaining them,
please contact the CLARKE Customer Service
Department.
TROUBLE SHOOTING
BREAKING BLADES
The breaking of blades is a common problem with
band saws, and the following are some of the causes
associated with this problem.
1. Faulty alignment
2. Blade guides incorrectly adjusted.
3. Feeding the work too fast.
4. Forcing or twisting the blade around a tight radius.
5. Blade too tight.
6. Dull teeth.
7. Blade is badly welded or brazed.
8. Blade left running when not in use.
REMEMBER
ALWAYS disconnect your bandsaw from the
power supply when troubleshooting, or
carrying out adjustments or maintenance.
11