D14 & D18 Upright Vacuum Operator's Manual READ THIS BOOK This book has important information for the use and safe operation of this machine. Failure to read this book prior to operating or attempting any service or maintenance procedure to your Clarke machine could result in injury to you or to other personnel; damage to the machine or to other property could occur as well. You must have training in the operation of this machine before using it.
Table of Contents Important Safety Instructions ............................................................................................................ 3 Introduction & Machine Specifications ............................................................................................. 7 Grounding Instructions .................................................................................................................... 8 How To Assemble The Machine ................................................
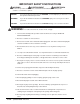
IMPORTANT SAFETY INSTRUCTIONS WARNING AVERTISSEMENT ADVERTENCIA For the safe operation of this machine, read and understand all dangers, warnings and cautions. Look for these symbols: DANGER: If you do not follow the instructions in a DANGER, severe bodily injury or death can occur to the operator and/or other personnel. WARNING: If you do not follow the instructions in a WARNING, injury can occur to you or to other personnel.
WARNING: To reduce the risk of fire, electric shock, or injury: 16. Belt pulleys can become hot during normal use. To prevent burns, avoid touching the belt pulley when servicing the drive belt. 17. Do not use to pick up flammable or combustible liquids such as gasoline, or use in areas where they may be present. 18. Unplug the machine before servicing the belt or brush. The brush may start suddenly and cause injury.
INTRODUCTION The D14 and D18 are upright vacuums for cleaning carpet. These machines are used to remove dry material from carpet. These machines are intended for commercial use. MACHINE SPECIFICATIONS Model Power Supply Vacuum Motor Brush RPM Cord Wheels (2) Wand Hose Agitator Brush Cleaning Width Filter Bags Weight (less power cord) Shipping Weight Vacuum Dimensions Warranty Clarke® Operator's Manual - D14 & D18 D14 D18 120V-60 Cycle 230V-50/60 Cycle 1050 Watts 4300 rpm 50 ft. 3-wire 2.7" x 1.
GROUNDING INSTRUCTIONS Grounded Outlet Box Preparation: The following are instructions for connection to the power supply and the electrical ground. This machine must be connected to the electrical ground to protect the operator from electrical shock. The machine has an approved power cord with three conductors and a plug with three terminals. Connect the plug to a receptacle that has three holes and is connected to the electrical ground.
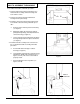
HOW TO ASSEMBLE THE MACHINE To assemble the machine, follow this procedure: 1. Remove the brush housing, vacuum bags, hose, wand, handle assembly, canister housing, and tools from the carton. C A 2. Remove the canister housing and the brush housing from the plastic bags. 3. Install the canister housing on the brush housing. To install the canister housing, follow this procedure: a. Position canister housing over brush housing (see figure 2). b.
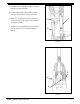
5. Install the wand assembly in the right rear canister housing (see figure 6, item A). 6. Position wand handle so that handle is towards the front of the machine (see figure 7, item A). 7. Attach hose to wand and canister (see figure 7). To attach hose properly, depress lock on canister (see figure 7, item B). 8. Snap the crevice (B) and upholstery (C) tools into the tool retainer on rear of canister housing (see figure 6).
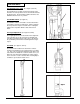
THE CONTROLS The Handle Release Pedal (See figure 8, item A) The handle release pedal is on the lower left side of the machine. Press the pedal to release the handle and start the brush motor. The brush motor will not run unless the ON/OFF switch is in the "I" position. C The ON/OFF Switch (See figure 9) The ON/OFF switch is on handle. Put the switch in the "I" position to start the vacuum motor. Put the switch in the "O" position to stop the vacuum motor.
Canister Door (See figure 12, item A) The canister door release is in the upper part of the canister housing. Lift to open door. NOTE: Door will not close without a properly mounted filter bag. See page 15 for filter bag mounting instructions. The Vacuum Indicator Light (See figure 12, item B) The vacuum indicator light is on the top of the canister housing. The indicator light comes on when the airflow to the vacuum motor is obstructed.
HOW TO OPERATE THE MACHINE CAUTION: To prevent damage to the machine, do not allow large objects to be pulled into the lower housing or the attachments. NOTE: The machine comes with a filter bag installed in the canister housing. Use the D14 & D18 as a carpet cleaner or as an upholstery cleaner. To operate the machine as a carpet cleaner, follow this procedure: 1. Remove the power cord from the cord storage hooks, by rotating the lower cord hook 180° (see figure 14). 2.
MAINTENANCE WARNING: To prevent injury, always remove the electrical plug from the electrical outlet before doing any maintenance or repairs to the machine. WARNING: Maintenance and repairs must be done by authorized personnel only. Use only genuine Clarke parts. How To Change The Filter Bag The machine uses a disposable paper filter bag. To change the paper filter bag, follow this procedure: 1. Make sure the ON/OFF switch in the "O" position and that the machine is disconnected from the power supply. 2.
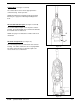
How To Change The Filter Cartridge Change the filter cartridge whenever it is dirty or suction performance decreases. To change the filter cartridge, follow this procedure: 1. Make sure the ON/OFF switch is in the "O" position and the machine is disconnected from the power supply. 2. Open the canister door. 3. Remove the filter bag. 4. Remove the filter cartridge (see figure 20). 5. Replace filter cartridge and filter bag (see figure 21). CAUTION: Check the filter cartridge while changing the paper bag.
How To Change the Drive Belt WARNING: To prevent injury, unplug machine before cleaning or replacing brush. Brush may start suddenly and cause injury. To change the drive belt, follow this procedure: 1. Put the machine on its side. 2. Lift the nozzle plate up to remove it. 3. Lift the brush assembly up to remove it (see figure 23). 4. Remove the drive belt from the brush pulley. 5. Remove the drive belt from the motor shaft. Figure 23 6. Put one end of the new drive belt around the motor shaft. 7.
BRUSH PERFORMANCE INDICATOR LIGHTS The D14 and D18 upright vacuums have 3 brush performance indicator lights (see figure 25). They are GREEN, YELLOW and RED. They work in the following manner: Normal Operation: • The GREEN light is on when the brush drive motor is on and the brush height setting is correct for the carpet. NOTE: It is normal for the red or yellow light to intermittently turn on and off as high or low surfaces are encountered.
D14 & D18 Section II Parts and Service Manual (70720A) Clarke® Operator's Manual - D14 & D18 19
Clarke® D14 & D18 Drawing #1 Upper Canister Assembly 2/04 40 1 39 38 34 37 36 35 33 2 3 32 4 6 8 11 10 5 7 5 9 12 13 29 31 30 28 27 14 23 15 22 21 16 24 25 26 20 19 18 17 20 Clarke® Operator's Manual - D14 & D18
Clarke® D14 & D18 Parts List #1 Upper Canister Assembly 2/06 Ref. No. Part No.
Clarke® D14 & D18 Drawing #2 Brush Housing Assembly 2/04 1 2 13 3 36 4 35 5 34 13 6 7 8 9 33 32 31 37 30 8 10 29 28 27 26 11 12 13 14 25 14 15 24 23 22 16 21 20 17 19 18 22 Clarke® Operator's Manual - D14 & D18
Clarke® D14 & D18 Parts List #2 Brush Housing Assembly 7/04 Ref. No. 1 Part No. 53231A 53232A 2 3 4 5 6 7 8 9 10 11 12 13 14 15 16 17 18 19 20 21 22 23 24 25 26 27 28 29 30 31 32 33 Clarke® 53245A 53242A 53259A 53291A 53248A 53227A 53228A 53267A 53268A 53331A 53355A 53284A 53229A 53260A 53261A 53250A 53251A 53263A 53354A 53350A 53286A 53282A 53230A 53348A 53285A 53325A 34 35 36 53249A 53326A 40732A 53275A 53333A 53241A 37 NI 53293A 53570A Operator's Manual - D14 & D18 Description Qty.
Clarke® D14 & D18 Electrical Schematic 1/06 (230V) BLUE (120V) BROWN(230V) (120V) GREEN/YELLOW (230V) GREEN (120V) BLACK 24 Clarke® Operator's Manual - D14 & D18