
Specifications

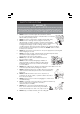


11. Two Head Transverse Stops are provided on
the top of the machine. These allow head
movement to be restricted, as desired.
Thread the slides on to the screw threads
of the transverse stops, ensurintg they are
the right way up, then screw on the stop
knobs as shown in Fig.7 Fig. 7
Temporarily position stops, one at each
end of the unit and loosely secure with
locking knobs.
Fig. 7
12. Screw the plug into the hole in the water tank, ensuring the
rubber washer is beneath the tank.
13. Finally, remove the cutting disk cover - three screws, and check
to ensure the disk is properly secured. Remember the securing
nut carries a LEFT HAND THREAD - turn ANTICLOCKWISE to
TIGHTEN.
OPERATION
1. Fill the water tank with clean cold water until the top of the pump is just covered, DO
NOT overfill. Check the water level constantly during use and top up as necessary.
3. With the machine disconnected from the
mains supply, measure the tile to be cut and
proceed to adjust:
a.) The angle of the cutting head which
can be adjusted up to 45 degrees from
the horizontal for mitre edge cuts if
required. For normal straight cuts at 90°,
the head should be set to zero degrees
in the scale at the R/H end of the
machine.
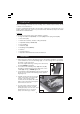
CAUTION: Ensure the unit is completely stable by adjusting the legs accordingly
L/H Side
R/H Side
Fig. 8
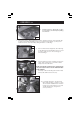
2. Traverse the head as far as possible to the
left hand side of the machine.
b.) For straight cuts, remove the Mitre Gauge by
unscrewing the two knurled nuts arrowed in Fig. 9 and slide
the assembly out of the housing. The tile is then place up
against the fence as desired.
For angle cutting, the mitre gauge is set as indicated in
Fig.9, with the appropriate angle set, and the gauge fully
locked in position.
5. Start the machine by pressing the green button on the switch
panel, marked ‘I’, wait for the cutting disc to reach full speed
before continuing.
6. Hold the tile to be cut firmly at all times, against the gauge/
fence. Slowly move the head towards the R/H side until
the cutting disc just touches the tile. Continue steadily
moving the head whilst observing the cut as you do so.
Fig. 9
-8-