
Specifications


11
Wiring instructions for the Standard and Vertical Clark • Reliance
Flat Glass Gage Illuminators
Note: Make sure that the power is turned off to the supply wiring before
connecting the illuminator.
Tools needed:
– Slotted Screwdriver
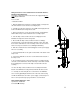
1. Open the illuminator housing by loosening the thumb screw (A) in the
side of the unit that secures the door assembly in place.
2. Carefully open the door and remove the 150W clear lamp (B) from the
inside of the illuminator housing and set aside.
3. Remove the two brass screws (C) from the bottom of the illuminator
which hold the lamp socket/conduit connector assembly in place.
4. Take the lamp socket/conduit connector assembly (D) from the
illuminator housing and set the housing aside.
5. Disassemble the lamp socket/conduit connection assembly by
removing the two screws (E) from inside of the lamp socket. (Note that
there are two small washers on the assembly screws. Do not lose these
washers as they are needed for re-assembling the illuminator.)
6. Slide the conduit connector and mounting plate over the power supply
wires for re-assembly.
7. Connect the black wire to the ‘gold’ screw terminal on the bottom of the
lamp socket.
8. Connect the white wire to the ‘silver’screw terminal on the bottom of
the lamp socket.
9. Re-assemble the lamp socket/conduit connector assembly using the
same two screws with washers inside of the lamp socket. Make sure that
the mounting plate is centered on the lamp socket/conduit connector
assembly.
10. Place the lamp socket/conduit connector assembly back into the
bottom of the illuminator housing and fasten with the two brass screws.
11. Carefully screw the lamp into the socket and close the illuminator
door. Secure by tightening the thumb screw on the side of the housing.
12. Wire the illuminator to the 120 V.* power supply. (*Unless lamp is for
230 V. service) Note that a proper ground wire is recommended.
FG*0 Standard Illuminator - 120V.
Specification:150W/120V
Current Draw: 1.25 Amps