
Operator`s manual


Page 22 CLARKE TECHNOLOGY Image 20 Operator's Manual
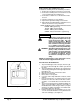
Figure 4
MAINTENANCE
WARNING: Maintenance and repairs must be
done by authorized personnel only.
Keep all fasteners tight. Use only
Clarke Technology parts. Mainte-
nance performed by someone other
than a Clarke Technology distribu-
tor or Clarke Technology replace-
ment parts could void your warranty.
WARNING: Operating a machine that is not com-
pletely or fully assembled could re-
sult in injury or property damage.
Do not operate this machine until it
is completely assembled. Inspect
the machine carefully before oper-
ating.
NOTE: For maintenance of the optional floor tools,
read the manual supplied with the tools.
After Each Use Of The Machine:
1. To prevent damage to valves and jets, flush one gal-
lon of clean water through the solution system and
the tools.
2. To prevent damage to the bristles, raise the brush off
of the floor by placing the brush height adjustment in
the highest slot.
3. Disconnect the power cord from the outlet.
4. Drain the recovery tank.
5. Rinse out the recovery tank.
6. Use a dry cloth to wipe both tanks and tools, inside
and out.
7. Inspect and clean the screen filter at the rear of the
machine. To remove the filter, turn the filter counter-
clockwise. To install the filter, turn the filter clock-
wise.
8. To prevent clogged jets due to alkaline buildup, the
spray system should be flushed at least twice a
month with either a white vinegar solution (one quart
vinegar to one gallon of hot water) or an anti-brown-
ing solution (mixed as directed).
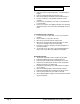
9. Remove any lint on the vacuum intake screen. The
screen is located behind the recovery lid and on the
end of the stand pipe. (See Figure 4)
How To Attach The Auxiliary Floor Tool
To attach the auxiliary floor tool, follow this procedure:
1. Remove the vacuum hose from the recovery tank.
2. Connect the auxiliary floor tool vacuum hose to the
recovery tank and to the auxiliary tool.
3. Connect the solution hose to the machine and to
the tool.
4. Turn the vacuum/accessory switch "I".
5. Operate the optional cleaning tool as normal.
6. When finished cleaning with the optional floor tool,
turn the vacuum/accessory switch "O".
NOTE:
Auxiliary floor tools recommended for this machine:
19209A - RM4 (Upholstery)
19212A - RM9 (9" Floor Wand)
785401 - RM10 (10" Floor Wand)
59220A - Plastic Hand Tool 4" (Upholstery)