
Specifications


PAINT SPRAYING HINTS
WARNING
NEVER attempt to spray unless you are wearing suitable, approved
respiratory and eye protection.
REMEMBER that some modern paints require specialist respiratory
protection...always consult the paint manufacturers instructions.
1. GENERAL PREPARATION
a. Ensure that the area in which you will be spraying is clean and dust free.
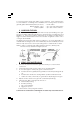
b. Connect spray gun to compressor via suitable flexible hose.
c. With no paint in spray gun, test system for air leaks.
d. Cover adjacent pieces of equipment to prevent overspray. Mask areas
of the article not to be sprayed.
e. Ensure surface to be painted is clean, dry and free from oil and dust.
Check paint manufacturer’s instructions for any special surface
preparation required.
REMEMBER - TIME SPENT PREPARING SAVES TIME SPENT FINISHING
2. PAINT PREPARATION
a. Achieve the correct paint viscosity. This should be done according to
paint manufacturer’s instructions, and will vary according to type of paint.
b. Having mixed the paint thoroughly in a separate container, pour into the
spray gun paint container through a fine filter.
DO NOT OVERFILL SPRAY GUN PAINT CONTAINER - three quarters full is maximum
c. It is usually best to experiment with a couple of practice spray coats on a
piece of material with the same type of surface as the article you wish to
spray, eg. metal for a car body panel, wood for a piece of furniture etc.
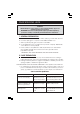
Some common problems:
PROBLEM CAUSE CORRECTION
Paint does not atomise Paint is too thick, air Add thinners
(comes out in blobs) pressure is too low. Increase air pressure (not
above 50 psi, unless specified by paint manuf.
Paint dries before hitting Paint is too thin. Air Add more paint.
surface, leaving it dry pressure is too high Reduce air pressure
with a rough texture
Finish is pitted like Air pressure too high Reduce air pressure,
Orange peel or spray too close to increase distance between
work gun and work.
14