Thank you for purchasing this CLARKE RANGER25 Oil Free Air Compressor, which is designed for hobby and DIY use only. Please read this leaflet thoroughly and carefully follow all instructions. In doing so you will ensure the safety of yourself and that of others around you, and you can look forward to the compressor giving you long and satisfactory service. GUARANTEE This product is guaranteed against faulty manufacture for a period of 12 months from the date of purchase.
SAFETY PRECAUTIONS WARNING As with all machinery, there are certain hazards involved with their operation and use. Exercising respect and caution will considerably lessen the risk of personal injury. However, if normal safety precautions are overlooked, or ignored, personal injury to the operator, or damage to property may result. It is in your own interest to read and pay attention to the following rules: 1.
14. Personal safety products can be obtained from your local dealer. 15. NEVER exert any strain on electrical cables and ensure that air hoses are not tangled or wrapped around machinery etc. 16. When disconnecting air hoses or other equipment from your compressor ALWAYS ensure that the air supply is turned off at the machine outlet and expel all pressurised air from within the machine and other equipment attached to it. 17.
ELECTRICAL CONNECTIONS Connect the mains lead to a standard, 230 Volt (50Hz) electrical supply through an approved 13 amp BS 1363 plug, or a suitably fused isolator switch.
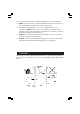
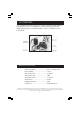
OPERATION (Numbers in brackets refer to fig. 1 below) Before connecting your Ranger25 to the mains supply, check the following:• The mains voltage is 230V. • The ON/OFF control knob (1) is in the OFF (lower) position. • The pressure regulator (2) should be set at its lowest setting, i.e. turned fully anticlockwise, and the tap (3) screwed IN to its closed position.
Turn ON the air supply to your air tool by opening the tap (3), and turn the pressure regulator (2) clockwise so that your chosen setting, shown on the label on top of the regulator knob, is opposite the inverted vee mark on the side of the casting. Note that the pressure gauge registers the pressure in the air receiver only. Check to ensure that there are no air leaks at any of the couplings or in other parts of the system before operating the spray gun or air tool in the normal way.
TROUBLE SHOOTING With considerate use, your CLARKE Air Compressor should provide you with a long and trouble free period of operation. Routine checks should be made on both the electrical supply as well as on all the compressed air lines and connections. If any fault appears, the reason for which is not immediately obvious, we recommend that you contact your local CLARKE Dealer. PROBLEM The compressor stops and will not start again. The compressor does not reach the set pressure and overheats easily.
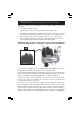
ACCESSORIES Your RANGER 25 Oil Free compressor can be used with a wide range of optional accessories, for inflating tyres, paint spraying, air brushing, stapling, blowing etc. For details, please contact your dealer or your local dealer. 7 SPECIFICATIONS Electrical Supply ............................. 230 V, 1 Phase 50Hz Motor Rating ................................... 1.5 HP Max. Air Pressure ............................. 115 lbf/in2 Max. Air Pressure .............................
PAINT SPRAYING HINTS WARNING NEVER attempt to spray unless you are wearing suitable, approved respiratory and eye protection. REMEMBER that some modern paints require specialist respiratory protection...always consult the paint manufacturers instructions. 1. GENERAL PREPARATION a. Ensure that the area in which you will be spraying is clean and dust free. b. Connect spray gun to compressor via suitable flexible hose. c. With no paint in spray gun, test system for air leaks. d.
For a professional looking finish paint must be thinned. If the manufacturers recommendations on thinning are not available, the following can be used as a general guide: Water based paints (emulsions) - 10-20% water Oil based paints (gloss) - up to 10% white spirit thinners Cellulose paints - up to 50% cellulose thinners 3. HANDLING THE GUN The first requirement for a good resultant finish is the proper handling of the gun.
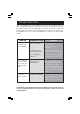
PARTS LIST No. Description Qty Part No. No. Description Qty Part No. 1 Air Reservoir 2 Plug 1 FN168HQ1000V 25 Filter Assembly 2 FN011008000 26 Comp.
PARTS DIAGRAM 14