SILENT AIR COMPRESSOR MODEL NO: SHHHAIR 30 PART NO: 2320860 OPERATION & MAINTENANCE INSTRUCTIONS 0309
INTRODUCTION Thank you for purchasing this CLARKE Silent Air Compressor. Before attempting to use this product, please read this manual thoroughly and follow the instructions carefully. In doing so you will ensure the safety of yourself and that of others around you, and you can look forward to your purchase giving you long and satisfactory service. GUARANTEE This product is guaranteed against faulty manufacture for a period of 12 months from the date of purchase.
SAFETY PRECAUTIONS WARNING: AS WITH ALL MACHINERY, THERE ARE CERTAIN HAZARDS INVOLVED WITH THEIR OPERATION AND USE. EXERCISING RESPECT AND CAUTION WILL CONSIDERABLY LESSEN THE RISK OF PERSONAL INJURY. HOWEVER, IF NORMAL SAFETY PRECAUTIONS ARE OVERLOOKED, OR IGNORED, PERSONAL INJURY TO THE OPERATOR MAY RESULT. 1. Compressed air is dangerous, NEVER direct a jet of air at people or animals, and NEVER discharge compressed air against the skin. 2. DO NOT operate your compressor with any guards removed. 3.
ELECTRICAL CONNECTIONS Connect the mains lead to a standard, 230 Volt (50Hz) electrical supply through an approved 13 amp BS 1363 plug, or a suitably fused isolator switch. WARNING: THIS APPLIANCE MUST BE EARTHED IMPORTANT: The wires in the mains lead are coloured in accordance with the following code: Green & Yellow Blue - Earth Neutral Brown - Live • Connect GREEN & YELLOW cord to terminal marked with a letter “E” or Earth symbol “ ” or coloured GREEN or GREEN & YELLOW.
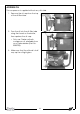
PREPARING FOR USE Before connecting your compressor to the mains supply, check the following:• Firstly, ensure the compressor is on level ground. Do not allow it to run if it is standing on an incline. • Check also that the mains voltage corresponds with that shown on the data label on the side of the compressor. • Ensure that you are not pressing down on the ON/OFF switch. FITTING THE INLET FILTER 1. Remove the cap from the top of the air inlet tube. 2.
ADDING OIL The compressor is supplied without any oil inside. 1. Remove the oil cap from the top of the oil filler tube. 2. Pour the oil into the oil filler tube using the funnel on the bottle, then replace the oil cap. • Only use Clarke synthetic compressor oil, available from your Clarke dealer (Part No. 3050795). 3. Make sure that the oil level is half way up the oil sight glass.
SWITCHING THE AIR COMPRESSOR ON 1. To start the compressor, use your foot to press and hold down the ON/OFF switch - the motor should start immediately. NOTE: If the motor fails to start immediately, the air receiver may already be full of air. Check the tank pressure gauge (shown on the right). If you release air, by opening the air outlet tap, the motor will start automatically once the cut-in pressure is reached. 2. Allow the compressor to run for 1015 seconds, with the air outlet tap, (A) open.
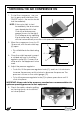
6. With operating pressure set, open the air outlet tap. NOTE: DO NOT exceed the duty cycle for the machine (see Specifications). SHUTTING DOWN THE COMPRESSOR 1. To shut off the compressor, simply Lift your foot off of the ON/OFF switch. 2. Close the outlet tap and trigger the equipment (spray gun, air tool etc.) to release air from the air hose before disconnecting the hose from the machine. DRAINING THE AIR OUTLET FILTER 1.
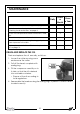
TROUBLESHOOTING PROBLEM PROBABLE CAUSE REMEDY The compressor will not start, or stops and will not start again Bad connections Check the electrical connections Blown fuse Replace fuse Overload cutout switch has tripped Wait 25-20 mins before attempting to restart The compressor does not reach the set pressure and overheats easily Inlet Air Filter is blocked NOTE: It is also possible that you are trying to use more air than the compressor is capable of delivering Renew oil filler/air Filter plug
MAINTENANCE Daily Check the oil level, See “Adding Oil” on page 6. X Drain the water collected in the air outlet filter. See “Draining the air outlet filter” on page 8. X Once Once a a Year Month X Check the compressor for loose connections, wear, etc. X Clean the compressor with a soft cloth. X Check the safety valve pulling the ring gently when there is pressure in the tank. X Total replacement of oil See “Drain and replace the oil” on page 10.
SPECIFICATIONS Max.Pressure 8 Bar Air Displacement 0.88 CFM Receiver Capacity 0.15L Fuse Rating 13 Amps Duty Cycle 50% (15 mins (ON) - 15 mins(OFF)) Part No. 2320860 Dimensions (L x H x W) 200 x 300 x 360 mm Sound Power Level 40dBA Weight 13kg Compressor Oil 500mL Synthetic Oil Oil Part No. 3050795 Please note that the details and specifications contained herein, are correct at the time of going to print.
EXPLODED DIAGRAM & PARTS LIST 12
EXPLODED DIAGRAM & PARTS LIST NO DESCRIPTION C0024 Rubber Oil Plug Ø8 C0052 Head Gasket C0053 Valve Plate E88 With Valve C0054 Cylinder Gasket C0359 Spacer E 59-E 88 C0360 Rubber Grommet E 59 -E 88 C1099 "Oil Level Glass 1/2""" C1236 Kit Valve Plate+Gasket E88 C1769 Kit Holding Band L55-L88 C1778 Kit Terminal Box L88 ( 230V ) C1779 Overload Protector L88 ( 230V ) C1782 Start Relay L88 ( 230V ) C1794 Kit Intake Filter C2247 O' Ring C1906 Motor Protection Ring C0012 Rubber Sup
DECLARATION OF CONFORMITY 14
NOTES 15