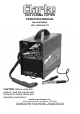
220V PLASMA CUTTER OPERATING MANUAL Model WE6494A UPC: 052249010173 CAUTION: Before using this product, read this manual and follow all its Safety Rules and Operating Instructions. Clarke Power Products Inc. 28740 Glenwood Rd., Perrysburg, OH 43551 Tel # 800-227-9603 or (419) 930-2299 - Fax # 877-354-0740 www.clarkeusa.com - E-mail: customer.service@clarkeusa.
TABLE OF CONTENTS Warranty ..............................................2 Safety Summary ..................................3 Safety Information ..............................3 Shock Hazards ..................................4 Flash Hazards ....................................4 Fire Hazards ......................................5 Plasma Arc Hazards ..........................6 Fume Hazards....................................6 Additional Safety Information ............7 Plasma Cutter Specifications .........
SAFETY SUMMARY TABLE OF CONTENTS Every craftsman respects the tools with which they work. They know that the tools represent years of constantly improved designs and developments. The true craftsman also knows that tools are dangerous if misused or abused. Note: • The following safety alert symbols identify important safety messages in this manual. • When you see one of the symbols shown here, be alert to the possibility of personal injury and carefully read the message that follows.
SHOCK HAZARDS WARNING ELECTRIC SHOCK CAN KILL! To reduce the risk of death or serious injury from shock, read, understand, and follow the following safety instructions. In addition, make certain that anyone else who uses this equipment, or who is a bystander in the operating area understands and follows these safety instructions as well.
• • • • To prevent an arc flash from being created on contact do not allow the uninsulated portion of the cutting torch to touch the ground clamp or grounded work. Provide bystanders with shields or helmets fitted with a #8 shade filter lens. Wear protective clothing. The intense light of the cutting arc can burn the skin in much the same way as the sun, even through light-weight clothing. Wear dark clothing of heavy material.
• • safe floor, preferably concrete or masonry, not tiled, carpeted, or made of any other flammable material. Protect flammable walls, ceilings, and floors with heat resistant covers or shields. Check work area to make sure it is free of sparks, glowing metal or slag, and flames before leaving the work area. • • PLASMA ARC HAZARDS WARNING THE HEAT FROM THE PLASMA ARC CAN CAUSE SERIOUS BURNS. THE FORCE OF THE ARC ADDS GREATLY TO THE BURN HAZARD.
ADDITIONAL SAFETY INFORMATION For additional information concerning welding and cutting safety, refer to the following standards and comply with them as applicable. • • • ANSI Standard Z49.1 – SAFETY IN WELDING AND CUTTING – obtainable from the American Welding Society, 550 NW Le Jeune Road, Miami, FL 33126 Telephone (800) 443-9353, Fax (305) 443-7559 – www.amweld.org or www.aws.org ANSI Standard Z87.
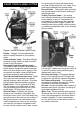
DESCRIPTION PLASMA CUTTER SPECIFICATIONS Your new Plasma Cutter is designed as a clean, distortion free means of cutting through metal, up to 3/16 inch thick.The plasma cutter power generator consists of a transformer, a rectifying unit, and a PC Board. The PC Board controls the unit safeguards and governs the work cycles of the various components which make up the unit, such as the solenoid valve, the power contactor, etc. Table 1 lists your Plasma Cutter specifications. Table 1.
KNOW YOUR PLASMA CUTTER tion at the ground clamp will waste power and heat. Scrape away dirt, rust, scale, oil or paint before attaching the ground clamp. Ground Cable – The ground cable connects the ground clamp to the internal workings of the plasma cutter. Cutting Torch and Cable – The cutting torch controls the delivery of the plasma arc to the material to be cut. Compressed air and electricity is fed through the cable and cutting torch when the trigger is pulled.
PLASMA CUTTER INSTALLATION SITE SELECTION Select a clean, dry location with adequate working space around all components. The power supply is fan cooled by air flow through the front and rear panels. This air flow must not be obstructed. Provide at least two feet of space in front of and behind the unit to allow for free flow of air.
ASSEMBLING THE PLASMA CUTTER The following procedures describe the process required to assemble, install, maintain, and prepare to work with your new plasma cutter. UNPACKING THE PLASMA CUTTER 1. Remove any cartons or bags containing parts/accessories. 2. Open the cartons or bags packed with your plasma cutter and inspect their contents for damage. 3. Lay out the parts and compare them to the packing list in Table 2 to familiarize yourself with the parts and what they are called.
4. Turn on the air supply. Make sure that the air supply pressure is at least 90psi. (90 -120 psi is ideal) 5. Pull out the air pressure regulator knob and set a pressure of 65 psi by turning the knob clockwise. 6. When the pressure on the air regulator gauge is set to 65 psi, lock the knob in position by firmly pushing down on it. (See Figure 4) indicating that the plasma cutter is supplied with power. 4.
before or not, it is important that you become familiar with your new plasma cutter. We strongly recommend that you practice with your new plasma cutter on scrap metal trying different base metals, base metal thicknesses, and cutting positions. By doing this you will gain a feel for how changes in these variables affect the cutting process. Of course, if you have not used a plasma cutter before, you will need to develop proper cutting skills and techniques as well.
WARNING WARNING EXPOSURE TO A PLASMA ARC IS EXTREMELY HARMFUL TO THE EYES AND SKIN! Prolonged exposure to the plasma arc can cause blindness and burns. Never strike an arc or begin cutting until you are adequately protected. Wear flameproof welding gloves, a heavy long sleeved shirt, cuffless trousers, high topped shoes and a welding helmet. 3. With the torch in the starting position pull the trigger and release, and then immediately pull the trigger again and hold.
MAINTENANCE This plasma cutter has been engineered to give many years of trouble free service providing that a few very simple steps are taken to properly maintain it. 1. Keep the unit clean and free of dust. Periodically use dry, compressed air to clean dust deposits from face plate and vents 2. Check the water trap regularly. Drain condensation before every use. 3. Keep the torch components free of slag at all times. A clogged nozzle or electrode will not allow proper airflow and may damage the torch. 4.
REPLACING THE ELECTRODE If your arc begins to lose power (i.e., will not cut through workpiece any longer), or the cutting arc becomes difficult to maintain, it may be necessary to change the electrode. A quick visual inspection will reveal whether an electrode is worn. A worn electrode is characterized by a crater shaped tip. Once this crater reaches 1.5 - 2 millimeters in depth, replacement is necessary.
TROUBLESHOOTING 17
PLASMA CUTTER MODEL WE6494A WIRING DIAGRAM 18
PLASMA CUTTER MODEL WE6494A PARTS LIST 19
PLASMA CUTTER MODEL WE6494A PARTS DIAGRAM 20
PLASMA CUTTER MODEL WE6494A TORCH PARTS LIST 21
NOTES:
NOTES:
220V PLASMA CUTTER OPERATING MANUAL Model WE6494A WE6494A-M001 1204