
Instruction manual


184 JUPITER CM-4400 Control Module Installation and Operating Manual
Section 5 — The Configurator Application
The Control Panel Sequence Set
A sequence is a switch of one or more sources to one or more destinations.
AccuSwitch is limited to 25 sequences if legacy boards are defined (For
example, VM, SI, SB, and Saturn) or 100 sequences if only AccuSwitch
boards are defined.
Sequences are stored as sequence sets; t
hese sets can be made available to
some or all control panels. Sequences can include outputs not otherwise
available to a panel. For example, when the outputs are not entered on the
CP Output Set assigned to the panel.
Data matrixes can be part of sequences when used in c
onjunction with the
DM 400 Off Time feature. No more than 25 DM 400 safe off time switches
should be saved per sequence. Safe off time in sequences must be used with
care as specifying too short of a safe off time may result in the switch occur-
ring too soon; this could result in sw
itches occurring out of sequence.
Great care needs to be used to ensure that the switches defined in CP
Sequence Sets involving Data
Routers do not conflict. Verify that each
sequence uses all defined data router inputs and outputs just once,
including the implied reverse switches. Failure to do this will result in
unintended switches, and possibly switching a single input to multiple
outputs at the same time.
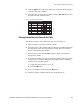
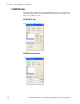
Defining a Sequence Set
On the top of the Jupiter Configurator window, ensure the configuration
set that you want to change is selected for editing. For steps activating the
Control Panel Set dialog, see Creating a CP Set on page 171.
Follow these steps to define a sequence:
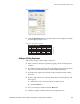
1. Select the Sequence radio button in the lower-right of the Type of Set
area of the dialog. The names of any previously created Sequence set
will then appear in the Sequence Sets: window.
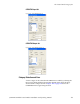
2. Enter an eight character name for the Sequence set in the Name field. Do
NOT use the same name for different CP sets. Also, do not name a CP
set with a name used by the system for a Device Type.
3. Select the appropriate option from the CP Type drop-down list.
4. Click the Apply button the new sequence will appear in the Sequence
Sets window (Figure 131 on page 185).
Note When both AccuSwitch and legacy boards are defined in the same system, a
sequence that is used for an AccuSwitch controlled L-S-LCD or GUI panel
may not be used by a legacy control panel (for example, MPK, CP3000,
CP3800).