
SSP-60 Pre-amplifier/Surround Sound Processor Owner's Manual


12
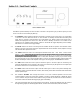
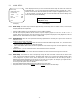
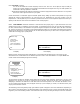
Section 4.0 - The SSP-60 Remote Control
The keys on the SSP-60 remote control are laid out in an easy to use pattern. The keys have been grouped according to
their use. The first three rows, DIM through TRIM /\, are a set of ten buttons with a variety of relatively unrelated tasks. The
second section is made up of three rows beginning with EXIT and ending with the single key \/. These seven keys are used
during the Setup of the surround processor. The five bottom rows, beginning with AV1 and ending with the VOLUME /\
key are the keys you will use most often. They include the keys used to directly access a Source, the MUTE and the
VOLUME up and down keys, as well as ZONE. The following is a list of the Remote Control Keys and their functions.
DIM Press
this key once to dim the display. A second press returns the display to its
normal brightness. NOTE: The dim setting does not reset when the unit i
s put in
STANDBY, though it will reset to bright if the rear on/off switch is cycled, or if the AC
supply is interrupted.
STATUS Pressing the STATUS key causes the SSP-
60 to display on the TV screen the
setup for the currently selected Source. The displa
yed information includes the name of
the input, the decode mode, the location and type of audio and video input selected.
NOTE: Similar information is always shown in the display window of the SSP-60.
Status will not be displayed if OSD is set to “OFF”.
STANDBY toggles the SSP-60 from “standby” to “operate”
and vice versa. There is an
on/off switch on the rear of the unit, which turns the AC on and off. When in “Standby”
the LED above the button glows green, when in “Operate” mode the LED is out and th
e
display is lit. Please note that if the remote zone is enabled, the display will read “Zone
B On” when the unit is in Standby. See section 7.0 for details on the remote
zone. The
“Standby” button will also activate or de-activate the trigger
s depending on their
settings. See section 5.5 for details on trigger settings.
MODE Press the
Mode key to scroll through all the available Modes of operation. The
available Modes depend on the audio input signal type. Appendix B shows all th
e
available Modes (subject to change) and indicates which speakers are active.
CAL Press the CAL key once you are in the “level setup”
menu to initiate the pink noise
test signal. This function is for manual calibration only. For auto calibration, see s
ection
5.2.5 for details.
COMP Press
this key to reduce the dynamic range of the audio. (The unit’s display will
show LateN ON when enabled and LateN OFF when disabled. The Screen will show
LateNight ON or LateNight OFF). Utilizing a process called dynami
c compression, the
processor can prevent loud passages from getting too much louder than the normal
passages. Turning on this feature allows you to enjoy your movie or other program
when you don’t want to disturb neighbors or family. Please note that this
function is
only available in Dolby Digital.
THX Press this key to enable the THX function (THX Music or THX AdvCine). To
disable THX press the Mode key. For more advanced THX settings, see section 5.6 THX
Audio Setup