Owner’s Manual Delta PRE Stereo Preamp/Processor
Contents Welcome to the Classé family...........................................................................4 Exceptional Design Features.............................................................................5 versatile connectivity..................................................................................5 superior performance.................................................................................5 clean, dedicated power.............................................................
Tone Control...................................................................................................32 Balance...........................................................................................................32 Configurations.................................................................................................32 Mono..............................................................................................................33 Status............................................
Welcome to the Classé family Congratulations on your purchase of the Classé Delta PRE, a stereo preamp/ processor with reference-quality performance. It is the result of many years of design experience, and we are sure that you will enjoy it for many years to come. Classé values its relationships with our customers and intends on supplying the highest level of support along with our product.
Exceptional Design Features The Delta PRE is a stereo preamp/processor, designed for music lovers who demand the ultimate in sonic performance from their audio system. Its connectivity and processing power accommodate the ever increasing array of music sources, allowing them to be accessed and enjoyed without compromise. versatile connectivity The Delta PRE is a stereo preamp/processor with both balanced and singleended output connections.
Unpacking and Placement We have taken all precautions, and made every effort to make the Delta PRE simple and straightforward to install and use. Still, we recommend that you take a few minutes to review this manual. Even if you are having the preamp/ processor professionally installed, you will want to know how to efficiently operate it to its potential. The Delta PRE menu system includes features that allow a great deal of finetuning.
warm-up/break-in period Your new Classé preamp/processor delivers outstanding performance immediately. However, you can expect to hear subtle improvements as it reaches normal operating temperatures and breaks-in. In our experience, you can expect the greatest changes within the first 72 hours. After initial break-in, you’ll enjoy consistent performance levels for years to come.
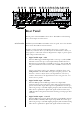
1 2 3 4 5 6 7 Delta PRE Delta PRE Front Panel The front panel of the Delta PRE is shown above. The numbers in the drawing refer to the descriptions that follow. 1 Standby/On Button and Status Indicator LED Pressing the Standby button puts the Delta PRE into standby mode – a low-power state which leaves the preamp/processor and outputs inactive but still allows the unit to respond to system commands via any of the supported control protocols (IR input, LAN, CAN-Bus or RS-232)*.
4 IR Window The location of the IR (infrared) receiver for the remote control is behind this window. In most cases, there must be a clear path between the IR window and the remote control in order for the Delta PRE to acknowledge the remote control commands. If the IR window is not in view, for example if the unit is placed in a cabinet or closet, then the rear panel IR input can be utilized for remote control.
12 15 16 1 13 2 4 10 11 7 8 3 17 6 9 5 14 18 DIGITAL IN 100-120~ T2AE 250V 220-240~ T1.25AH 250V AES/EBU USB ETHERNET COAX1 COAX2 OPT1 COAX3 OPT2 OPT3 CAN BUS CAUTION! TO REDUCE THE RISK OF ELECTRIC SHOCK, GROUNDING OF THE CENTRE PIN OF THIS PLUG MUST BE MAINTAINED AUX 2 2 IN 1 IR ATTENTION! POUR RÉDUIRE LE RISQUE DE CHOC ÉLECTRIQUE LA FICHE CENTRALE DE LA PRISE DOIT ÊTRE BRANCHÉE POUR MAINTENIR LA MISE À LA TERRE SUB OUT RS-232 Conforms to ANSI/UL Std.60065 Cert. to CAN/CSA Std.
75Ω impedance rating. Your Classé dealer can help you with proper cable selections. 4 Digital Audio Inputs - Optical The Delta PRE supports three digital audio inputs, with optical TOSlink connectors labeled OPT1 to OPT3. These inputs accept PCM data streams up to 32-bits long and up to 192 kHz sampling frequency*. We recommend using cables that are optimized for digital audio signal transfer. Your Classé dealer can help you with proper cable selections.
The list of available IR command codes can also be used in macros for sophisticated remote control systems, facilitating the control of the Delta PRE in the larger context of the complete system. 8 IR Output Use the IR output to pass IR commands from an external IR transmitter through the Delta PRE to another component, when necessary. The output uses a mono mini-jack (3.5mm phono) with the same properties as the diagram in the previous section.
NOTE: The Balanced (XLR) Output pin assignments adhere to the AES (Audio Engineering Society) “Pin 2 = hot” standard. The XLR male outputs carry the following pin assignments: Pin 1: Signal ground Pin 2: Signal + (non-inverting) Pin 3: Signal – (inverting) Connector ground lug: chassis ground Refer to the operating manuals of your balanced-input power amplifiers to verify that the pin assignments of their input connectors adhere to this standard (Classé power amplifiers are compliant).
The Remote Control Your Delta PRE Stereo Preamp/Processor includes a versatile IR remote control for both the Preamp/Processor itself and several aspects of the rest of a Classébased system. The buttons are arranged in logical groups according to their functions. The remote control of the Delta PRE is shown on the left. The numbers in the drawing refer to the descriptions that follow.
5 1 • MENU accesses the main screen for the menu system, in the same fashion as the front panel Menu button. • HOME returns the touchscreen display to the Home page. The HOME button essentially acts like a “back to start” button – no matter how deeply you’ve navigated into the menu system, a single button push returns you to the front page.
Initial Setup Your Delta PRE Stereo Preamp/Processor is delivered with default factory settings to facilitate initial setup. But we highly recommend that you work with your Classé dealer for the final setup of the preamp/processor. Your dealer’s knowledge and experience with Classé products will ensure that your audio system is optimized for your listening space. However, if you can’t wait to get started, this section is designed to assist you in setting up and becoming familiar with the Delta PRE hardware.
can also provide useful suggestions for what source components you should add to your system and guidance in setting them up. Make sure you keep a detailed record of the rear panel connectors that you used while connecting the source components! You’ll need to know what connector(s) each source is attached to when you enter the setup menus. An Installation Worksheet is included at the end of this manual to assist you.
When connecting a cable, make sure the cable has a good connection and is firmly attached to the rear panel connectors on both the amplifier and the Delta PRE. The Delta PRE also provides two Auxiliary analog audio outputs. See the section on Configuration Setup for more details about the Auxiliary outputs. If used, connect the AUX output(s) to its corresponding amplifier(s) or subwoofer. Step 5 Connect the loudspeakers to the amplifiers.
Using the Delta PRE The Delta PRE’s versatile touchscreen LCD supports your day-to-day operations and provides access to a flexible menu system for controls and setup functions that aren’t accessed as often. This section of the owner’s manual outlines the use of the touchscreen in routine operation of the system. When you bring the Delta PRE out of Standby mode, the touchscreen displays the Home page of the menu system, as shown below.
The Delta PRE has up to 18 selectable source buttons which are all interchangeable: Any source may be assigned to any button location and associated with any connector. Touch any source button on the touchscreen to select it as the current source. The selected source button is shaded. If the source you want to choose is not on this screen (and you have more than nine source buttons enabled), press the button to return to the button for the next page of sources. Or, press the previous page.
button which uses the At the top right of the menu pages you may find a arrow icon when additional menu options are available, and/or a Home button for returning to the Home page. When on the main Menu page, pressing the Menu button returns to the Home page. If you are on a page within the Menu System, pressing the Menu button returns you to the main Menu page. When you navigate beyond the main Menu page, a return or back button using the icon appears on the upper left corner of the page.
Source Setup Each of the 18 source buttons supported by your Delta PRE can be customized in several ways to enhance system performance and/or to simplify operation. The source select page is dynamic in that it shows up to nine sources on a single page. If six or fewer are enabled, then the page shows six somewhat larger buttons and if three or fewer are enabled, it shows only three large buttons. Press the button for the source or button location you want to set up.
the source name, press Enter on the keyboard to save the change. Important! Note: While the Phono R/L RCA connectors are dedicated phono inputs, the R2/L2 XLR connectors may serve either line level (the default setting) or phono sources. Because a line level source might be connected to these XLR inputs after they’ve been set to phono, there is the possibility that an extremely loud signal could pass to your amp/speakers.
Phono Setup The Delta PRE supports up to two phono inputs, one through the RCA R/L connectors and a second through the XLR R2/L2 connectors. Each may have its own gain and loading, adjusted from the touchscreen. Go to System Setup, Phono Setup and choose the phono input you want to configure, first. Select the desired gain. Custom loading options appear in the listbox on the right-hand side of the page. You can evaluate a chosen loading option, then easily select another for quick, on-the-fly comparisons.
The remote control F1 to F8 buttons correspond to the Function Keys displayed on the touchscreen. Select the Function Key that you would like to assign, then scroll through the list and choose the specific function you want that Fkey to perform. Important note on Fkey use All Classé Delta and CT series remote controls provide at least four Fkeys.
Max Volume The Max Volume page allows you to establish a maximum volume setting for your system. This scale runs from -93.00 to +14.00, with +14.00 dB indicating that you do not want any artificial limit placed on the maximum gain your Delta PRE can provide. This setting is interactive. It is easiest to play the system at increasing levels until you reach the volume which you want to use as the maximum for the system. Using the volume control, enter that value on the Max Volume page.
Configuration Setup The Configuration Setup page allows you to define up to six different speaker configurations. Touch the button for the specific configuration you want to set up to open its configuration setup menu. The page contains buttons for naming the configuration and enabling balanced (XLR) and/or single-ended (RCA) outputs for Main, Aux and Subwoofer channels. Choosing a subwoofer output causes a Bass Management button to appear. The same menu is used to set up each configuration.
Auxiliary Channels The Delta PRE has two auxiliary channels that can be utilized for bi-amping the L&R speakers. Alternatively, Aux 1 may be used in conjunction with the Sub output to provide a second mono subwoofer or stereo subwoofer configuration. When configured for Stereo Subs, the Sub output channel serves as the Right Channel Sub and the Aux 1 output channel serves as the Left Channel Sub.
If you prefer the display of the Delta PRE to remain on whenever not in Standby mode, select the Never timeout option. The lamp in the touchscreen display is designed for harsh automotive environments and will give you many years of reliable operation. NOTE: setting the brightness to a lower setting does not increase the life of the lamp. Network Setup The Network Setup page displays the IP address of the Delta PRE and the Network status.
In order to define the PEQ filters, select EQ Setup from the System Setup menu, Check the box to enable the EQ. Choose which channel you wish to adjust, select a band and enable its filter, then tune it with the appropriate center frequency, gain, and Q. You do not need to have all or even any filters enabled for every channel. The installer need only make the adjustments to the channels necessary to correct for the room’s interaction.
way the trigger operates can solve installation-specific problems that otherwise require external devices that add to both the cost and complexity of your system. The triggers can be associated with the Standby mode, a specific source or a configuration. To use the Inverse Logic option, simply check the Inverse Logic box on the Trigger Setup page. For more information on the potential use of DC triggers, we recommend you speak with your authorized Classé dealer.
Tone Control Setting up the Tone Control involves choosing high and low frequency inflection points, and relative cut or boost for them. The factory default settings create what is called a tilt control, which tilts the tonal balance either toward more high and less low frequency for a leaner, crisper sound, or the opposite direction toward a warmer, fuller sound. NOTE: To change these parameters, press MENU, then System Setup, Tone Control Setup.
specific sources, they may also be called from the Main Menu page or the remote control. Pressing the Configurations button in the Main Menu or choosing CONFIG SELECT on the remote opens the Configurations page. Choose the configuration you wish to employ. To customize configurations, see the Configuration Setup description in the System Setup section. Mono Pressing the Mono button combines L & R channels, resulting in monaural output on all channels (including Auxiliary and subwoofer channels).
CAN-Bus CAN-Bus Classé’s Controller Area Network, or CAN-Bus, allows communication and control between similarly featured Classé components. When the Delta PRE is connected with other CAN-Bus-equipped Classé components, the different elements in the system are in constant communication, creating a “global” network that delivers system wide status information and shared operational features, all through the preamp/processor’s touchscreen display.
Selecting a unit on the CAN-Bus devices screen identifies it as the target unit. The front panel LED(s) or meter light of the target unit will start flashing (unless you choose the unit that you are using to access CAN-Bus). Once you have chosen the target unit, the touch screen will list the CAN-Bus features available to it. Some CAN-Bus features are shared by all models, some are specific to individual models.
a particular unit to be excluded from Global Dim, deselect Global Dim for that unit. Other status The Other Status screen displays information about the target unit’s internal temperature sensors. Readings for Heatsink 1 & 2 are displayed in degrees Celsius. Note: This feature is only available when the target amplifier is in operate mode. name You can set the name which will appear next to the unit model name and facilitate the identification of units in large systems.
Apple AirPlay The Delta PRE is AirPlay certified; it can render audio content from Apple iPhone, iPad or iPod touch devices or from iTunes on a Mac or PC. To play content on the Delta PRE: 1. Connect your device to the same Network as the Delta PRE. 2. Open iTunes or the iPod App on your iPhone, iPad or iPod touch. and select the Delta PRE from the 3. Locate and tap the AirPlay icon menu (if attempting to AirPlay video content from Safari or Videos, begin playback first). 4. Press play.
Using an iOS device for AirPlay works the same way. Choose the Music App icon, tap the AirPlay icon, select the Delta PRE from the list of AirPlay speakers, choose your music and play. Volume is likewise adjusted in the Delta PRE by using the volume control on the device. DLNA If you have chosen a Media Player other than iTunes and/or wish to stream higher bit-rate files (up to 384 kHz PCM or DSD 256), the Network connection will use the DLNA protocol.
Troubleshooting Always refer any service problems to your Classé dealer. However, if you run into a problem, we recommend referring to this section first as sometimes an error is not a malfunctioning product, but simply an oversight in the proper setup or use of the component. This section provides suggested solutions to potential problems. If none of these solutions work, please consult your Classé dealer for assistance. There are no user-serviceable parts inside the Delta PRE.
adjacent to the AC cord inlet. If the fuse is blown (best verified using an ohm meter), contact your qualified Classé dealer for replacement fuse based on the unit configuration below. Mains voltage: Fuse type: Rating: 100-120VAC IEC time lag, low breaking capacity 2AL 250V Mains voltage: Fuse type: Rating: 200-240VAC IEC time lag, high breaking capacity 1.
have a natural tendency to pick up noise even when shielded. P If any source components are connected to cable TV, try disconnecting the cable television line from the source component. If the hum goes away, you need an isolation device between your cable TV converter and the source component. Your Classé dealer can help you obtain one of these inexpensive devices.
Care & Maintenance To remove dust from the cabinet of your Delta PRE, use a feather duster or a lint-free soft cloth. To remove dirt and fingerprints, we recommend using a microfibre cloth and an anti-static spray such as lens or display cleaner applied to the cloth, not directly onto the Delta PRE. Dampen the cloth with cleaner fluid first and then lightly clean the surface of the Delta PRE with the cloth. Do not use excessive amounts of cleaner that might drip off the cloth and into the Delta PRE.
Specifications All specifications are accurate at the time of printing. Classé reserves the right to make improvements without notice.
Continued n Crosstalk (one channel undriven - BAL/SE) n Channel Matching (Left to Right) -143dB at 100Hz -140dB at 1kHz -124dB at 10kHz +/- 0.03dB DAC (Digital inputs) n Frequency response (-3dB, sweep Fs=192kHz) n Harmonic Distortion (measurement bandwidth: 90kHz) n Dynamic range (-60dBFS, Fs=44.1kHz, A-wtd) n Signal-to-noise ratio (A-wtd, 22kHz BW, ref 4Vrms) n Jitter (Coaxial in, Fs=44.1kHz) 5Hz - 90kHz <0.
Continued Format n USB Front 44.1k, 48k, 88.2k, 96k (iOS specific) (Charging capability : 2.1A) n USB Back 32k, 44.1k, 48k, 88.2k, 96k, 176.4k, 192k, 352.8k, 384k, DSD64, DSD128, DSD256 (Native - requires Windows driver), DSD64, DSD128 (DoP) n SPDIF 32k, 44.1k, 48k, 88.2k, 96k, 176.
Made for: n iPod touch (5th generation) n iPod touch (4th generation) n iPod touch (3rd generation) n iPod touch (2nd generation) n iPod touch (1st generation) n iPod classic Made for: n iPhone Xr n iPhone Xs n iPhone 8 n iPhone 7 Plus n iPhone 7 n iPhone 6S n iPhone 6 Made for: n iPad mini (Retina) n iPad Air n iPad (4th generation) n iPad (3rd generation) n n n n n n n n n n n n n n n n iPod nano (7th generation) iPod nano (6th generation) iPod nano (5th generation) iPod nano (4th generation) iPod na
Dimensions 0.75" (20mm) 16.5" (419mm) 4" (102mm) 16" (406mm) 17.5" (445mm) 4.75" (121mm) 17.
Installation Worksheet Source:.______________________________________________________________ Audio Connector:______________________________________________________ Input:_______________________________________________________________ Source:.______________________________________________________________ Audio Connector:______________________________________________________ Input:_______________________________________________________________ Source:.
51
Classé 380, rue McArthur Saint-Laurent, Québec H4T 1X8 CANADA Classé offers International Service and Support for its Products. Please visit our Website to find up-to-date Contact Information. https://classeaudio.com Copyright © 2019 Sound United, LLC V 1.