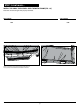
ITEM/ARTICLE/ARTÍCULO: 52-065-010404-00 SNOW THROWER SHIELD English (page 01) Français (page 15) Español (página 29) WARNING READ YOUR INSTRUCTIONS COMPLETELY AND CAREFULLY BEFORE ATTEMPTING TO SET UP YOUR NEW SNOWTHROWER SHIELD OR OPERATE YOUR SNOWTHROWER WITH YOUR SHIELD INSTALLED. Questions, problems, missing parts? Before returning to your retailer, call Classic Accessories customer service at 1-800-854-2315, 8 a.m. - 4 p.m., PST, Monday-Friday. Email: customerservice@classicaccessories.
TABLE OF CONTENTS Safety Information.................................................................................................................................................................................... 2 Package Contents List (Parts and Hardware)............................................................................................................................................. 3 Tools Needed...............................................................................................
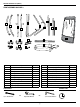
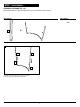
Package contents LIST (PARTS) START ASSEMBLY ON PAGE 4 I E A B J F C G K D O M Part H S Q T P N L R Description Quantity Part Description Quantity A Left Base Bar 1 K Short Hoop Support Pole 1 B Right Base Bar 1 L Short Hoop Support Pole 1 C Mounting Post Lower, Left 1 M Small Loop Clamp 2 D Mounting Post Lower, Right 1 N Hex Bolt - short 2 E Mounting Post Center 2 O Large Loop Clamp 2 F Mounting Bar Top, Left 1 P Small Loop Clamp - coated 2 G M
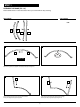
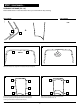
STEP 1 ASSEMBLE THE FRAME (Fig. 1-9) Note: Assemble frame on a clean flat surface next to your snow thrower for easy mounting. Parts NEEDED TOOLS NEEDED NONE A B C D 1 2 A B Inside view Slide mounting posts [A, B] together until spring button pops through hole. 3 4 C C Insert mounting post lower left [C] onto the end of left base bar [A] until spring button pops through hole. Insert mounting post lower right [D] onto the end of right base bar [B] until spring button pops through hole.
STEP 1 continued... ASSEMBLE THE FRAME (Fig. 1-9) Note: Assemble frame on a clean flat surface next to your snow thrower for easy mounting. Parts NEEDED TOOLS NEEDED NONE + E 5 E E C D Insert both mounting post upper [E] onto upright studs on lower mounting [C, D] until spring button pops through hole.
STEP 1 continued... ASSEMBLE THE FRAME (Fig. 1-9) Note: Assemble frame on a clean flat surface next to your snow thrower for easy mounting. Parts NEEDED TOOLS NEEDED NONE F G + 6 7 G F Slide top mounting bars [F, G] together until spring button pops through hole. 8 9 F F G E G E C C D Attach top mounting bar assembly [F, G] to the top of mounting posts [E] until spring button pops through holes. Make sure the stub tubes are facing the same direction as the stub tubes on [C, D].
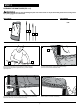
STEP 2 ASSEMBLE THE front SHIELD (Fig. 1-4) WARNING: Use care when assembling the poles. Poles under tension can slip out of the metal/plastic sleeves causing serious injury. Safety goggles are recommended. Parts NEEDED TOOLS NEEDED NONE H I J K L 1 2 H I J Insert one long hoop pole [I] into [J] to assemble the lower support rod. Repeat with remaining short hoop poles [K] into [L], to make a separate upper support rod. Lay out the shield shell [H].
STEP 3 Install the fabric Shield SHELL ONTO the metal frame (Fig. 1-6) Note: Fabric shell will be tight when properly assembled. Parts NEEDED TOOLS NEEDED NONE + 1 2 G C H I F D C Insert one end of the longer flexible [I,J] support rod into the lower stub tube connecting [C] to [D]. Firmly insert the support pole completely into the stub tube. Repeat step and insert one end of the shorter flexible [K,L] support rod into the upper stub tube connecting [F] to [G].
STEP 3 continued... Install the fabric Shield SHELL ONTO the metal frame (Fig. 1-6) Note: Fabric shell will be tight when properly assembled. Parts NEEDED TOOLS NEEDED NONE NONE 5 6 Tighten up the skin by closing around the support bars all of the rip-n-grip strips on both sides and at the bottom of the frame.
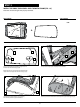
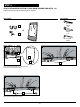
STEP 4 Attach the MOUNTING SYSTEM TO your SNOW THROWER Shield (Fig. 1-3) Note: Exact positioning may vary depending on your machine. Parts NEEDED TOOLS NEEDED 1/2 in. Box Wrench M OR + Adjustable Wrench N OR 1/2 in. Socket Wrench 1 2 M A A B M Slide on the small loop clamp [M] onto the two open spaces on the lower part of the shield frame [A,B]. 3 N Secure small loop clamp [M] with hex bolt [N].
STEP 5 Attach the MOUNTING SYSTEM TO your SNOW THROWER FRAME (Fig. 1-2) Note: Exact positioning may vary depending on your machine. Note: In some instances, it may be necessary to mount the loop clamps [L] or [M] above the handlebar crossbar support. This will help the assembled shield sit higher for added protection. Parts NEEDED TOOLS NEEDED NONE Q O + R P S 1 2 O O Note: You will only need one set of either [O] or [P] for this step.
STEP 6 - for lighter weight machines Attach the counter balance bag TO your SNOW THROWER (Fig. 1-5) Note: Exact positioning may vary depending on your machine. Exact weight may vary depending on your machine. Parts NEEDED TOOLS NEEDED NONE T + LBS + Weight Not Included 1 2 3 T Fill the counter balance bag [T] with extra weight. Weight Options: Sand, Kitty litter, etc. Roll the top of the counter balance bag [T] down.
STEP 7 Mounting THE FRAME (Fig. 1-4) Parts NEEDED TOOLS NEEDED Q 1/2 in. Box Wrench OR R + + Adjustable Wrench OR 1/2 in. Socket Wrench 1 2 M O Q Lift your pre-assembled shield and align the two loop clamps. Insert Hex bolt [Q] through both loop clamps [M] & [O]. Repeat on the other side. 3 4 P Q Tighten down the Hex nut [R]. Tighten down until the shield sits at the preferred angle.
CARE AND MAINTENANCE STORAGE Store in a clean dry place. Never store a wet shield in an enclosed area as it can develop mildew. Avoid folding the plastic windows of the cover for long periods. BOLTS Check all bolts before each use to see that they are tight. If one or more bolts come loose, failure of shield parts may occur. WINDOWS Don't clean the plastic windows when they are dry—you can scratch them. Hose them with water and rub them with your bare hands. Liquid soap may be used.