
Instructions / Assembly


7
Hardware Used
Fig. 9
H
DD
DD
Shelf Pin x 8
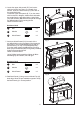
9. TO ADJUST HINGES
To adjust door forward or backward change
keyhole slot position. (As Shown In Diagram a)
To adjust door right or left loosen/tighten screw.
(As Shown In Diagram b)
To adjust door up or down adjust bracket height.
(As Shown In Diagram c)
Choose desired height of Glass Shelf (H) and place
the four Shelf Pin (DD) into same height shelf holes
inside side panels. Insert Glass Shelf (H), allow
Glass Shelf (H) to rest on the Shelf Pin (DD).
10. To adjust door forward or backward:
Loosen screw A change keyhole slot position.
To adjust door right or left:
Turn screw B counter-clockwise to move door
right, clockwise to move door left.
To adjust door up or down:
Loosen screw C, adjust bracket height.
C
Fig. 10
A
B
Fig. 11
Completed
Unit
Electric
Fireplace Insert
Install
Insert
From
Back
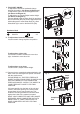
11. Remove the two mounting brackets attached to the
back of the Left and Right Front panels. Set aside
with the wood screws.
PLEASE READ ALL “ELECTRIC FIREPLACE
INSERT” INSTRUCTIONS PRIOR TO INSTALLING
ELECTRIC INSERT IN YOUR COMPLETED
FIREPLACE MANTEL. INSTALL THE INSERT IN
YOUR FIREPLACE CLOSE TO ITS FINAL
POSITION.
Lift insert carefully into the back of the unit and
center in the insert opening. Do not drag insert
across Base (A) as it may scratch your unit.
Install the mounting brackets to hold insert fl ush
against the inside of the mantel front panel.
MOVE YOUR COMPLETED UNIT ONLY SHORT
DISTANCES. MOVE COMPLETED UNIT WITH
GREAT CARE. IT TAKES TWO PEOPLE TO
MOVE COMPLETED UNIT INTO ITS FINAL
POSITION.