
Operation Manual


BASIC OPERATIONS
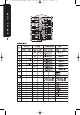
3) PANEL RELEASE BUTTON (REL)
Press this button to remove the control panel.
1) POWER ON/OFF BUTTON
Long press the POWER button or Short Press any other button on the front of the unit (except the Open/Eject) to
turn On the unit. Long press the POWER button to turn Off the unit.
1) MUTE BUTTON
Short Press the MUTE button to mute the audio output, and “Mute” will appear on the display. Press the mute button
again to restore the audio output to the previous level.
Please refer to the related description in “Audio Operation of Sub-woofer” for details operation of the
Subwoofer control !
The Subwoofer Level and Low Pass Filter control will only appear in the Audio Menu only if the Subwoofer
function is currently activated 'On”.
8) SUB-WOOFER (SUB-W)
Long Press the SUB-W button to activate the Sub-woofer function On, and “Sub-woofer” will appear on the LCD
display for 3 seconds. press the SUB-W button again to turn off the Sub-woofer function.
10) iX-BASS BUTTON (iX-Bass )
Long Press the iX-Bass button to turn on the IX-Bass function, and “iX-Bass” will appear in the LCD display for 3
seconds. Press the iX-Bass button again to turn off the IX-Bass function
Please refer to the related description in “Audio Operation of iX-Bass” for details operation of iX-Bass
control
The IX-Bass Boost Level control will only appear in the Audio Menu only if the iX-Bass function is currently
activated 'On”.
5) MODE BUTTON (MODE)
Short Press the MODE button to select a different mode of operation as indicated on the display panel.Available modes
include Tuner, DVD, Card(SD/MMC Card),AV IN-1 and AV IN -2
6) ENCODER VOLUME BUTTON
To increase the volume, rotate the volume control knob clockwise.To decrease the volume, rotate the volume control
knob counter clockwise.When the volume is adjusted, the volume level is shown on the display panel as a number
ranging from 00 (lowest) to 46 (highest).
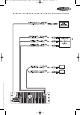
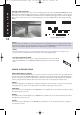
FRONT PANEL A/V IN JACK
The unit is allowed to connect with external Audio / Video system such
like Digital Camera or Game Console.You can connect the external A/V
system through the A/V in jack on front panel.After connect with
external A/V system, pressing mode to “A/V In” to enjoy this external
A/V system on this unit.
The unit only supports the 3.5mm A/V Jack Pin Assignment shown as the diagram.
The unit supports A/V out thrue the A/V Jack on front panel. For more details of
operation, please refer to “Menu operation-AV Jack”.
9
MCD 773 manual-EN-werkdoc.qxd 22-10-2007 08:53 Pagina 9