User Manual Nord Electro 4 HP Nord Electro 4 SW OS Version 1.1x Part No.
The lightning flash with the arrowhead symbol within an equilateral triangle is intended to alert the user to the presence of uninsulated voltage within the products enclosure that may be of sufficient magnitude to constitute a risk of electric shock to persons.
| Nord Electro 4 HP/SW User Manual Rotary Menu 1 Introduction 5 Nord Electro 4 HP/SW Reference Thank you! . . . . . . . . . . . . . . . . . . . . . About this manual . . . . . . . . . . . . . Disclaimer . . . . . . . . . . . . . . . . . . . . . . OS and internal memory . . . . . . . Factory presets . . . . . . . . . . . . . . . . 4 OS upgrades . . . . . . . . . . . . . . . . . . .
| Nord Electro 4 HP/SW User Manual OS v1.1x 1 Introduction Thank you! OS and internal memory We’d first like to thank you for purchasing the Nord Electro 4 HP/SW. Our goal when we developed the Nord Electro instruments was to create the best emulations of traditional electromechanical keyboard instruments on the market, and to make these instruments compact and lightweight.
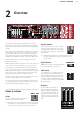
Chapter 2 Overview 2 Overview The front panel of the Nord Electro 4 HP/SW has four main areas, Organ, Piano, Program and Effects. We’ll familiarize ourselves briefly with the panel here and describe the functions in detail in the following chapters. On the left part of the panel is the Master Level knob, the organ model selector and the Rotary Speed section. The Master level controls the entire instruments output level at the two output jacks and the headphone output.
| Nord Electro 4 HP/SW User Manual OS v1.1x 3 CONTROL PEDAL Connections ROTOR PEDAL SUSTAIN PEDAL USB MIDI OUT MIDI IN MONITOR IN RIGHT OUT LEFT OUT MONO HEADPHONES Audio connections MIDI Connections Headphones MIDI Out This is where you connect a ¼" stereo connector from a pair of headphones. MIDI connection used for sending keyboard and panel generated MIDI data from the Nord Electro 4 HP/SW to other equipment such as sound modules or computers.
Chapter 3 Connections Pedal Connections Sustain Pedal ¼" connector for a switch type pedal. When a connected pedal is operated, the notes you play will be sustained. Rotor Pedal ¼" connector for a switch type pedal. When a connected pedal is operated, the rotary speed will change. MM Two types of pedal polarities can be used with these inputs; you select the one that applies to each pedal, in the System menu which is described on page 17.
| Nord Electro 4 HP/SW User Manual OS v1.1x 4 Getting Started Let’s take a few minutes to get familiar with the Electro 4 HP/SW. The user interface is designed to be as intuitive as possible, and to perform as well as you do in a live situation. We hope that you soon will feel confident in using it, and by following this short chapter, we will go through most of the functions. 4 About the programs Sound and effect settings are stored in the Program memory of the Nord Electro 4 HP/SW.
Chapter 4 Getting Started Use the Model selector buttons to select one of the samples that are included in the Electro 4 HP/SW from the factory. 5 Press the Samp Env button repeatedly. This will cycle through the four options for the sample’s attack and velocity settings. 6 Press and hold Shift and the Samp Env button. This allows you to select one of the four available release time settings. MM This button doubles as the Clavinet EQ selector, when the Clavinet type is active.
| Nord Electro 4 HP/SW User Manual OS v1.1x Storing a program Adding effects If you are happy with a change to a program that you have made, you should probably store the program. 1 Select the program number 1.1 which is a Grand Piano with a hint of reverb. 1 2 Turn on Effect 2 (the On LED should be lit) and press repeatedly on the Effect 2 selector. Press the Store button. The program number in the LED starts flashing. 2 Select a new location where you want to store the program.
Chapter 5 Nord Electro 4 HP/SW Reference 5 Nord Electro 4 HP/SW Reference Master level knob The VX model This control sets the overall output level of the Electro 4 HP/SW, at the line and the headphone outputs. This is not a programmable control. If you want to set an output level for a particular program, this can be achieved with the Gain control. The original instrument is probably the most famous of all the transistor-based combo organs that emerged in the early 60’s.
| Nord Electro 4 HP/SW User Manual OS v1.1x Rotary Speed Percussion The rotary speaker speed is controlled with the rotary speed buttons or with an external pedal connected to the rotor pedal input on the rear panel. The Percussion effect adds extra attack to the B3 sound by having a single envelope generator controlling either the 2nd or the 3rd harmonic. The envelope “opens up” for a short moment in the beginning of the sound when you press the key(s).
Chapter 5 Nord Electro 4 HP/SW Reference This will activate the organ split mode, but since MIDI Split is set to On, the Electro 4 HP/SW’s keyboard will only play the upper part without being split. Adjust the drawbars for the lower, external keyboard when the 1/Lo LED is lit and for the Electro 4 HP/SW’s keyboard when the 2/Up LED is lit. The drawbars The drawbars of the Nord Electro 4 HP/SW are represented by buttons and LED graphs.
| Nord Electro 4 HP/SW User Manual OS v1.1x Samp Env When the Samp Lib type is active, the Samp Env LEDs and button can be used to set a desired velocity response and attack and release time behavior that affects the playback of the samples. When none of the Attack LEDs are lit, the sample playback is not affected by any additional attack from the Electro 4 HP/SW and it does not respond to keyboard velocity. Slow At – select this when you want to play the samples with a slower attack.
Chapter 5 Nord Electro 4 HP/SW Reference If the Live memory is selected and you decide you wish to store the settings permanently as a program you can do so using the standard methods (see above). You can also store programs into the Live memory location, in which case the program settings will replace the current Live memory settings. You have the possibility in every program, to store the on or off setting of the effects, also for the instrument not being used as the active in the program.
| Nord Electro 4 HP/SW User Manual OS v1.1x Effect 2 Effect 2 offers three types of modulation effects: Phaser, Flanger and Chorus. Each of these effects has 3 selectable depths in the same fashion as the tremolo and pan in the Effects 1 section. The Rate knob control the rate of the effect. Speaker / Comp This section contains the speaker/amp emulations, the rotary speaker emulation and a compressor. Small, JC and Twin emulates three different kinds of amplifier and speaker cabinets.
Chapter 6 The Menus 6 The Menus Any settings that you change in the System, MIDI, B3 or Rotary menu will take immediate effect on a global basis, and will be stored until you change them the next time. Enter the menus by pressing and holding Shift and the System, MIDI, B3 or Rotary button (Prog 1 - 4), the 1-4 LED will start blinking. Select a function with the Up/Down buttons and change the setting by pressing and holding Shift and the Up or Down button.
| Nord Electro 4 HP/SW User Manual OS v1.1x 10 - Ctrl Pedal Mode 3 - MIDI Channel A connected control pedal can be used to control several things. It can be used as a solitary organ swell pedal (swell is a combination of volume and frequency control), as a combined organ swell/volume pedal for the samples type, and finally as a swell/volume pedal for all the instrument sections (incl. the pianos) in the Nord Electro 4 HP/SW.
Chapter 6 The Menus B3 Menu Rotary Menu 1 - Tonewheel Mode 1 - Rotary Model Sets the level of tonewheel crosstalk and cable leakage artifacts of the B3 organ model. There is one rotary model available, with two separate microphone positions. The 122 is modeled with the microphones placed traditionally a bit away from the speaker. The 122 Close have the microphones placed closer to the cabinet. The Vintage 3 mode will create noises from the B3 model even if you don’t play any keys.
| Nord Electro 4 HP/SW User Manual OS v1.1x 7 Nord Sound Manager The Nord Sound Manager is the application that allows you to organize the various memory areas, the partitions in the Nord Electro 4 HP/SW. It is also used to download pianos or programs to the Nord Electro 4 HP/SW or to upload any of these items - called sounds - from the Nord Electro 4 HP/SW memory to the computer hard drive.
Chapter 8 MIDI functions 8 MIDI functions About the MIDI implementation The following MIDI messages can be transmitted and received from the Nord Electro 4 HP/SW: With a sequencer Note On/Off Connections • Note On and Note Off messages are transmitted and received. 1 Connect the MIDI Out on the Nord Electro 4 HP/SW to the MIDI In on your sequencer. 2 Connect the MIDI Out from your sequencer to the MIDI In on the Nord Electro 4 HP/SW.
| Nord Electro 4 HP/SW User Manual OS v1.1x Program and CC dumps To dump a Program SysEx, or MIDI Controller data via MIDI, either to another Nord Electro 4 HP/SW or for recording the data into another MIDI device, proceed as follows: Sending program dumps 1 Connect the MIDI OUT on the Nord Electro 4 HP/SW to the MIDI In on the receiving device, or use the USB connection. 2 Set up the receiving device to accept MIDI SysEx and MIDI Controller data.
Chapter 8 MIDI functions MIDI Implementation Chart Function Transmitted Recognized Basic Channel 1 - 16 1 - 16 1 - 16 1 - 16 Default Mode 3 Mode 3 Message X X 0-127 0-127 Default Channel Mode Altered Note Number True Voice Velocity Note ON O, v= 1 - 127 O, v= 1 - 127 Note Off O, v= 1 - 127 O, v= 1 - 127 After Key’s X X Touch Channel X X Pitch Bender X X Control Change O O Program Change O, 0-127 O, 0-127 O O X X X X X X True# System Exclusive System Song Pos
| Nord Electro 4 HP/SW User Manual OS v1.
FCC Information (U.S.A.) 1. IMPORTANT NOTICE: DO NOT MODIFY THIS UNIT! This product, when installed as indicated in the instructions contained in this manual, meets FCC requirements. Modifications not expressly approved by Clavia may void your authority, granted by the FCC, to use the product. 2. IMPORTANT: When connecting this product to accessories and/ or another product use only high quality shielded cables. Cable/s supplied with this product MUST be used. Follow all installation instructions.