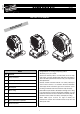
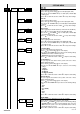
ENGLISH A.LEDA B-EYE K10 EASY A.LEDA B-EYE K10 A.LEDA B-EYE K20 ® C61415 C61419 C61420 INSTRUCTION MANUAL PR ARY N I M ELI INDEX Page Contents 2 Safety information 3 Unpacking and preparation 4 Installation and start-up 5 Control panel 7 Menu setting 15 Maintenance 17 Technical information 17 Cause and solution of problems 18 Channel functions Congratulations on choosing a Clay Paky product! We thank you for your custom.
SAFETY INFORMATION • Installation Make sure all parts for fixing the projector are in a good state of repair. Make sure the point of anchorage is stable before positioning the projector. The safety chain must be properly hooked onto the fitting and secured to the framework, so that, if the primary support system fails, the fitting falls as little as possible. If the safety chain gets used, it needs to be replaced with a genuine spare.
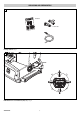
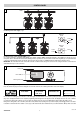
UNPACKING AND PREPARATION 1 IST009/001 2 x 183102/805 Packing contents - Fig. 1 2 UNLOCKED 3 ° 90 A.LEDA B-EYE ° 90 PAN Mechanism Lock and Release (every 90°) - Fig.
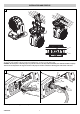
INSTALLATION AND START-UP 3 Installing the projector - Fig. 3 The projector can be installed on the floor resting on special rubber feet, on a truss or on the ceiling or wall. WARNING: with the exception of when the projector is positioned on the floor, the safety cable must be fitted. (Cod. 105041/003 available on request). This must be securely fixed to the support structure of the projector and then connected to the fixing point at the centre of the base.
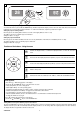
CONTROL PANEL 5 Mains Connecting to the mains supply - Fig. 5 6 DMX 512 5 PIN 5 4 3 1 2 SCREEN SIGNAL SIGNAL DMX 512 3 PIN SIGNAL 2 SCREEN 1 3 SIGNAL Connecting to the control signal line (DMX) - Fig. 6 Use a cable conforming to specifications EIA RS-485: 2-pole twisted, shielded, 120Ohm characteristic impedance, 22-24 AWG, low capacity. Do not use microphone cable or other cable with characteristics differing from those specified.
8 28 28 Reversal of the display - Fig. 8 To activate this function, press UP and DOWN keys simultaneously while the display is in the rest mode. This status will be memorised and maintained even for the next time it will be switched on. To return to the initial state, repeat the operation all over again. Setting the projector starting address On each projector, the starting address must be set for the control signal (addresses from 1 to 512). The address can also be set with the projector switched off.
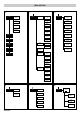
MENU SETTING 1 2 Set Up Dmx Address 3 Option Pan / Tilt Invert Pan Information Invert Tilt Channel Mode System Errors Fixture Hours Swap Pan-Tilt LED Energy Tot Fixture ID Encoder Pan-Tilt Ethernet Interface System Version P/T Homing mode Option Board Diagnost.
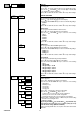
NOTE: On grey the default options Set Up Dmx Address SET UP MENU DMX ADDRESS NOTE: without the DMX signal the Address (XXX) flashing Allows you to select the DMX ADDRESS. 1) Press - the current DMX Adress appear on the display. 2) Use the UP and DOWN , RIGHT keys to plan the DMX Address. 3) Press to confirm the selection or LEFT to keep current settings. Address xxx F B C E D F Channel Mode CHANNEL MODE Allows you to select a channel arrangement from the four available.
OPTIONS MENU Option Pan / Tilt Invert Pan PAN / TILT Invert pan Used for reversing Pan movement. 1) Press - the current settings appear on the display (On or Off). 2) Use the UP and DOWN keys to enable (On) or disable (Off) PAN inversion. 3) Press to confirm the selection or LEFT to keep current settings. On Off F B C F Invert Tilt D Invert tilt Used for reversing tilt movement. 1) Press - the current settings appear on the display (On or Off).
DISPLAY Used for automatically reduce brightness on the display after about 30 seconds in idle. 1) Press - the current settings appear on the display (On or Off). and DOWN keys to enable (On) or disable (Off) 2) Use the UP the decreasing of display brightness. to confirm the selection or LEFT to keep current settings. 3) Press On Option Display Off F B C F Special Functions D SPECIAL FUNCTIONS Pan / Tilt speed Lets you select two different Pan and Tilt speeds.
F 1) Press , a confirmation message (Are you sure?) appears on the display. 2) Select YES to confirm the selction or NO to keep current setting. OPTION DEFAULT Invert Pan Off Invert Tilt Off Swap Pan-Tilt Off Encoder Pan-Tilt On P/T Homing Mode Standard Pan Home Def Pos 270 degrees Tilt Home Def Pos 50% On Display Silent Mode Standard P/T Speed Fast Dimmer Curve Curve 1 RGB Gamma Gamma 1.
MANUAL CONTROL Manual Control RESET Used for resetting the projector. 1) Press to reset the projectors, a confirmation message (Are you sure ?) appears on the display. 2) Select YES to starting reset the fixture or NO to keep the current setting and return to the top menu level. No Reset Yes F CHANNEL Used for setting channel levels from the projector control panel. 1) Press - the first channel appears on the display.
9 WARNING: no alcohol CAUTION: • Light collimation system This product contains internal light collimation system. Avoid intense light from any angle. To avoid damage to the internal parts of the fixture when the fixture is not working, is recommended to turn the head down before turning the fixture off, so that the front lenses of the fixture are invested as little as possible from the sun or any intense light.
10 1 2 6 3 4 5 Battery removal - Fig. 10 This product contains a rechargeable lead-acid or lithium iron tetraphosphate battery. To preserve the environment, please dispose the battery at the end of its life according to the regulation in force. LiFePO4 Pb A.
MAINTENANCE 11 3 4 1 2 Opening the covers - Fig. 11 12 1 2 1 1 1 Removing/Assembling the lens unit - Fig. 12 A.
13 Replacing the line actuator - Fig. 13 CAUSE AND SOLUTION OF PROBLEMS THE PROJECTOR WILL NOT SWITCH ON ELECTRONICS NON-OPERATIONAL PROBLEMS DEFECTIVE PROJECTION REDUCED LUMINOSITY POSSIBLE CAUSES No mains supply. LED exhausted or defective. Signal transmission cable faulty or disconnected. Incorrect addressing. Fault in the electronic circuits. Lenses or reflector broken Dust or grease deposited. A.LEDA B-EYE CHECKS AND REMEDIES Check the power supply voltage. Call an authorised technician.
TECHNICAL INFORMATION 350 (13.78") Zoom OUT 310 (12.20") Zoom IN Power supplies available 100-240V 50/60Hz A.Leda B-EYE K10 233 (9.17") Zoom OUT 189 (7.44") Zoom IN Input power • K20 - 750VA • K10 - 450VA 248 (9.76") 360 (14.17") 423 (16.65") Total output B-EYE K10: t.b.d. B-EYE K10 Easy: 4800 lumens B-EYE K20: 9800 lumens LED source LED Osram Ostar RGBW - 15W Average LED life: 50.000 h Motors 5 (k10), 7 (k20) stepper motors, operating with microsteps, totally microprocessor controlled. 494 (19.
CHANNEL FUNCTION A.
A.
A.
NOTE: On conclusion of resetting in case of absence of DMX signal, Pan & Tilt move to the "Home" position (Pan 128 bit - Tilt 128 bit ) all the others channels stay at 0 bit.
• STOP STROBE - FOREGROUND STROBE - BACKGROUND STROBE MACRO BIT EFFECT 252 - 255 239 - 251 226 - 238 213 - 225 208 - 212 207 OPEN RANDOM FAST STROBE RANDOM MEDIUM STROBE RANDOM SLOW STROBE OPEN FAST PULSATION (25 flash/sec) 108 104 - 107 103 SLOW PULSATION (0,5 flash/sec) OPEN FAST STROBE (25 flash/sec) 4 0-3 • TILT FINE • TILT BIT BIT 255 255 0 0 SLOW STROBE (1 flash/sec) CLOSED G Operation with option InvertPan Off (Tilt conventionally represented at 35 bit and option Invert Tilt • DIMME
• RESET 255 • RED LED 1 to… GREEN LED 1 to… BLUE LED 1 to… WHITE LED 1 to… EFFECT BIT COMPLETE RESET Complete reset is activated passing throug the unused range and staying 5 seconds in complete reset levels 128 127 BIT EFFECT 255 LED ON 0 LED OFF COMPLETE RESET PAN / TILT RESET Pan / Tilt reset is activated passing throug the unused range and staying 5 seconds in Pan / Tilt reset levels 77 76 PAN / TILT RESET ZOOM RESET Effects reset is activated passing throug the unused range and staying 5
SHAPE SPEED - SHAPE OFFSET - SHAPE FADE - BACKGROUND SELECT Shape Shape Selection Slot Macro Name On K10 On K20 Description Random colors *1 N.a.
Shape Shape Selection Slot Macro Name Bar 2 (Variable size) Random explosion On K20 Yes Yes N.a.
• SHAPE FADE • SHAPE TRANSITION 18 17 16 0-15 BIT EFFECT BIT 246-255 245 243 244 Smooth, fading curve with automatic gamma * Smooth, fading curve gamma 2 Smooth, fading curve gamma 1,986 Smooth, fading curve gamma 1,993 Smooth, fading curve gamma 0,513 Smooth, fading curve gamma 0,506 Smooth, fading curve gamma 0,5 Snap EFFECT 255 4 sec 216 3 sec 171 2 sec 113 1 sec 73 0,5 sec 5 100 ms 0-4 No fade • BACKGROUND SELECT Aleda K10 - Background select • SHAPE RGBW SHAPE DIMMER BACKGROUND
A.LEDA B-EYE K10 & K10 EASY LED reference number for pixel mapping TILT: channel 16 @ 200 bit 13 14 12 15 4 11 5 16 LED 3 6 1 10 17 2 7 18 9 19 8 A.LEDA B-EYE K20 LED reference number for pixel mapping TILT: channel 16 @ 200 bit 28 29 30 27 26 13 14 4 5 31 12 15 25 11 LED 3 24 32 16 6 1 33 10 17 2 23 7 9 22 8 19 20 37 21 A.
Cod. IST009/001 EN PRELIMINARY 06/14 CLAY PAKY S.p.A. - Via Pastrengo, 3/b - 24068 Seriate (BG) Italy - Tel. +39-035-654311 - Fax +39-035-301876 - www.claypaky.