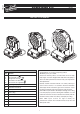
ENGLISH A.LEDA WASH K5 A.LEDA WASH K10 A.
EN SAFETY INFORMATION • Installation Make sure all parts for fixing the projector are in a good state of repair. Make sure the point of anchorage is stable before positioning the projector. The safety chain must be properly hooked onto the fitting and secured to the framework, so that, if the primary support system fails, the fitting falls as little as possible. If the safety chain gets used, it needs to be replaced with a genuine spare.
• Battery This product contains a rechargeable lead-acid or lithium iron tetraphosphate battery. To preserve the environment, please dispose the battery at the end of its life according to the regulation in force. LiFePO4 Pb • Disposing This product is supplied in compliance with European Directive 2012/19/EU - Waste Electrical and Electronic Equipment (WEEE). To preserve the environment please dispose/recycle this product at the end of its life according to the local regulation.
IT INFORMAZIONI DI SICUREZZA • Installazione Assicurarsi che tutte le parti per il fissaggio del proiettore siano in buona condizione. Assicurarsi della stabilità del punto di ancoraggio prima di posizionare il proiettore. La fune di sicurezza, debitamente agganciata all’apparecchio e fissata alla struttura di sostegno, deve essere installata in modo che, in caso di cedimento del sistema di supporto primario, si abbia la minor caduta possibile dell’apparecchio.
• Batteria Questo prodotto contiene una batteria ricaricabile piombo-acido o Litio Ferro Tetrafosfato. A tutela dell'ambiente si prega di smaltire la batteria a fine vita in conformità alla normativa vigente. LiFePO4 Pb • Smaltimento Questo dispositivo è conforme alla Direttiva Europea 2012/19/UE - Rifiuti di apparecchiature elettriche ed elettroniche (RAEE). Nel rispetto dell'ambiente, smaltire/riciclare il prodotto al termine del suo ciclo di vita secondo le disposizioni di legge locali.
FR CONSIGNES DE SÉCURITÉ • Installation S’assurer que toutes les pièces pour la fixation du projecteur sont en bon état. S’assurer de la stabilité du point d’ancrage avant de positionner le projecteur. Le câble de sécurité, à fixer correctement à l’appareil et à la structure de support, doit être installé de façon à ce que, en cas de rupture du système de support principal, la chute de l’appareil soit la plus limitée possible.
LiFePO4 Pb • Batterie Ce produit contient une batterie rechargeable au plomb-acide ou tétraphosphate de fer au lithium. Une fois la batterie arrivée à la fin de sa durée de vie, procéder à son élimination conformément à la norme en vigueur de manière à éviter toute pollution. Élimination Ce dispositif est conforme à la Directive Européenne 2012/19/UE – Déchets d’équipements électriques et électroniques (DEEE).
DE INFORMATIONEN ZUR SICHERHEIT • Installation Sicherstellen, dass alle Teile für die Befestigung des Projektors in einwandfreiem Zustand sind. Vor der Installation des Projektors die Stabilität der Verankerungsstelle überprüfen. Das korrekt am Gerät eingehakte und an der Haltestruktur befestigte Sicherheitsseil muss so installiert werden, dass bei einem Nachgeben der Haupthalterung die Fallhöhe des Gerätes so gering wie möglich ist.
LiFePO4 Pb • Batterie Dieses Produkt enthält eine wiederaufladbare Blei-Säure-Batterie oder Lithium-Eisen-tetraphosphat. Zum Schutz der Umwelt bitten wir Sie, diese Batterie, nachdem sie verbraucht ist, gemäß den geltenden Vorschriften zu entsorgen. Entsorgung Diese Vorrichtung entspricht der Europäischen Richtlinie 2012/19/UE - Abfall von elektrischen und elektronischen Gerätschaften (RAEE).
ES INFORMACIONES DE SEGURIDAD • Instalación Asegúrese de que todos los elementos de fijación del proyector estén en buenas condiciones. Controle la estabilidad del punto de anclaje antes de instalar el proyector. La cuerda de seguridad, correctamente enganchada al aparato y fijada a la estructura de soporte, debe colocarse de modo que, si el soporte principal cede, el aparato sufra la menor caída posible. En caso de desgaste de la cuerda de seguridad, sustitúyala por el recambio original.
LiFePO4 Pb • Batería Este producto contiene una batería recargable plomo-ácido o de litio tetrafosfato Hierro. Para proteger el ambiente se ruega eliminar la batería conforme a la normativa vigente. Eliminación Este dispositivo es conforme a la Directiva Europea 2012/19/UE - Residuos de equipos eléctricos y electrónicos (RAEE).
UNPACKING AND PREPARATION 1 IST004/001 2 x 183102/805 Packing contents - Fig. 1 2 UNLOCKED 12 ° 90 A.LEDA WASH ° 90 PAN Mechanism Lock and Release (every 90°) - Fig.
INSTALLATION AND START-UP 3 Installing the projector - Fig. 3 The projector can be installed on the floor resting on special rubber feet, on a truss or on the ceiling or wall. WARNING: with the exception of when the projector is positioned on the floor, the safety cable must be fitted. (Cod. 105041/003 available on request). This must be securely fixed to the support structure of the projector and then connected to the fixing point at the centre of the base.
CONTROL PANEL 5 Mains NB: connecting one “A.leda Wash K5” to the mains, it is possible to connect up to a maximum of 11 “A.leda Wash K5” in parallel at the same time. Connecting to the mains supply - Fig. 5 6 DMX 512 5 PIN 5 4 3 1 2 SCREEN SIGNAL SIGNAL DMX 512 DMX 512 3 PIN SIGNAL SCREEN 1 2 3 SIGNAL Connecting to the control signal line (DMX) - Fig. 6 Use a cable conforming to specifications EIA RS-485: 2-pole twisted, shielded, 120Ohm characteristic impedance, 22-24 AWG, low capacity.
8 28 28 Reversal of the display - Fig. 8 To activate this function, press UP and DOWN keys simultaneously while the display is in the rest mode. This status will be memorised and maintained even for the next time it will be switched on. To return to the initial state, repeat the operation all over again. Setting the projector starting address On each projector, the starting address must be set for the control signal (addresses from 1 to 512). The address can also be set with the projector switched off.
MENU SETTING 1 2 Set Up Dmx Address 3 Option Pan / Tilt Invert Pan Information Invert Tilt Channel Mode System Errors Fixture Hours Swap Pan-Tilt LED Energy Tot Fixture ID Encoder Pan-Tilt Ethernet Interface System Version P/T Homing mode Option Board Diagnost.
NOTE: On grey the default options Set Up Dmx Address SET UP MENU DMX ADDRESS NOTE: without the DMX signal the Address (XXX) flashing Allows you to select the DMX ADDRESS. 1) Press - the current DMX Adress appear on the display. 2) Use the UP and DOWN , RIGHT keys to plan the DMX Address. 3) Press to confirm the selection or LEFT to keep current settings. Address xxx F B C E D F Channel Mode CHANNEL MODE Allows you to select a channel arrangement from the four available.
OPTIONS MENU Option Pan / Tilt Invert Pan PAN / TILT Invert pan Used for reversing Pan movement. 1) Press - the current settings appear on the display (On or Off). and DOWN keys to enable (On) or disable (Off) 2) Use the UP PAN inversion. 3) Press to confirm the selection or LEFT to keep current settings. On Off F B C F Invert Tilt D Invert tilt Used for reversing tilt movement. 1) Press - the current settings appear on the display (On or Off).
Option Silent mode SILENT MODE Lets you set an operator mode choosing from the two available: • Standard: Maximum speed and consequently maximum effect and fan noise. • Quiet: reduces the speed of some effects and fans thus also reducing noise. Standard Quiet Fan Speed Mode FAN SPEED MODE Allows you to set how to manage the fan speed of the head of the fixture, select between the two available: • Auto: the head’s fan varies the speed/power depending on the temperature detected on the LED.
Option Setting Default Preset SETTING Used to save 3 different settings of the items in the options menu and relative submenus. 1) Press - “Default preset” appears on the display. 2) Use the UP and DOWN keys to select one of the following configurations: - Default preset (*) - User preset 1 - User preset 2 - User Preset 3 3) Press - “Load preset X” appears on the display. 4) Use the UP and DOWN keys to select: - Load preset X to recall a previously stored configuration.
Information LED ENERGY TOT Lets you view total LED working hours. 1) Press - to display total and partial Watts/hour: Total Total LED working hours from construction to date. Partial LED working hours from last reset to date. 2) Press to reset the partial counter. A confirmation appears on the screen (Are you sure?) 3) Select YES to reset the partial counter or NO to keep the current setting and open the next menu level. LED Energy Tot F F System Version Board Diagnost. Board CPU brd com.
TEST MENU Test Pan-Tilt Colour Zoom All TEST Allows you to check the proper functioning of effects. 1) Press to return to the top menu level. 2) Use the UP and DOWN keys to select the required test. 3) Press to confirm the selection or LEFT to keep current settings. Test sequence: Pan - Tilt effects (Pan & Tilt) Colours Zoom All effects F B F C D ADVANCED MENU Advanced To enable the "Advanced Menu" set up the "Access code" (1234) using the UP , DOWN , RIGHT keys.
9 1 2 6 3 4 5 Battery removal - Fig. 9 This product contains a rechargeable lead-acid or lithium iron tetraphosphate battery. To preserve the environment, please dispose the battery at the end of its life according to the regulation in force. LiFePO4 Pb A.
MAINTENANCE 10 3 4 1 2 Opening the covers - Fig. 10 11 4 3 1 2 Removing/Assembling the lens unit - Fig. 11 NB: Apply Loctite 222 (p/n COL002) to the threads of the 3 screws (1) before tightening them. A torque of 0.3N is recommended in order to avoid damaging the zoom movement actuators. A.
12 2 DIM002/001 1 Replacing the line actuator - Fig. 12 NB: It is highly recommended to use the DIM002/001 (1) template whenever it is necessary to replace one of the three Zoom movement line actuators. DIM002/001 ensures the actuator group is centred correctly on the lens plate before tightening the 2 screws (2) that fasten the actuator in place. A.
OPTIONAL ACCESSORIES A.LEDA WASH K5 13 C61452 C61453 1 2 3 Cover - Fig. 13 C61452 - Transparent cover C61453 - Frosted cover 14 C61451 1 3 4 2 Transparent mask - Fig. 14 A.
A.LEDA WASH K10 15 C61455 C61456 1 2 3 Cover - Fig. 15 C61455 - Transparent cover C61456 - Frosted cover 16 C61454 1 3 4 2 Transparent mask - Fig. 16 Continue A.
A.LEDA WASH K20 17 C61458 C61459 1 2 3 Cover - Fig. 17 C61458 - Transparent cove C61459 - Frosted cover 18 C61457 1 3 4 2 Transparent mask - Fig. 18 A.
TECHNICAL INFORMATION 220 (8.66") Power supplies available 100-240V 50/60Hz 155 (6.10") 155 (6.10") Input power • K20 - 750VA • K10 - 450VA • K5 - 170VA Max 1800VA (with 11 A.leda Wash K5 connected in parallel) 245 (9.65") 374 (14.72") Total output K5 - Max 2100 lumens K10 - Max 5500 lumens K20 - Max 10500 lumens 381 (15.00") 320 (12.60") 253 (9.96") LED source Osram Ostar RGBW - 15W - LED Average LED life: 50.000 h 290 (11.
CHANNEL FUNCTION NB: To prevent accidental breakage of the effects, which could collide with each other during transport, before switching the projector OFF check that all the projector Channels have been excluded (DMX level @0 bit). A.
NB: To prevent accidental breakage of the effects, which could collide with each other during transport, before switching the projector OFF check that all the projector Channels have been excluded (DMX level @0 bit). A.
NB: To prevent accidental breakage of the effects, which could collide with each other during transport, before switching the projector OFF check that all the projector Channels have been excluded (DMX level @0 bit). A.
NOTE: On conclusion of resetting in case of absence of DMX signal, Pan & Tilt move to the "Home" position (Pan bit 128 - Tilt bit 128) all the others channels stay @ bit 0.
• PAN FINE Operation with option InvertPan • STOP STROBE MACRO BIT EFFECT 252 - 255 239 - 251 226 - 238 213 - 225 208 - 212 207 LED ON RANDOM FAST STROBE RANDOM MEDIUM STROBE RANDOM SLOW STROBE LED ON FAST PULSATION (25 flash/sec) 108 104 - 107 103 SLOW PULSATION (0,5 flash/sec) LED ON FAST STROBE (25 flash/sec) GOff BIT 255 SLOW STROBE (1 flash/sec) LED OFF 4 0-3 0 Operation with option InvertPan • DIMMER • DIMMER FINE BIT EFFECT BIT 255 MAXIMUM BRIGHTNESS 255 GOn EFFECT BIT UPPER BRI
• RESET • TILT FINE Operation with option InvertTilt GOff BIT 255 EFFECT COMPLETE RESET Complete reset is activated passing throug the unused range and staying 5 seconds in complete reset levels BIT 255 128 127 COMPLETE RESET PAN / TILT RESET Pan / Tilt reset is activated passing throug the unused range and staying 5 seconds in Pan / Tilt reset levels 77 76 PAN / TILT RESET ZOOM RESET Effects reset is activated passing throug the unused range and staying 5 seconds in Effects reset levels.
SHAPE SELECTION - SHAPE SPEED - SHAPE OFFSET 0-7 8 9 10 11 12 13 14 15 16 Macro OFF Ring 1 Ring 2 Ring 3 Ring 4 Ring 1 + 2 Ring 1 + 3 Ring 1 + 4 Ring Opening (Closing) Ring Opening (Closing) Filled Yes Yes Yes No No Yes No No Yes Yes Yes Yes Yes Yes No Yes Yes No Yes Yes On K20 Yes Yes Yes Yes Yes Yes Yes Yes Yes Yes 17 Ring Open/Close (close/open) Yes Yes Yes Yes 18 Ring Open/Close (close/open) Filled Yes Yes Yes Yes 19 Ring with variable radius Yes Yes Yes N.a.
Macro Off DMX channel value: from 0 to 7. No shape effects activated. Turns off any previously selected shape. Static Rings DMX channel value: from 8 to 14. The ring or rings used by the macro are turned on with the foreground colour (Shape Red+Shape Green+Shape blue+Shape White). Avaliable combinations: Ring 1 On, Ring 2 On, Ring 3 On (Aleda K10, K20 only), Ring 4 On (Aleda K20 only),Ring 1+2 On, Ring 1+3 On (Aleda K10, K20 only), Ring 1+4 On (Aleda K20 only).
• SHAPE FADE BIT 246-255 245 243 244 18 17 16 0-15 EFFECT Smooth, fading curve with automatic gamma * Smooth, fading curve gamma 2 Smooth, fading curve gamma 1,986 Smooth, fading curve gamma 1,993 Smooth, fading curve gamma 0,513 Smooth, fading curve gamma 0,506 Smooth, fading curve gamma 0,5 Snap • SHAPE RGBW SHAPE DIMMER BACKROUND DIMMER BIT EFFECT 255 MAXIMUM BRIGHTNESS LED OFF 0 • SHAPE TRANSITION BIT EFFECT 255 4 sec 216 3 sec 171 2 sec 113 1 sec 73 0,5 sec 5 100 ms 0-4 No fade
A.LEDA WASH K5 A.LEDA WASH K10 LED reference number for pixel mapping TILT: channel 16@ bit 200 LED reference number for pixel mapping TILT: channel 16 @ bit 200 13 14 12 15 4 11 LED 3 2 1 17 2 7 18 9 8 7 A.LEDA WASH K20 LED reference number for pixel mapping TILT: channel 16 @ bit 200 28 29 30 27 26 13 14 4 5 31 12 15 25 11 32 16 LED 3 24 6 1 33 10 17 2 23 7 9 22 34 18 8 19 20 37 21 A.
IST004/001 – EN - Rev.C 02/15 CLAY PAKY S.p.A. - Via Pastrengo, 3/b - 24068 Seriate (BG) Italy - Tel. +39-035-654311 - Fax +39-035-301876 - www.claypaky.