CLEANCUT STEP INSTALLATION GUIDE COPYRIGHT © 2017 SAFEWAY SAFETY STEP, LLC (DBA “CleanCut”) All Rights Reserved Reproduction or Distribution of this Installation Manual is Strictly Prohibited VIDEO INSTRUCTIONS CAN BE VIEWED AT cleancutbath.
Page 2 of 9 IMPORTANT – PLEASE WATCH VIDEO PRIOR TO READING DIRECTIONS AND BEFORE BEGINNING INSTALLATION IT IS VERY IMPORTANT THAT ALL INSTRUCTIONS IN INSTALLATION MANUAL ARE FOLLOWED THOROUGHLY. THE VIDEO INSTRUCTIONS CAN BE VIEWED AT cleancutbath.com INSTALLATION OF THE CLEANCUT STEP REQUIRES USE OF POTENTIALLY DANGEROUS TOOLS. SAFEWAY SAFETY STEP, LLC (DBA “CLEANCUT”) ACCEPTS NO RESPONSIBILITY FOR ANY TYPE OF INJURY, LOSS OR DAMAGE OCCURRED DURING INSTALLATION OR SUBSEQUENT USE OF THE CLEANCUT STEP.
Page 3 of 9 Thank you for your interest in the CleanCut Step. This installation manual includes an overview of the CleanCut Step installation kit as well as instructions pertaining to the step-bystep instructions for CleanCut Step installation.
Page 4 of 9 Preparing the Tub 1. Before beginning any work, it is important to inspect the tub for existing chips, markings or other types of damage. It is always wise to make the owner or manager aware of any existing damage prior to beginning the installation process. 2.
Page 5 of 9 3. Then cut all four downward cuts. Finish by cutting the two adjoining top pieces. 4. The opening for the CleanCut Step is now completed and you can remove the cut-out section. Use caution when removing the cut-out section as there may be sharp or jagged edges both on the cut-out segment and along the edges of where the cuts were made on the sides of the tub. It is helpful to spend a moment to file down any potential hazard areas.
Page 6 of 9 1. Take a stack of heavy card stock paper. This is the paper used to trace the cut- out section of the tub onto the CleanCut Step. Place the card paper onto the left end and trace the outline of the pattern onto the paper. Once completed, mark this tracing as “Left”, so as to remember which side was traced. It is also helpful to place an arrow on the template to indicate which direction is the inside of the tub. 2. Repeat the process for the right side of the tub. Mark this tracing “Right”.
Page 7 of 9 7. Use a tape measure and transfer the shape of the inside of the tub edge to the step. The inside of the tub may be irregular in shape, so measurements for the inside line must be made every 3” from one end of the CleanCut Step to the other. Once completed, use your yard stick and marker to connect the markings for the inside line. **Alternate Method: You may use card stock paper such as done with the sides to create a bottom template 8.
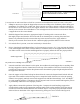
CLEAN CUT STEP FIGURE 6 Page 8 of 9 SUPPORT BOX STRUCTURE – LARGE SUPPORT BOX COMPRESSED ON SMALL BOX BASE 2X4 AFFIXED TO FLOOR, IF NECESSARY It is important to understand that each tub has variations and modifications maybe necessary in the field. 1. It may be necessary to adjust the Support Box structure according to the conditions present during your installation.
Page 9 of 9 8. Apply adhesive to the tops of the 2x4’s that are already in place in the channel, if they are needed for height adjustment and insert the support box structure. 9. Place the CleanCut Step into position once more to inspect the fit and position. This is the final opportunity to make any adjustments if necessary. 10. Apply adhesive to the top of the large support box.