
Installation Guide


Page 4 of 9
Preparing the Tub
1.
Before beginning any work, it is important to inspect the tub for existing chips, markings or other types of
damage. It is always wise to make the owner or manager aware of any existing damage prior to beginning the
installation process.
2.
Prior to beginning the installation, remove any personal items from the bathroom area to create extra
space during the installation and to prevent possible damage or exposure to dust and debris that may result
during the installation process.
3.
One method to minimize the areas where dust can settle is to use a 2-ply drop cloth with the paper side up
to catch and trap dust and other shavings. In particular, a drop cloth should be taped into the bottom of the
tub. This will help to collect debris as well as to help prevent accidentally scratching the bottom surface of
the tub. The drain of the tub should be completely covered to prevent any shaving from going down into the
drain. Make sure that there is no water or dampness in or around the tub.
Due to the significant amount of dust created when cutting a cast-iron tub, it is recommended that all walls
and surfaces are covered, including the floor, before cutting the tub. See other considerations for cutting cast-
iron tubs in the following section.
4.
Once the tub area is prepared for installation, it is necessary to mark the tub to determine the section that
will be cut to make room for the CleanCut Step. First, measure the length of the tub and determine the
midpoint of the tub and measure back, half the distance of the CleanCut Step itself. Using the template that
was included in the installation kit, place the template flush against the tub and begin tracing, Use a red
sharpie marker so as to make the lines that are traced easily visible. Flip the template over and now trace the
outside of the tub. Keep in mind that it may not be possible to place the CleanCut Step directly in the center
of the tub due to obstructions in the tub area such as the placement of sinks, vanities or commodes and the
use of shower seats may warrant moving the opening forward as well.
Cutting the Tub
The tub has been marked and is ready to cut. Safety is of highest importance and it is critical to remember to
use the proper safety equipment when cutting the tub.
Protective eye and ear wear and filter mask are required.
The CleanCut Step can be installed in fiberglass, steel or cast-iron tubs. On fiberglass or steel tubs, use a side
grinder with the diamond blade to make necessary entry points for the reciprocating saw. For cast-iron tubs,
the side grinder with the diamond blade is the only cutting tool used. If you are cutting a cast-iron tub,
please read the special considerations noted below before beginning to cut.
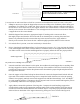
1.
The first corner notches will be made with the side-grinder as illustrated in Figure 1 below.
2.
Using the reciprocating saw on fiberglass and steel tubs, cut out the bottom markings on each
side of the tub.
FIGURE 1