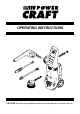
OPERATING INSTRUCTIONS CAUTION: Do not use the appliance without having read the instructions for use
We are pleased that you have decided to purchase this high-pressure cleaner. This high-pressure cleaner is ideally suited to the cleaning of vehicles, facades, terraces, garden implements, tools. It is not constructed for industrial use. Please read these operating instructions before putting your unit into use for the first time and give particular attention to the safety notes! The warning and information signs affixed to the unit are important indications for its use free from danger.
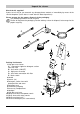
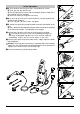
Unpack the cleaner Check the kit supplied! If parts are missing or you ascertain any damage please contact us immediately by means of the service telephone (at the latest 1 week after the date of purchase). Please arrange for the proper disposal of the packaging The packaging material can be recycled. Please do not place the packaging into the ordinary refuse for disposal, but arrange for the proper recycling.
Attaching the Transport Handle and Detergent Tank A) Slide the transport handle on to the casing. B) Fasten the transport handle using the two screws provided for the purpose. Insert the detergent suction hose with the filter on the connection nipple. Also fasten the detergent suction hose in the two guides of the transport handle. Insert the detergent suction hose with the filter in the detergent tank and close it with a lid.
Safety Instructions The operation of the device in hazardous locations is not admissible. Please comply with the corresponding safety instructions if you use the appliance in danger areas (e.g. filling stations). Do not turn on the appliance if the power supply cable or important components of the appliance, such as safety components, high-pressure hoses, spray jet, are damaged. Warning: High-pressure hoses, fittings, and couplings are of importance for the appliance safety.
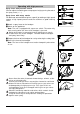
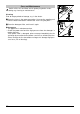
Initial Operation A) First squeeze out the clip using a sharp object or similar. B) Then you can pull out the clip. C) Put the high-pressure hose into the handgun up to the stop. Press the clip back into the handgun. D) Use it to secure the high-pressure hose. A) Insert a spray lance (or the washing brush) into the bayonet connection of the handgun. B) Turn it by 90 ° (B) until it locks into place. A) Screw the quick-fitting coupling onto the water connection of the unit.
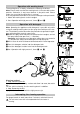
Operating with high pressure Spray lance with pressure control You can adjust the working pressure progressively by turning the end of the spray lance (+ / –). Spray lance with rotary nozzle For obstinate accumulation of grime: a pencil jet rotating at high speed creates a high impact pressure and thus achieves a good cleaning result. Attach a spray lance to the handgun. Switch on the appliance. Note: The unit is equipped with a pressure switch.
Operation with washing brush The washing brush is ideally suited for the cleaning of vehicles. Note: Please make sure that the washing brush is free from dirt or other particles. Otherwise, it may cause defects in the paint work. Please make also sure that the water flow is ensured. Also a dry operation of the brush can result in damages to the paint work. 1. Attach the washing brush to the handgun. 2. See “Operation with high pressure”, items and .
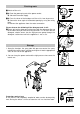
Finishing work Switch off the unit. A) Draw the power plug out of the power socket. B) Close off the water supply. A) Press the lever of the handgun until the unit is free of pressure. B) Secure the lever against inadvertent opening by using the safety latch. Disconnect the appliance from the water connection. Please observe the following if the detergent tank is full: Please pull out the detergent suction hose with the detergent filter up to the cover once you have finished your work.
Care and Maintenance Switch off the unit and draw out the power plug before undertaking any cleaning or maintenance! Cleaning Prior to longer periods of storage, e.g. in the winter: Clean the sieve in the water connection. Unscrew the coupling unit from the water connection. Remove the sieve using flat pliers. Clean the detergent filter, and insert it again. Maintenance • The appliance is maintenance-free. • Check the power cord and the high-pressure hose for damages in regular intervals.
Troubleshooting In this section we should like to give you some advice on how you can clear minor malfunctions yourself. Switch off the unit and draw out the power plug before undertaking any cleaning or maintenance! Any investigation of electrical components may only be carried out by the authorised customer service. When there are malfunctions, check the function with both spray lances. Unit does not function • Check the mains voltage. • Check the power cord for damage.
Guarantee CONDITIONS OF GUARANTEE Warranty does not extend to defects arising from the product being used for purposes beyond normal household use, particularly when it goes beyond the purpose for which it was designed such as commercial, industrial or rental applications. All warranty periods commence on the date of purchase and are not transferable.
Technical Data Power supply Voltage Type of current Connected load Supply fusing (time-lag) Safety class Water connection Supply temperature (max.) Supply volume (min.) Supply pressure Supply hose - length, min. - diameter, min. .......................................... 240 ........................................ 1~50 ........................................... 2,1 ............................................ 13 ................................... 1, IPX 5 V Hz kW A ....................................
EU Declaration of Conformity We hereby declare that the equipment described below conforms to the relevant fundamental safety and health requirements of the appropriate EU Directives, both in its basic design and construction as well as in the version marketed by us. This declaration will cease to be valid if any modifications are made to the machine without our express approval.
01-06_5961993.