CellCom/FreeSpeak Firmware Update Procedures CellCom/FreeSpeak Firmware Update Procedures Upgrade procedure for CellCom10/FreeSpeak10 system components to CellCom/FreeSpeak ©2009 Vitec Group Communications Ltd VGC Part No.- 810372Z Rev 6.05 Rev: 6.05 VGC Part No.
CellCom/FreeSpeak Firmware Update Procedures Contents 1 INTRODUCTION ....................................................................................................... 4 2 BELTPACK FIRMWARE UPGRADE ....................................................................... 5 2.1 Software and Hardware Required. ................................................................. 5 2.2 Beltpack Upgrades .......................................................................................... 5 2.2.1 2.2.
CellCom/FreeSpeak Firmware Update Procedures Rev: 6.05 VGC Part No.
CellCom/FreeSpeak Firmware Update Procedures 1 Introduction This document replaces the following previously released documents on the CellCom/FreeSpeak release CDs :1. CellCom/FreeSpeak Active Antenna Firmware Upgrade Procedure 2. CellCom/FreeSpeak Active Antenna DECT Update Procedure 3. CellCom/FreeSpeak Beltpack Firmware Upgrade Procedure 4. CellCom/FreeSpeak Beltpack DECT Update Procedure 5. CellCom/FreeSpeak Upgrading Beltpacks Readme 6.
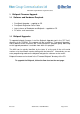
CellCom/FreeSpeak Firmware Update Procedures 2 Beltpack Firmware Upgrade 2.1 Software and Hardware Required. 1. 2. 3. 4. FreeSpeak Upgrader – supplied on CD FreeSpeak Registation Serial Cable Latest release of Bootloader and Beltpack – supplied on CD PC with a serial connection 2.2 Beltpack Upgrades To upgrade beltpack firmware, install the Beltpack Upgrader tool in the "PC Tools" directory of this CDROM.
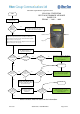
CellCom/FreeSpeak Firmware Update Procedures CELLCOM / FREESPEAK BELTPACK FIRMWARE UPGRADE GUIDE FOR PD2202 / MKI / MKII START Power On the Beltpack and wait 20 Seconds. Yes Does the Beltpack show “Clear-Com Searching” ? Register the Beltpack with a Matrix using a Config Editor and download the map to the matrix. Power down the Beltpack No 1.Press and Hold the Left and Right menu keys for 5 seconds to enter the Beltpacks Programming Mode. Then Release the Menu keys. 2.
CellCom/FreeSpeak Firmware Update Procedures 2.2.1 “Freespeak Upgrader” for Beltpack Updates 1) Run “FreeSpeak Upgrader” on the PC (make sure that the correct COM port is selected). 2) Make sure the selected Firmware File is the latest Beltpack release (e.g. xxxxx.mot) and is of the correct type (ie MKI KIRK or MKII KIRK). The flow diagram will help you to determine your hardware version. See the release notes for the latest version information. 3) Switch off the Beltpack.
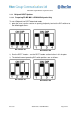
CellCom/FreeSpeak Firmware Update Procedures 2.2.2 Beltpack DECT Updates 2.2.2.1 Preparing FS-BP MK I & PD2202 Beltpacks Only To set a Beltpack into DECT download mode, 1) open the case (see the section on opening beltpacks) and set the DIP switches to the following positions: DIP Switch S5 DIP Switch S6 2) Run the DECT Loader – see the DECT Loader section further in this chapter. 3) The default/normal operating DIP switch positions are as follows: DIP Switch S5 Rev: 6.05 DIP Switch S6 VGC Part No.
CellCom/FreeSpeak Firmware Update Procedures 2.2.2.2 FS-BP MK II Beltpacks 1) Connect the PC to the beltpack using the beltpack registration cable. 2) Run Terminal Emulator on a Connection at baud 19200 8,N,1 3) Type “# 0174” note there is a space after the „#‟. The DECT will reset and the terminal will start streaming characters. If characters are not seen, check cables, baud settings, hit return on the Terminal Emulator and type “# 0174” again.
CellCom/FreeSpeak Firmware Update Procedures 2.2.3 “Flash Downloader” for Beltpack DECT updates 1) Install the DECT loader onto a PC with a serial port. 2) Connect the PC to the Beltpack using the Beltpack registration cable. 3) Start up the Flashloader program, set as follows with the correct DECT update file selected in “Target Final Flash Executable”. 4) Ensure the “Send Break signal while idle” and “Boot on start up” is unchecked. 5) For FS-BP MK I and PD2202 beltpacks only.
CellCom/FreeSpeak Firmware Update Procedures The auto start will begin on starting the flash downloader app with the BP connected and powered on. After the DECT is upgraded: 2.2.3.1 FS-BP MK I & PD2202 Turn off the BP, disconnect the power or remove a battery and set the Dipswitches back to their normal operating position. Reassemble the BP (see the section on opening beltpacks) install the batteries, power up and check that the BP versions are correct in the version menu. 2.2.3.
CellCom/FreeSpeak Firmware Update Procedures 8. Run FDT on the PC - Configured to c. Device - H8S/ 2318/f, d. CPU Crystal Frequency - 10.36Mhz, e. Boot mode, f. 19200 baud 9. Select Bootloader01a.mot (or the latest version) and Download it to Device 10. When this is complete, close FDT and power off the Beltpack by removing at least one battery. 11. Put the Beltpack back into Normal Mode by changing the following jumpers: g. ON/OFF to OFF h. MD2 to OFF. 12. Replace the battery and power up the Beltpack.
CellCom/FreeSpeak Firmware Update Procedures 3 Active Antenna Firmware Upgrade 3.1 Software and Hardware Required. 1. FreeSpeak Upgrader – supplied on CD 2. FreeSpeak Registation Serial Cable 3. Latest release of Bootloader and Antenna App – supplied on CD 3.2 Antenna Upgrades To upgrade antenna firmware, install the „BeltpackUpgrader‟ tool in the "PC Tools" directory of this CDROM.
CellCom/FreeSpeak Firmware Update Procedures Rev: 6.05 VGC Part No.
CellCom/FreeSpeak Firmware Update Procedures 3.2.1 “Freespeak Upgrader” for Antenna Updates 1) Run FreeSpeak Upgrader on the PC (make sure that the correct COM port is selected). 2) Make sure the selected Firmware File is the latest AA release 3) Click Download (the AA should still be connected to the PC via the beltpack registration cable). 4) When the firmware file is downloaded successfully (takes about 2 mins) the Green status LED should start flashing at about 1Hz.
CellCom/FreeSpeak Firmware Update Procedures 3.2.2 Active Antenna DECT Updates 3.2.2.1 Preparing Active Antenna To set an Active Antenna into DECT download/debug mode, open the case and put links on LK4 and LK2, as shown below. These are the same links set to upgrade or debug the DECT firmware. These links should be removed for normal operation.
CellCom/FreeSpeak Firmware Update Procedures Kirk Module RM5 Module 3.2.3 “Flash Downloader” for Antenna DECT updates 1) Install the DECT loader onto a PC with a serial port. 2) Connect the PC to the Antenna using the Beltpack registration cable. 3) Start up the Flashloader program, set as follows with the correct DECT update file selected in “Target Final Flash Executable”. 4) Power up the Antenna select start. The DECT should start updating; the status will change from “idle” to “erasing flash”.
CellCom/FreeSpeak Firmware Update Procedures 7) After the DECT is upgraded. Turn off the Antenna, disconnect the power and remove the jumpers from the LK2 and LK4. 8) Check that Jumper LK1 is shorted as this activates the watchdog. 9) Connect a terminal emulator (i.e. HyperTerminal) set at 19200,8,N,1. 10) Power up check that the SW versions are correct. Rev: 6.05 VGC Part No.
CellCom/FreeSpeak Firmware Update Procedures 3.3 Active Antenna Bootloader The active antenna bootloader is only required for Antennas that have never had an application loaded into it. You will need to install the Flash Development Toolkit (FDT).- obtainable from Renesas - Flash Development Toolkit Download. 3.3.1 Active Antenna Bootloader Install the Flash Development Toolkit (FDT) Details on configuring the FDT are in appendix.
CellCom/FreeSpeak Firmware Update Procedures 4 Splitter Firmware Update Procedure 4.1 How to Reprogram Splitters Splitters do not have a bootloader. Upgrades are done using FDT. 4.2 Software and Hardware Required. 1. Flash Development Toolkit (FDT).- obtainable from Renesas - Flash Development Toolkit Download. 2. FreeSpeak Registation Serial Cable 3. Latest release of Splitter Application– supplied on CD 4.3 Splitter Application 1. 2. 3. 4. 5. 6. 7. 8. 9.
CellCom/FreeSpeak Firmware Update Procedures 5 Basestation Upgrade Procedure Software and Hardware Required - Ethernet/Ethernet Cross-over Cable - Xilinx USB Programmer - CellCom/FreeSpeak Registration Cable - Memory SIMM (older units only) - Boot PROM (older units only) - Latest version of Application Code (found on CD) - Latest version of Xilinx Code (found on CD) - CellCom/FreeSpeak PC ToolKit - Valid v2.0 Passcode 5.
CellCom/FreeSpeak Firmware Update Procedures START Is the unit s/n 1761 or above? 1. Make back ups of the maps on the PC System. 2. If possible, retrieve the map from the basestation and back it up 3. Install the new CellCom toolkit CELLCOM / FREESPEAK BASESTATION FIRMWARE UPGRADE GUIDE Open the unit and replace the Boot PROM and memory SIMM with the upgrade parts.
CellCom/FreeSpeak Firmware Update Procedures CELLCOM-10 / FREESPEAK-10 BASESTATION FIRMWARE UPGRADE GUIDE START 2 1. Power Down the base and remove the power cable 2. Remove the lid and move the jumper next to the battery to link pins 2&3. 3. Wait 5 seconds and move the jumper back to its original place. 4. Set dipswitches 1 and 2 into the “ON” position 3 and 4 to “OFF”. 5. Reconnect the Power cable and Power On the Basestation for 30 Seconds. 6.
CellCom/FreeSpeak Firmware Update Procedures The progress is indicated in the program. The basestation display will also display information on the download whist continuing with the update. On completion the basestation will reset. 5.1.
CellCom/FreeSpeak Firmware Update Procedures Note: a license agreement will need to be accepted before download. The download is large (approx 1Gb). 5.2.1 Steps to upgrade the Xilinx FPGA using v2.0 - Connect the Basestation and PC via Ethernet Open the Configuration Editor software Click on „Send File‟ Enter the Basestation IP address Find the *.
CellCom/FreeSpeak Firmware Update Procedures - Click „OK‟ to begin programming Restart the Basestation XiLINX versions can be checked from v2.0 onwards from the INFO display on the Basestation 5.3 Boot PROMs and Memory SIMMs A number of the older CellCom/FreeSpeak units have incorrect boot PROMs and memory SIMMs. This can cause the basestation to fail the application upgrade process.
CellCom/FreeSpeak Firmware Update Procedures 6 Appendix A – Flash Development Toolkit Set-Up Due to licensing restrictions a copy of the flash development toolkit (FDT) cannot be included on the CellCom/FreeSpeak release CD. A freeware version of the FDT may be downloaded from the following site:Renesas - Flash Development Toolkit Download This is a direct link to the latest version at the time of publishing (Renesas Flash Development Toolkit V.3.07 Release 02).
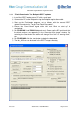
CellCom/FreeSpeak Firmware Update Procedures 6.1 Flash Development Toolkit Installation After selecting the tool to download – read and accept the licence agreement. The download page is displayed. Select the Download button Rev: 6.05 VGC Part No.
CellCom/FreeSpeak Firmware Update Procedures Run (or save and run later) the installer The installation will be downloaded – this may take a while depending on the speed of your internet connection Select Run. The installation will start. Hit OK Rev: 6.05 VGC Part No.
CellCom/FreeSpeak Firmware Update Procedures A warning webpage may be displayed. Follow the instructions Rev: 6.05 VGC Part No.
CellCom/FreeSpeak Firmware Update Procedures Select the desired installation language Accept the licence agreement Rev: 6.05 VGC Part No.
CellCom/FreeSpeak Firmware Update Procedures Enable installation of Kernel: Protocol B – H8S-2300 family feature drivers. All other feature can be installed but they are not needed. It is recommended that you do not install „AutoUpdates‟ Select Next Rev: 6.05 VGC Part No.
CellCom/FreeSpeak Firmware Update Procedures Support for .MOT data files only is required – it will not affect anything if the other file supports are installed. Accept or change the installation directory Rev: 6.05 VGC Part No.
CellCom/FreeSpeak Firmware Update Procedures Install the application. Accept finish when available Rev: 6.05 VGC Part No.
CellCom/FreeSpeak Firmware Update Procedures Note after accepting finish on the installation – the installer may start an additional installation – this may be cancelled without affecting the FDT. The tool it now installed and ready to use. Rev: 6.05 VGC Part No.
CellCom/FreeSpeak Firmware Update Procedures 6.2 Running and Configuring and using the FDT From the start menu – select Renesas\Flash Development Toolkit 3.07\Flash Development Toolkit 3.07 Basic This will start the tool as below Note: you could run the full tool and save the setting under project – please see the documentation installed with the tool if you will to so this. Select the device as specified in the instructions (currently this is only H8S/2318F) Rev: 6.05 VGC Part No.
CellCom/FreeSpeak Firmware Update Procedures Select the serial port you are using Rev: 6.05 VGC Part No.
CellCom/FreeSpeak Firmware Update Procedures Select the CPU Crystal Frequency as specified in the instructions – current settings shown below. Beltpack Antenna Splitter – 10.36MHz – 10.36MHz – 16.38MHz Set connection mode as specified in the instructions – BOOT mode for all applications Set the recommended speed as specified in the instructions – currently 19200 fro all applications (note you will need to deselect the „use default‟ check box allow this to be set). Rev: 6.05 VGC Part No.
CellCom/FreeSpeak Firmware Update Procedures Leave protection and Messaging to the default settings above Rev: 6.05 VGC Part No.
CellCom/FreeSpeak Firmware Update Procedures Check the User/Data Area check box and select the file to be downloaded. Ensure that the beltpack registration cable is connected to the unit and the unit is configured as per the instructions. Select Program Flash and the download should start. Rev: 6.05 VGC Part No.
CellCom/FreeSpeak Firmware Update Procedures If the download is successful the appropriate message is displayed in the application window. The download is complete – follow the rest of the instructions. Rev: 6.05 VGC Part No.
CellCom/FreeSpeak Firmware Update Procedures 7 Appendix B – Beltpack Opening 7.1 Disassembling a MKI Beltpack For a DECT Upgrade 1 Remove the Belt clip Remove the Battery clip Remove the 7 screws from the rear of the unit 2 Remove the ClearCom badge from the front of the unit and remove the screw below Rev: 6.05 VGC Part No.
CellCom/FreeSpeak Firmware Update Procedures Remove the front cover by pulling it forward. Apply pressure towards the table on the top (encoder part) of the chassis to keep the PCBs from lifting as you remove the front bodywork 3 Remove the 2 screws holding the PCB by the XLR connector Separate the front and rear parts of the beltpack enough for the connectors to clear by lifting the boards vertically. Be aware that there are 3 boards loosely connected together.
CellCom/FreeSpeak Firmware Update Procedures Adjust the dip switches as required 5 See Preparing FS-BP MK I & PD2202 Beltpacks Only for download mode dipswitch settings Should the lower board become separated, reconnect it before attempting to reassemble the unit. There is a single connector that if misaligned will damage the unit. 6 Rev: 6.05 VGC Part No.
CellCom/FreeSpeak Firmware Update Procedures 7 Ensure that the connector is aligned as shown in this picture. Failure to do so will result in damage to the unit. 8 Should the upper board and assembly become separated, reconnect before attempting to reassemble the unit. There are 2 connectors which can be misaligned if care is not taken Rev: 6.05 VGC Part No.
CellCom/FreeSpeak Firmware Update Procedures 9 Fold the connected upper boards over towards the rear of the unit. Place the XLR connector so that it straddles the lower board Line up the connector between the top and bottom halves. This can be mis-connected without due care Adjust the XLR connector and the two halves together 10 Replace battery clip Power Program the DECT as required Repeat steps 4 – 9 changing the dip switches back to the default.
CellCom/FreeSpeak Firmware Update Procedures Replace screws and badge 10 Rev: 6.05 VGC Part No.
CellCom/FreeSpeak Firmware Update Procedures 7.2 Disassembling a 2202 Beltpack For a DECT Upgrade Remove the battery cover Remove the 6 screws fastening the unit Remove at least 1 battery. Rev: 6.05 VGC Part No.
CellCom/FreeSpeak Firmware Update Procedures Open the unit like a clamshell. Separate the case by lifting the back up, while attempting to keep the front of the unit and PCB together Take care when moving two halves apart as the cables to the battery are often tight Adjust the dip switches as required Close the unit and replace the battery without the screws Power up and run the DECT loader to upgrade the DECT NOTE: For dip switch settings See Preparing FS-BP MK I & PD2202 Beltpacks Only.