HME# 400G623 Rev B 9/24/09 DX300ES Wireless Headset System Operating Instructions
Table of Contents SECTION 1. SECTION 2. INTRODUCTION..............................................................................................1 EQUIPMENT IDENTIFICATION..................................................................2 STANDARD EQUIPMENT..................................................................................................................................... 2 OPTIONAL EQUIPMENT .................................................................................................
FCC NOTICE This device complies with Part 15 of the FCC rules. Operation is subject to the following two conditions: (1) This device may not cause harmful interference, and (2) This device must accept any interference received, including interference that may cause undesired operation. NOTE: This equipment has been tested and found to comply with the limits for a Class A digital device, pursuant to Part 15 of the FCC rules.
SECTION 1. INTRODUCTION The DX300ES is a digital wireless communication system that enables handsfree two-way secure communication on two independent channels, or both channels at the same time. It can be operated with AC or battery power. Multiple base stations can be interconnected for expanded capabilities. In addition to the standard communication among base station and beltpac operators, the system can be configured to operate with almost any radio or digital matrix (4-Wire) communication system.
SECTION 2.
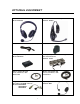
OPTIONAL EQUIPMENT Headset with dual ear muffs Model # HS15D All-in-one headset with battery Model # WH300 Headset extension cable, 6 ft (1.83 meter) Foam earmuffs for all-in-one headset Rechargeable battery for base station Model # BAT850 Battery charger for use with rechargeable base station batteries Model # AC850 Remote antenna kit with 6 foot (1.83 meter) cable and bracket Remote antenna kit with 30 foot (9.
EQUIPMENT FEATURES Base Station Top Panel — Antennas Battery compartment latches Power button Left headset volume control Right headset volume control Left talk lights Right talk lights Left select button Right select button Left talk button Right talk button Active Channel lights Clear/Band button Registration button 4 Status indicator Reset switch (recessed)
Front Panel — Auxiliary audio in/out volume adjustments (recessed) Left Side Panel — Cable “input” from another base station Microphone gain adjustment for left headset Left headset connector Single/Dual base station selection switch Primary/Secondary base station selection switch Right Side Panel — Right headset connector Microphone gain adjustment for right headset Antenna connectors Cable “output” to another base station Power supply connector Rear Panel — 10-pin connector for auxiliary audio
Beltpac X-channel button ALL button O-channel button Power/O-channel light Battery Battery release latch Power/X-channel light Power button Headset cable connector Volume up button Volume down button All-In-One Headset (optional) O-channel button X-channel button Power/Talk light Volume up button Power button Headband slide-to-fit Microphone boom ALL button Volume down button Battery release latch Sanitary muff Talk light Battery 6
SECTION 3. EQUIPMENT SETUP BATTERY CHARGER NOTE: Set up the battery charger and charge all beltpac and/or all-in-one headset batteries while you are setting up the base station.
BASE STATION Antenna and AC Power Connections 1 2 3 90° angle Screw both antennas onto the connectors on the back of the base station. Tighten at 90° angle. Antenna connectors Set up base station where no objects are blocking the line-of-sight from base station to the beltpacs. If base station can not be set up with no objects in line-of-sight between it and the beltpacs, install the antennas away from the base station. See page 17 for remote antenna installation.
Optional Battery Operation of Base Station NOTE: Always plug base station into AC power when it is available. Turn base station off when it is not being used, to conserve battery power. Typical base station battery life when used continuously is as follows: Energizer Lithium BAT850 Rechargeable Battery Duracell Coppertop 1 2 6 hours 3 hours 1 hour If you are using the battery sled, load 6 “AA” batteries into it.
Spectrum Friendly™ Interference Avoidance Interference such as popping sounds may occur when frequencies of a WiFi system, a wireless DMX lighting system or another HME system is in use. This interference may be avoided if these systems can be limited to one portion of the 2.4GHz to 2.48GHz frequency band, and your base station is set to operate in the opposite half of the band as follows: 1 Turn the base station power on. The STATUS window will show “8” for a few seconds.
Multiple Base Stations Up to 20 crewmembers can communicate in the dual-channel mode, 5 per base station, by interconnecting base stations as described below. Audio Connection Connect base stations with the provided interconnect cable, from the BASE OUT connector on one to the BASE IN connector on the other.
Multiple Base Station Initialization Multiple base stations must be “initialized” according to the following instructions, so their frequencies will not cause interference. After initializing each base station, register each beltpac that will be used with that base station (See page 15). Primary/Secondary Base Station Setting Set the BASE switch on each base station as described below, and then configure each base station through the initialization procedure that follows.
4 5 Press the REGISTER button on the primary base station The STATUS window will show a small “o.” Press the REGISTER button on the secondary base station to assign it a number (1, 2 or 3). Wait until the base is initialized (approximately 10 seconds). RECOMMENDED: If only two base stations will be used, set the secondary base station to #2.
Base Station Microphone Gain Adjustment The microphone gain adjustment allows you to adjust the level of your voice as it is transmitted from the headsets plugged into the base station, to the rest of the system. Microphone gain must be adjusted for each base station headset. 1 2 3 4 5 Use a headset that is plugged into the right side of a base station, and locate the MIC GAIN adjustment that is recessed in a hole on the right side of the base station.
BELTPACS Beltpac Registration NOTE: Registration of all-in-one headsets is the same as the beltpac registration described below, except for step 2. If you have more than one base station, you must register each beltpac and/or all-in-one headset to the base station it will be used with. 1 2 3 Turn the base station power on, and beltpac power off. Plug the headset into the beltpac and put the headset on your head. Press the REGISTER button on the base station registration panel.
Beltpac or All-In-One Headset Adjustments Sidetone Adjustment (Beltpac only, not on all-in-one headset) When you speak into the microphone, you can hear sidetone (your own voice) in the beltpac headset. Sidetone can be adjusted as follows: 1 2 Be sure the beltpac power is on. While holding down the “O” button, press the volume-up ▲ or volume-down ▼ button as many times as needed to reach an acceptable level. You do not hear beeps except for maximum or minimum double beep.
OPTIONAL REMOTE ANTENNA INSTALLATION If it is not possible to avoid obstructions that may block signals between the base station and the beltpacs and/or all-in-one headsets, it may be necessary to locate the antennas away from the base station. Remote antenna kits with either 6 foot (1.83 meter) or 30 foot (9.14 meter) cables can be used to mount the antennas wherever necessary to alleviate this problem. To order a remote antenna kit, see optional equipment on page 3.
OPTIONAL AUXILIARY EQUIPMENT CONNECTION Equipment requiring 4-Wire audio interfacing, such as audio/video recorders or hardwired intercoms, can be connected to the 10-pin connector and plugged into the rear panel of the base station. Equipment requiring relay closure, such as a router or mobile radio, can be connected to the 8-pin connector and plugged into rear panel of the base station.
SECTION 4. EQUIPMENT OPERATION BASIC OPERATION Base Station Headset volume Channel indicator lights (O, ALL or X) Green – Listen only Red – Talk and listen Left headset controls Right headset controls Channel select button (O, ALL or X) Talk button (Push ON – Push OFF) 1 2 3 Press base station POWER button to turn on power. Put left or right headset on your head. Use headset controls on same side of base station as headset. Adjust headset volume as needed.
Beltpac / All-In-One Headset The O, X and ALL button functions described below are for operation in the standard default mode. The buttons can also be set to function in other modes. See page 22 for operating mode setups. 1 2 3 Be sure fully charged battery is in the unit. If using beltpac — Plug headset into beltpac and put headset on your head. Slide beltpac into pouch and clip it on your belt. Press and release PWR (power) button to turn unit on.
Changing Batteries Beltpac batteries typically provide 20 hours of continuous use in listen mode. If you hear “Change battery” in your headset ― 1 2 3 4 5 6 If using beltpac, remove it from its pouch. On beltpac or all-in-one headset, slide battery release latch in direction of arrow. Lift battery out of beltpac or all-in-one headset. Place battery in battery charger port for recharging. Install fully charged battery in beltpac or all-in-one headset. If using beltpac, put it back in its pouch.
Operating Mode Setup Set up beltpacs and/or all-in-one headsets to operate in the desired mode by pressing and holding the button combinations shown below when you press the PWR (power) button to turn the unit on.
RADIO APPLICATIONS Emergency Services Operating Scenario ● All crewmembers will hear both the Crew Channel and Radio Channel simultaneously. ● All crewmembers have the ability to talk to other crewmembers in either Latching (hands-free) or PTT (push-to-talk) modes, using either the O or X buttons. ● All crewmembers have the ability to talk to the radio channel in a PTT mode, using the ALL button. Beltpac Configuration ● Set for Latching mode with the O and ALL buttons enabled.
Production Crew with Separate Radio Channel Operating Scenario ● Production Manager will monitor Radio Channel and Production Crew Channel simultaneously, hands free. Production Manager can selectively talk to Radio channel or Production Crew Channel. ● Production Crew members will hear and talk to Production crew members only. ● Radio Crew members will hear and talk to radio Crew members only. Beltpac Configuration ● Production Manager Beltpac set for X and O and ALL (monitor on O).
SECTION 5. TROUBLESHOOTING If you are unable to correct any of the problems described below or if your problem is not covered, call 1-800-848-4468 for assistance. Power light on base station does not come on when power button is pressed. Be sure the power supply is properly connected to the base station, and the power cord is properly connected to the power supply and electrical outlet.
Beltpac or all-in-one headset users can not hear or talk to base station operators who are using headsets. Be sure base station headsets are fully plugged into the base station headset connectors. Be sure the appropriate SELECT lights are red (O, X or ALL) when base station operators are talking. Be sure everyone is talking or listening on the right channel (O, X or ALL). Beltpac range is bad. Be sure antennas are properly connected and tightened on base station.
FREQUENTLY ASKED QUESTIONS Are the battery charger and base station power supplies interchangeable? Yes. What is the maximum recommended number of base stations that can be linked together with interconnect cables? Four. Does linking the base stations automatically prevent them from interfering with each other? No, all bases that are linked together must be initialized or set to the high or low portion of the frequency band to prevent them from interfering with each other’s frequencies.
SECTION 6. TECHNICAL DATA EQUIPMENT SPECIFICATIONS Base Station GENERAL ⎯ Frequency Range: Frequency Response: Power Requirements: Temperature Range: Size: Weight: # of Beltpacs per Base: 8-Wire I/O: Auxiliary Audio: Headset Connectors: Electret microphone: Headset Output: Top Panel Controls and Indicators: Front Panel: Left Panel: Right Panel: Rear Panel: Antenna Type: System Distortion: Communication Security: All, 2400 – 2483.5 MHz Low, 2401.92 to 2439.94 MHz High, 2443.39 to 2481.
TRANSMITTER ⎯ Type: Transmit Power: Modulation Type: Frequency Stability: Harmonics/Spurious: Frequency hopping, spread spectrum 100mW burst Gaussian filtered FSK, TDMA 13 ppm Exceeds FCC and ETSI specifications over temperature RECEIVER ⎯ Type: RF Sensitivity: Frequency Stability: Distortion: Frequency hopping, spread spectrum <–90dBm w 10-3 BER 13 ppm <2% Beltpac Frequency Range: Antenna: Frequency Response: Transmit Power: RF Sensitivity: Battery Requirements: Battery Life: Temperature Range: Weight:
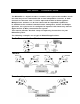
BASE STATION BLOCK DIAGRAM 30
SECTION 7. INDEX Base station audio connection (multiple base stations) ...............................................................................11 features......................................................................................................................................4 interference avoidance, Spectrum Friendly™ .........................................................................10 microphone gain adjustment ..................................................................