
User`s manual

Chapter 4: Using the Chat Application 17
CHAPTER 4: USING THE CHAT APPLICATION
USING THE CHAT APPLICATION
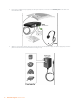
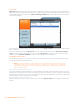
If not already open, start the CHAT application.1.
Click the 2. My Devices button and select the device you want to tune (select the Other or All option if your device/ap-
plication is not listed), then click the Apply to CHAT button.
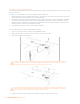
For external hardware devices, connect the device to the CHAT 170 using the appriopriate connection diagrams 3.
located in Chapter 2: Getting Started.
Adjust the speaker and volume settings on the external device or in the application to 50% (half volume).4.
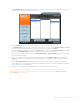
Click the 5. Advanced button to display the pre-defined audio settings for the device you selected in step 2. Use
the USB Audio section of the screen to tune applications; use the Line Audio section to tune external hardware
devices connected to the CHAT 170 breakout box.
> NOTE: In the Advanced screen, adjusting Microphone Level under USB Audio changes the CHAT
170 microphone volume for USB applications, while adjusting the Output Level under Line Audio
changes the microphone volume being sent to the device connected to the CHAT 170’s line audio jack.
Likewise, adjusting Speaker Level under USB Audio changes the CHAT 170 speaker volume, while
adjusting the Input Level under Line Audio changes the speaker volume being received from the con-
nected device.
Place a call using the device or application. Land lines provide the best audio for tuning purposes.6.
Ask the person on the other end of the call to count from 1 to 10 in a normal voice. While the person is counting, 7.
click and move the Input slider in the CHAT application until the caller’s voice can be clearly heard. Repeat as
needed to find the optimal speaker volume for the device.
While the caller is still connected, count from 1 to 10 in a normal voice. Ask the caller if they can hear you clearly. 8.
Click and move the Output slider until the caller can hear you clearly. Repeat the test count as needed to find the
optimal microphone volume for the device.
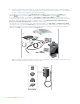
Click 9. Save to Database to capture the optimized settings. The Add Settings to Database dialog appears. Enter
appropriate name in the Model field, then click the Save to Database button.
The optimal audio settings for the device or application are now ready for use. Repeat steps 1 through 9 for any ad-10.
ditional devices and applications.
To switch between audio settings for different devices and applications, click the My Devices button, select the desired
device or application, then click the Apply to CHAT button. The audio settings are instantly applied for the chosen
device or application.
Using A Third-Party Application
IfyouareusingtheCHAT170withanapplicationotherthanCHAT−suchasCiscoCommunicatororSkype−ClearOne
recommends using the tuning wizard or audio configuration controls in that application to adjust audio settings. If the
application does not have a tuning wizard or audio settings, use the CHAT application to tune audio settings for optimal
sound quality as explained in the previous section. Audio setup information can also be found for the CHAT Application
in the next few pages.