ClearOne Communications Inc.
AccuMic™ User Manual
ii AccuMic Microphone — Table of Contents Table of Contents Introduction . . . . . . . . . . . . . . . . . . . . . . . . . . . . . . . . . . . . . . . . . . . . . . . . . . . .1 Service and support . . . . . . . . . . . . . . . . . . . . . . . . . . . . . . . . . . . . . . . . . . . . . . . . . . . . . .1 Product returns . . . . . . . . . . . . . . . . . . . . . . . . . . . . . . . . . . . . . . . . . . . . . . . . . . . . . . . . .1 Unpacking . . . . . . . . . . . . . . . . . . . . . . . . . . . . . . .
AccuMic Microphone — Introduction Introduction The AccuMic™ VC and the AccuMic PC are highly-advanced microphones that provide high quality, hands free audio. The AccuMic VC connects to video codecs to improve audio in videoconferencing applications. The AccuMic PC connects to a computer to improve audio in webconferencing applications.
2 AccuMic Microphone — Introduction Unpacking Carefully remove the AccuMic, cables and power supply from the packaging. Ensure that you received the following parts: AccuMic VC AccuMic VC 910-156-115 4 Plug RCA Cable with Breakout Power 830-156-003 100-240V In Line Power Supply with Power Cord 551-153-001 Manual 800-157-001 Figure 1. Unpacking the AccuMic VC AccuMic PC AccuMic PC 910-157-001 3.
3 AccuMic Microphone — Introduction Product overview Microphone pad B A Figure 3. Microphone pad A. LEDs. Indicates when the microphones are activated. B. Mute button. Mutes or unmutes the microphones. AccuMic VC cable A B C AccuMic PC cable D A B E Figure 4. AccuMic VC connector cable C D E Figure 5. AccuMic PC connector cable A. Speaker Reference In.This plug provides an echo cancellation reference for the AccuMic, ensuring audio is clear and echo-free. B. Speaker Reference Out.
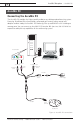
4 AccuMic Microphone — AccuMic PC AccuMic PC Connecting the AccuMic PC Line In The AccuMic PC provides the highest quality audio to any desktop webconferencing system. Featuring Distributed Echo Cancellation, automated gain control, gating control and adaptive ambient mode, the AccuMic PC flawlessly picks up audio within a full 360 degree coverage area. You can connect an AccuMic PC Extension Mic (part no. 910-157-010) to expand the audio pick-up capabilities of the conferencing system.
5 AccuMic Microphone — AccuMic PC To connect the AccuMic PC 1. Connect the 10-pin plug to the 10-pin connector on the AccuMic PC. 2. Connect the Speaker Ref In (green) to the Line Out connector on the PC soundcard. 3. Connect the Mic Out (red) to the Mic In on the PC soundcard. 4. Connect the Speaker Ref Out (green) to the Speaker jack cable from the speakers. Note: Your speakers connect directly to the AccuMic PC to allow the echo cancellation to work properly. 5.
6 AccuMic Microphone — AccuMic PC Configuring volume control settings To ensure audio is heard clearly on both ends, you must configure the Volume Control settings on your computer. You need to mute the near-end microphone balance to prevent local audio feedback. (Note: This does not mute the AccuMic Microphone). You also need to select and adjust the far-end microphone balance to ensure audio is being sent at a proper level and far-end participants can hear you. To open the volume control panel 1.
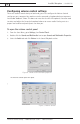
7 AccuMic Microphone — AccuMic PC To mute near-end microphone balance Note:You must mute the microphone balance to prevent local audio from looping back through your loudspeakers and causing feedback problems. 1. Open Volume Control panel. 2. On the Options menu, click Properties. Figure 10. Options menu Figure 11. Playback 3. In the Properties window, click Playback. 4. Scroll down and select the Microphone check box. 5. Click OK.
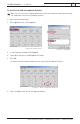
8 AccuMic Microphone — AccuMic PC To select and adjust far-end microphone balance Note: You must select Microphone in the Recording Control window to ensure audio is being sent to the far end. 1. Open Volume Control panel. 2. On the Options menu, click Properties. 3. In the Properties window, click Recording. 4. Select the Microphone check box. Figure 13. Recording 5. Click OK to open the Recording Control window. 6. Click the Select check box for Microphone Balance. Figure 14. Recording control 7.
9 AccuMic Microphone — AccuMic VC AccuMic VC Connecting the AccuMic VC The AccuMic VC easily connects to most video codecs at the line level audio input and output. Please refer to the table in the appendix for a list of video codecs that are compatible. You can connect an optional AccuMic VC Extension Mic (kit part no. 910-156-117) to expand the sound pick-up capabilities of the conferencing system. To connect to a video codec 1.
10 AccuMic Microphone — AccuMic VC To connect an AccuMic VC Extension Mic Note: Do not connect an AccuMic VC extension to an AccuMic PC. The AccuMic VC is not compatible with the AccuMic PC and will not work properly. 1. Disconnect the first AccuMic VC from the power source. 2. Connect one end of the 10' (3 meter) mini-DIN cable to the 8-pin connector on the first AccuMic VC. 3. Connect the other end of the cable to the 8-pin connector on the extension AccuMic VC. 4.
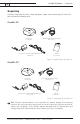
AccuMic Microphone — Operation 11 Operation Using the AccuMic The AccuMic is a plug-and-play microphone; the only function that is controlled manually is Mute. To mute the AccuMic 1. Press the Mute button (on top of the mic pad) to mute the AccuMic’s mic elements.The LEDs will turn red. 2. Press Mute again to unmute the mics.The LEDs will turn green. Note: When using two connected AccuMics, pressing the Mute button on either unit will mute/unmute both AccuMic mic pads.
12 AccuMic Microphone — Appendix Appendix Specifications Dimensions (L x W x H) 8" x 6.5" x 1" (20.3 x 16.5 x 2.5 cm) Speaker Reference Out AEC Tail Time RCA jack Nominal level -10dBu 130ms Noise Cancellation 6dB attenuation Weight 1 lb (.45 kg) Operation Temperature: 41–104° F (5–40° C) Humidity: 50–80% Storage Temperature: 41–158° F (5–70° C) Humidity: 10–90% Power 12 VDC, 2.5A, 25W, center positive AccuMic VC Cables (1) 35' (10.7 m) four plug RCA cable (1) Power In 12VDC, 2.
AccuMic Microphone — Appendix 13 Video codec compatibility AccuMic VC only Figure 17.
14 AccuMic Microphone — Appendix Warranty ClearOne Communications, Inc. (Manufacturer) warrants that this product is free of defects in both materials and workmanship. For full warranty information and coverage, refer to the ClearOne website at www.clearone.com. ClearOne Communications, Inc.
AccuMic Microphone — Appendix 15 Technical Services Group ~ 1-800-283-5936 (USA) ~ 1-801-974-3760
16 AccuMic Microphone — Appendix FCC Part 15 Compliance This equipment has been tested and found to comply with the limits for a Class A digital device, pursuant to Part 15 of the FCC rules.These limits are designed to provide reasonable protection against harmful interference when the equipment is operated in a commercial environment.
17 AccuMic Microphone — Appendix Standard(s) to which Conformity is declared: 89/336/EEC "Electromagnetic Compatibility (EMC) Directive": EN 55022: 1994 (Emissions) Specification for limits and methods of measure ment of radio interference characteristics of information technology equipment. EN 61000-3-2:1995/A1/A2:1998 Part 3: Limits – Section 2: Limits for harmonic current emissions.