
Manual


Integrating with NetStreams Musica 5000 Series
4-5
All specifications subject to change without notification. All rights reserved. Copyright © 2006 NetStreams
Main +1 512.977-9393 / fax +1 512.977.9398 / Toll Free Technical Support +1 866-353-3496
3600 W. Parmer Lane, Suite 100; Austin, TX 78727 / www.netstreams.com.
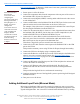
2. Connect a component video cable from the component video out ports of the
source to the PAN6400 VDC (2) IN ports for that source.
3. Connect the coaxial digital (S/PDIF) audio cable from the source to the PAN6400
VDC (1) IN port (green) for that source.
4. Connect the analog audio from the source to the Musica MU5066ADC.
The Musica and PAN6400 VDC devices must all connect to the same number
source input (S1 - S4). If you connect the video cables to the S2 ports, the coaxial
digital (S/PDIF) cable and the analog cables must also connect to the S2 ports on
the respective devices.
5. Connect an IR Emitter to the Musica MU5066ADC IR OUTPUT port for the
source and place the emitter end over the IR window on the front of the source.
6. Connect a null modem cable from the RS-232C port of the Musica MU5066ADC
to the RS-232 IO1 port of the PAN6400 VDC (1).
7. Connect a null modem cable from the RS-232 IO2 port of the PAN6400 VDC (1)
to the RS-232 IO1 port of the PAN6400 VDC (2).
8. Connect a CAT5 cable from the DISPLAY OUTPUT port for that source on the
PAN6400 VDC (2) to the VIM port of a VP500.
9. Connect the VP500 attached to PAN6400 VDC (2) to the display using a
component cable.
You can also route the video from the VP500 to the A/V Receiver and then to the
display.
10. Connect an IR Emitter to the IR Out port of the VP500 attached to PAN6400
VDC (2) and place the emitter end over the IR window on the display.
11. Connect a CAT5 cable from the DISPLAY OUTPUT for that source on the
PAN6400 VDC (1) to the VIM port of a VP500.
12. Connect a coaxial digital (S/PDIF) cable from the Y/Composite port of the VP500
attached to the PAN6400 VDC (1) to the Digital Audio In of the A/V Receiver.
13. Connect 5.1 or 7.1 channel speakers from the output ports of the A/V Receiver.
14. Connect a CAT5 cable from the appropriate room CLASS 2 WIRING port on the
Musica MU5066ADC to the ADC port of the Musica Keypad.
Use the same output number on both the PAN6400 VDC and the Musica
MU5066ADC ports. Otherwise the system will not synchronize the display and the
audio connected to the VP500 and the Musica Keypad.
15. Connect a 16/4 cable with 2-pin Phoenix connectors from the PWR port on the
Musica Keypad to the appropriate display ROOM POWER port on the Musica
MU5066ADC.
A 16/4 and CAT5 Siamese (combo) cable is easier to run and less likely to break.
You can use a 16/2 cable since two wires on the 16/4 cable are clipped and not
used. However, using the 16/4 cable allows for easy future expansion or upgrades.
16. Connect speakers using 4-pin Phoenix connectors from the rear of the Musica
MU5066KP Keypad to the left and right speakers.
17. Turn power on to all devices.