N DigitalTalk MAX™ 2100 Owner’s Manual -0-
Table of Contents Chapter 1: Getting Started ............................................ 1 Phone Activation ............................................................ 1 Phone Safety & Performance..........................................1 NEC Authentic Accessories™ ........................................1 Connecting & Disconnecting the Battery.........................1 Charging the Battery .......................................................2 NiCd and NiMH Battery Charging Times .....................
Table of Contents 3. Message ..................................................................... 14 Voice Messages........................................................... 14 Text Messages ............................................................ 15 Text Message Viewer....................................................16 SMS Menu ....................................................................16 Clear All Text Messages ..............................................
Table of Contents 8. Digits Editing ............................................................. 29 Manual pause............................................................... 29 Auto Pause................................................................... 30 9. Mute............................................................................ 30 Mic Mute........................................................................30 All Mute ........................................................................
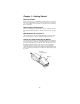
Chapter 1: Getting Started Phone Activation Before you can use your new NEC cellular telephone, the phone must be activated by a cellular service provider. Please contact your local cellular service provider for any questions regarding phone activation. Phone Safety & Performance Prior to operating your cellular phone, please read this manual thoroughly including Chapter 4, “Safety & Performance” on page 32.
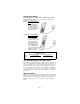
Charging the Battery A new phone battery must be fully charged before being used for the first time. The phone battery can be charged through one of two setups. Setup 1: Phone & AC Adapter Only Plug the AC adapter into a standard AC electrical outlet. Insert the adapter plug into the jack located on the side of the phone. Setup 2: Phone, AC Adapter, &Charging Stand Plug the AC adapter into a standard AC electrical outlet. Insert the adapter plug into the charging stand jack.
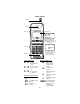
Phone Layout Antenna Earpiece Volume Keys Display Screen !, ;( + 1 2 : 0 0 am J an 0 1 SER V I CE Standby Mode Display Example with Phone Operating on Digital Control Channel within Home System Service Area \! Phone Keys ;( + 5 551 21 2 I n Use Call in Progress Display Example with Phone Operating on a Digital Voice Channel within Digital Control Channel Microphone Display Icons Service Indicators ! or / Digital or Analog Channel In Use , or $ Home or Roam System Service In use / or %
Menu Tree Overview M Menu Options 1 Call Logs 2 Phone Book 1 2 3 4 5 6 1 2 3 4 5 Add to Phone Book View by Name View by Location View by Number Lock Phone Book Clear Phone Book 3 Message 4 Settings 1 2 3 4 5 6 7 8 9 1 2 3 4 Lock Call Text Message Audio Network Clock Environment Handsfreep Reset settings Dialed Received Missed Air Time Clear Voice Messagesl Text Messagesl Clear All Text Messages Store as Voice Mail number 5 Lock Keypad 6 Silent Mode 1 Off 2 On w 7 Non Pub Mode 1 Acquire New Sy
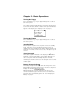
Chapter 2: Basic Operations Turning On Phone Press and hold the P key for approximately two seconds to turn on the phone. The cellular signal strength indicator, the battery charge indicator, the time, the date, and the cellular service provider indicator appear on the display. (See “Display Icons” on page 3.) ! , ;( 1 2 : 0 0 am J an 0 1 SERVI CE + Turning Off Phone Press and hold the P key for approximately two seconds to turn off the phone.
Placing a Call With the phone in the standby mode, key in the telephone num- S \ . The phone icon ( ) appears indicating the ber and press phone is in use. Correcting Digit Entry Error If you make a mistake entering a phone number, press C once to delete the last entered digit, or press and hold C to erase all of the entered digits.
Adjusting Earpiece Volume The volume keys located on the side of the phone can be used to adjust the earpiece volume during a phone call. With a call in progress, press < to increase or press > to decrease the ear- piece volume. Adjusting Keypad Volume The volume keys located on the side of the phone can be used to adjust the keypad volume. With the phone in the standby state (no call in progress), press < to increase or > to decrease the keypad volume. Accessing and Navigating Menus M key.
Viewing Your Phone Number C To view the phone number of your cellular phone, press with the phone in the standby mode. The phone number appears on the bottom line of the display for approximately three seconds. Retrieving Voice Mail If voice mail service is available through your cellular provider, you can easily retrieve your voice mail messages by pressing E1 with the phone in the standby mode.
Chapter 3: Menus Menu Navigation The phone contains menus and submenus to access and select the phone settings. You can navigate through all menus and submenus by using the E and B keys to scroll through the menu listings. Each of the menu and submenu listings has an assigned menu or submenu number. You can select and access a menu by pressing the assigned menu number on the keypad or by pressing M when the desired menu listing is flashing on the display.
1. Call Logs Menu Shortcut M1 With the phone in the standby mode, the Call Log Menu can be accessed by pressing below. M1 . The Call Log Menu is displayed C al l L o g menu 1 . D i al e d 2 .R e c e i v e d 3 .M i s s e d 4 .A i r T i m e 5 . C l e ar Use B and E to scroll through and view the entire Call Log Menu Menu Shortcut Dialed (Calls Log) M11 Your phone maintains a list of up to 20 of the last phone numbers you dialed. To view the list of the last 20 outgoing calls, M11 1 .
Menu Shortcut Air Time M14 Your phone automatically maintains a log of the total air time usage. The air time counter can be viewed by pressing M14 . The time counter for the air time usage in your cellular provider service area (indicated with an “H” for home system) and the air time usage outside your cellular provider service provider (indicated with an “R” for roam system) are displayed. Press N to exit the air time log.
Menu Shortcut Add to Phone Book M21 To add a phone number to the phone book, press M21 . Enter the phone number you want to add to the phone book and press M. Use the keypad to enter a name associated with the phone number. By repeatedly pressing a key, the characters shown in the table below can be included in a phone book entry name. You can enter a name of up to 10 characters with any blank space or symbol counted as a character.
Menu Shortcut View by Name M22 To recall a phone book entry by name, press M22 . Enter the first letter(s) of the desired phone book entry name M . If necessary, use the B and E keys to S to dial the phone number or press N to exit the phone book. and press locate the phone book entry. Press Menu Shortcut View by Location M23 To recall a phone book entry by the speed dial location number, press Press M23 . Enter the location number and press M .
3. Message Menu Shortcut M3 The Message Menu can be accessed by pressing Message Menu is displayed below. M e s s ag e menu 1 .V o i c e M e s s ag e s 2 .T e x t M e s s ag e s 3 . C l e ar Al l t e x t M e s s ag e s 4 . S t o r e as V o i c e M ai l number M3 . The Use B and E to scroll through and view the entire Message Menu Your phone can receive voice and text messages. Contact your cellular service provider for information and availability of voice and text messaging.
Menu Shortcut Text Messages M32 When you receive a text message, your phone sounds an alert and displays a notification. The alert and the displayed notification vary depending on the type of received text message. The types of text messages, the displayed notifications, and the alerts are shown below. Type of Text Message Displayed Notification Alert Normal XXXNew Messages PressMENU toread Dual tone alert; repeated one time.
Text Message Viewer Text messages are displayed within the text message viewer. The following keys can be used to navigate and operate within the text message viewer. B E # * S M C N Scrolls down through text messages line-by-line. Scrolls up through text messages line-by-line. Scrolls to the top of the next text message. Scrolls to the top of the previous text message. Automatically dials the contact telephone number of text message sender if the sender provided a telephone number within the message.
Menu Shortcut Clear All Text Messages M33 Text messages stored in your phone can be deleted. Press M33 . Press 1 to delete all text messages stored in 2 to delete only the unlocked text messages stored in your phone. Press 2 (for yes) to complete the deletion of text messages. Press N or C to exit the clear your phone or press text messages menu. Menu Shortcut Store As Voice Mail Number M34 The voice mail system telephone number can be stored into your phone.
Menu Shortcut Lock M41 Menu Shortcut Auto Lock M411 To protect your phone from unauthorized usage, you can set your phone to automatically lock when it is turned on. With the phone in the standby mode, press M411 . 2 to set As prompted, enter the 4-digit password. Press the automatic lock selection to on. If automatic lock is set to on, the phone is locked when it is powered on. To unlock the phone, press M0 , enter the 2 for unlock.
each time a call is either sent or received also can be either digital or analog. (See the following paragraph for information on the use of digital and analog voice channels.) To M422 ; 1 for digital call type or 2 for analog call select the voice channel type, press then press type. The call type/voice channel currently in use for the call ! icon / icon for analog voice in progress is indicated on the phone display by the for digital voice channel or the channel.
Menu Shortcut Transmit DTMF Tone M424 For your phone to successfully transmit tones, as described “Transmit DTMF Tone” on page 20, for accessing automated telephone systems, the capability to transmit tones must be turned on. (See the following paragraph for additional information on setting tones on or off.) To select the DTMF tone M424 . Press 1 to turn off 2 to turn on tone transmission. Press N to exit the transmit DTMF tone menu.
wrap selection, press M432 ; press 1 to 2 to disable word wrap. enable word wrap or press ? Enabled or Disabled Word Wrap With the word wrap selection set to enabled, the word breakage within text messages is limited to words exceeding 10 characters. Because word division is restricted, the messages can be easier to read; however, text messages with word wrap enabled usually contain more lines of text and require additional scrolling.
Menu Shortcut Network M45 Menu Shortcut Voice Privacy M451 Voice privacy is an enhanced security feature available through some digital cellular service providers. Voice privacy encrypts or scrambles the voice channel to ensure a telephone conversation is secure and private. For your phone to utilize the cellular service provider’s enhanced voice privacy feature, the voice privacy setting in your phone must be turned on. To set the voice privacy selection, press M451 .
M452 To set the system selection, press . Select one of the following system settings. Standard Press 1 to set your system selection to Standard (Home and Roam). The Standard setting allows the phone to first search for an available channel in the home system. If the phone cannot find an available channel in the home system, the phone searches for an outside or roam system. The roam indicator, $, and the roam system type indicator, / or %, are displayed when your phone accesses an outside or roam system.
Alarm Set Alarm: With the Auto On/Auto Off/Alarm setting screen displayed, press E or B until ALM is flashing; press M. If the alarm has been previously set, the last alarm time setting is automatically displayed. Press B to advance to the hour field. Key in hour; press B. Key in minutes; press B. Use M to specify a (for a.m.) or p (for p.m.). Press N to save the alarm time setting and exit the set alarm menu. The alarm icon (@) appears on the standby mode display.
outgoing calls to local phone numbers. To set the fixed digit dialing selection, press M472 . As prompted on the display, enter the 4-digit password. Type in a specified number of digits for restricting outgoing calls; for example, press 7 to restrict outgoing calls to 7-digit numbers. The M to save setting; press range is 0 to 26 digits. Press N to exit the fixed digit dialing menu.
Menu Shortcut Backlight M482 When your phone is connected to an in-vehicle handsfree adapter, the keypad and display backlight can be set to remain illuminated continuously. To select the backlight setting, press M482 . Press 2 for the phone backlight to remain on continuously in a handsfree configuration or press 1 to turn it off. Press N to exit the backlight menu.
6. Silent Mode Menu Shortcut M6 The Silent Mode Menu can be accessed by pressing The Silent Mode Menu is displayed below. M6 . Si l en t mode 1 .O f f 2 .O n By setting the phone to the silent mode, all phone alerts are turned off; an incoming call is indicated only by the keypad and LED flashing, and the incoming call notification appearing on the display. With the silent mode menu displayed, press turn off silent mode or press N 1 to 2 to turn on silent mode. Press to exit the silent mode menu.
If a system is located, the phone returns to the standby state with the private system’s descriptive name or label displayed. The private system is now available for use and is stored into the phone system database. If a system is not located, the following message is displayed: No Systems Found Press C to exit the acquire new system selection. Menu Shortcut Search for System M72 You can set your phone to manually search for available private M72 .
Menu Shortcut 8. Digits Editing M8 The Digits Editing Menu can be accessed by pressing The Digits Editing Menu is displayed below. D i gi t edi ti 1 . M an P au s ng u al se M8 . Use B and E to scroll through and view the entire Digits Editing Menu 2 .A u t o P au s e 3 .L i n k t o Phon e book Automated telephone systems prompt you through a recorded message to enter a set or sets of identifying numbers such as a credit card account number, bank account number, or personal identification number.
Menu Shortcut Auto Pause M82 An automatic pause can be inserted between sets of digits in a similar manner as manual pauses. To enter automatic pause M82 . A “,” marks, enter in the telephone number; press (comma) is displayed after the phone number. Enter in the next M82 to insert another set of digits. If necessary, press automatic pause and then enter in the next set of digits.
Menu Shortcut All Mute M92 The phone microphone and earpiece can be turned off or muted during a conversation. With a call in progress, press M92 . Press and earpiece again. M93 to turn on the microphone Menu Shortcut Unmute M93 The microphone mute and full mute settings can be cancelled by pressing M93 . 0. Lock Phone Menu Shortcut M0 Your phone can be locked to prevent unauthorized use. To lock M0 . As prompted, enter your 4-digit your phone, press password.
Chapter 4: Safety & Performance Safety Precautions For safe and efficient operation of the phone, observe the following guidelines. The cellular telephone is a radio transmitter and receiver. When the unit is powered on, the phone receives and sends radio frequency (RF) energy. The phone operates in the frequency range of 824 MHz to 894 MHz, and employs commonly used frequency modulation (FM) techniques.
Electronic Devices Most modern electronic equipment is shielded from RF energy; however, RF energy from cellular telephones may affect some inadequately shielded electronic equipment. RF energy may affect improperly installed or inadequately shielded electronic operating and entertainment systems in motor vehicles. Check with manufacturers or manufacturers representatives to determine if systems are adequately shielded from external RF energy.
Do not transport or store flammable gas, liquids, or explosives in the same compartment that contains the phone or its accessories. Vehicles using liquefied petroleum gas, such as propane or butane, must comply with the National Fire Protection Standard (NFPA-58). For a copy of the standard, contact the National Fire Protection Association, One Batterymarch Park, Quincy, MA 02269, Attn: Publication Sales Division.
Phone Performance Technical Information Dimensions (without antenna) 147.32 x 50.8 x 27.94mm 5.8″ x 2.0″ 1.1″ Weight 8.42 ounces (NiCd battery) 8.78 ounces (NiMH battery) Transmitting Power 0.6 W max. ERP Operating Voltage 4.8V Frequency Band 824.040 - 848.970 MHz (TX) 869.040 - 893.
Chapter 5: Warranty & Service Limited Warranty 1. What Products May Be Covered By This Limited Warranty? The following products (the “Products” or the “Product”) purchased through an NEC America, Inc. (NECAM), Wireless Communications Division Authorized Dealer (the “Dealer”) in the United States on or after January 1, 1997, may be covered by this warranty: [DIGITALTALK MAX™ 2100 CELLULAR TELEPHONE] 2.
(v) Accessory items such as antenna, cables, curl cords, cases, etc., or; (vi) Products shipped to NECAM for repair from outside the United States. (b) Any other warranties, including but not limited to the implied warranties of merchantability and fitness for a particular purpose, shall be limited to the duration of this warranty. Some states do not allow limitations on how long an implied warranty lasts, so the above limitation may not apply to you.
NEC Service Support NEC Service Support can assist you with any additional information that you may need in the operation your NEC cellular telephone and NEC Authentic Accessories™. Contact NEC Service Support at the following telephone number or address. Writing: NEC America, Inc. Service Support 1621 Walnut Hill Lane Irving, Texas 75038 Telephone: 1-800-637-5917* 1-972-751-7500 *The 800 number listed above also provides access to NEC Repair Service and Parts Sales.
Index A Acquire New System. . . . . . . . . . . 27 Activation, Phone . . . . . . . . . . . . . . 1 Add to Phone Book . . . . . . . . . . . . 12 Adding Numbers from a Call Log to the Phone Book . . . . . . . . . . . . . . . . . 12 Adding Numbers from Scratchpad to the Phone Book . . . . . . . . . . . . . . . 12 Adjusting Earpiece Volume . . . . . . . . . . . 7 Keypad Volume . . . . . . . . . . . . 7 Air Time. . . . . . . . . . . . . . . . . . . . . 11 Alarm. . . . . . . . . . . . . . . . . . . . . . .
Index Standby . . . . . . . . . . . . . . . . . . 5 Mute All. . . . . . . . . . . . . . . . . . . . . . 31 Microphone . . . . . . . . . . . . . . 30 Unmute . . . . . . . . . . . . . . . . . 31 N Navigation, Menu . . . . . . . . . . . . . . 9 Network. . . . . . . . . . . . . . . . . . . . . 22 O One-Touch Dialing . . . . . . . . . . . . 24 P Password Change . . . . . . . . . . . . . . . . . 18 Phone . . . . . . . . . . . . . . . . . . . 2 Set . . . . . . . . . . . . . . . . . . . . . 18 Pause Auto . . . . .
Quick Reference Guide Basic Function Operation Turn On/Off Phone Press and hold P for approximately two seconds. Place A Call Key in phone number; press S . Answer A Call Press S. End A Call Press N. View Own Phone Number Press C . Access Phone Book Press B to scroll through names; press S to call. Access Main Menu Press M . Navigate in Menus Press E Exit Menu Press N. Store Voice Mail Phone Number Key in voice mail phone number; press M34 . Retrieve Voice Mail Press E1 .
Menu Overview M M1 Main Menu Call Logs M11 M12 M13 M14 M15 M2 Phone Book M21 M22 M23 M24 M25 M26 M3 M0 Off On Acquire New System Search for System View Stored Systems Digits Editing M81 M82 M83 M9 Lock Call Text Message Audio Network Clock Environment Handsfree Reset settings Non Public Mode M71 M72 M73 M8 Voice Messages Text Messages Clear All Text Messages Store Voice Mail Phone Number Lock Keypad Silent Mode M61 M62 M7 View by Name View by Location View by Number Lock Phone Book Clear Phon