
Specifications


TECHNICAL SUPPORT: 1.800.283.5936 (USA) OR 1.801.974.3760
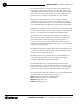
INSTALLATION AND SETUP • FRONT PANEL
4
Front Panel
The XAP 800’s front-panel controls (see Figure 1) perform the following
functions described below.
Esc
Enter
Meter
-4
-4
-4
-4
-10
-10
-10
-10
-30
-30
-30
-30
5
6
7
8
Mic On
1
2 3
4
5 6
7
1. LCD This display is for XAP 800 setup in conjunction with the four
associated front-panel buttons [2, 3, and 4]. Baud rate and flow
control must be configured from the front panel; see the LCD
Menu Tree on page 10 for the location of these in the menu
system. Other functions accessed via the front-panel include system
options, RS-232 configuration, troubleshooting, and level readings.
2. Enter
This button is used when programming the XAP 800 via the
LCD window. To move deeper in the menu or execute a selected
parameter, press the Enter button.
3.
▲/▼ These buttons scroll up and down through vertical
programming options within a specific XAP 800 programming
parameter or increases/decreases a numeric value.
4. ESC
This button, when used in programming the XAP 800 with the
LCD window, steps you out of a selected parameter or moves you up
one level in the menu. When a parameter has been displayed with the
arrow buttons [3], you can select it with the ENTER button [2] to modify
it. Then, you can step out of the menu with the ESC button.
5. LED Meter
This assignable, peak-level LED bar meter is used to
display the audio level of an input, output, or processing channel of the
XAP 800.
6. Meter
Takes you directly to the Meter branch of the XAP 800’s LCD
menu tree.
7
. LED 1-8 These LEDs indicate Inputs 1-8 gate status.
All front panel buttons are
also used to enter the front
panel pass code. See
Security (page 11) for more details.
✍
Figure 1. Front Panel