ENGLISH ESPAÑOL FRANÇAIS Operating Manual ClearSounds® CSC600D Amplified Freedom Phone™ with Full ClearDigital Power™ 1 – ENGLISH
TABLE OF CONTENTS PRIOR TO USE Pg. 4 Pg. 4-6 Pg. 7-8 Pg. 9-10 Pg. 10-13 Congratulations Important Safety Instructions Location of Controls Keys Descriptions Installation Steps MENU NAVIGATION Pg. 14 Menu Map BASIC TELEPHONE FUNCTIONS Pg. 15-16 Pg. 16-17 Pg. 18 Pg. 18 Pg. 19 Pg. 19 Pg. 20 Pg. 20-21 Amplification Ringer Setting Visual Indicator Hearing Aid and Cochlear Implant Users Speakerphone Answer a Call Make a Call Audio & Telephone Headset Jacks TELEPHONE SETTINGS Pg. 22 Pg. 23 Pg. 23 Pg. 24 Pg.
CALLER ID (CID) Pg. 32 Pg. 33 Pg. 33-34 Pg. 34 Pg. 34-35 Pg. 35 Pg. 35 Pg. 35 General Information Receiving & Storing Caller ID Records Talking Caller ID Caller ID on Call Waiting Review Caller ID Dial from Caller ID Delete Caller ID Store Caller ID PHONEBOOK Pg. 36 Pg. 37 Pg. 38 Pg. 38 Pg. 38 Pg.
PRIOR TO USE PRIOR TO USE Congratulations on your purchase of the CSC600D phone from ClearSounds Communications®. Please read this User Manual carefully in order to get the best use out of your new phone. This phone is designed for individuals with mild to severe hearing loss. Keep this manual near the phone for easy reference. Please visit our website at www.clearsounds.com to register your product, download additional manuals and review trouble-shooting tips.
WARNING: Use only the power supply indicated in the User’s Manual. WARNING: To avoid the possibility of electrical shock, do not use this product near water (For example, near a bathtub, wash basin, kitchen sink or laundry tub, in a wet basement or near a swimming pool) while in the bathtub or shower or when you are wet. If the phone becomes submerged in water, do not attempt to retrieve it until after you have unplugged the AC adapter from the electrical outlet and the line cord from the modular wall jack.
WARNING: Never push any object through the slots in the phone. They can touch dangerous voltage points or short out parts that could results in risk of fire or electrical shock. WARNING: Do not cover slots and opening on the units, they are needed for ventilation and protection against overheating. WARNING: Stop using the phone if dropped or if it becomes damaged. WARNING: Ring volume is very loud and can damage your hearing. Never put your ear close to the ringer.
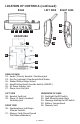
█ LOCATION OF CONTROLS 2 4 5 3 6 1 7 9 10 8 11 12 21 13 14 20 15 19 01. 02. 03. 04. 05. 06. 07. 08. 09. 10. 11. 17 Handset Hanger Tab Large LCD Screen/Caller ID Screen Hook Switch Left Soft Key Up/Down Scroll Right Soft Key Emergency Memory Key Handset Tone Control Handset Volume Control Voice Mail Key Call Waiting Key 16 12. 13. 14. 15. 16. 17. 18. 19. 20. 21.
LOCATION OF CONTROLS (continued) REAR LEFT SIDE RIGHT SIDE 31 22 23 24 25 26 27 30 UNDERSIDE 28 32 36 29 33 34 35 REAR OF BASE 22. Audio (3.5mm) Headset / Neckloop Jack 23. Port for (optional) ClearSounds Bed Shaker 24. Shaker/Strobe Ringer Select 25. Amplification Reset Override Switch (ON/OFF) 26. AC Power Adapter Jack 27. Phone Line Cord Jack LEFT SIDE 28. Handset Cord Jack 29. Phone (2.5mm) Headset/ Neckloop Jack RIGHT SIDE 30. Speakerphone and Ringer Volume Controls 31.
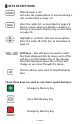
█ KEYS DECRIPTIONS Make/Answer a call Activates the speakerphone if pressed during a call, as described on page 19 Enter the redial list, as described on page 26 Insert a pause when pre-dialing a number or storing a one-touch memory key, as described on page 24 Highlight or scroll for lists and menu options Enter the Caller ID (CID) list, as described on page 34 Soft Keys – Two soft keys are used to select functions displayed directly above each of the soft keys (on the bottom line of the display).
█ KEYS DESCRIPTIONS (continued) To store numbers, as described on page 24 To disconnect a call and re-establish dial tone or to switch over to another caller if you use call waiting, as described on pages 28 & 34 One-Touch Memory Keys – Store up to 5 numbers for one-touch memory dialing, as described on page 24 To adjust ringer and speakerphone volume █ INSTALLATION STEPS Installation of your ClearSounds® CSC600D Amplified Freedom Phone with Full Digital Power is easy.
1. PARTS CHECKLIST Check the contents of the box - The CSC600D should contain: Phone base Handset Phone Line Cords AC Adapter User Manual Wall Plate Adapter 2. PRE-SELECT AUXILIARY FEATURES: If you plan to mount your phone on the wall, you may want to consider setting up the Amplification Override Switch (page 16) and Ringer Switch (page 18). 3. PHONE INSTALLATION The phone should be located in an area where it is easy to see the visual display and lighted ringer.
To install: 1. Make sure the AC adapter and phone line cord are disconnected. 2. Open the battery compartment door located on the underside of the phone by unscrewing the battery compartment door and removing it from the phone (screwdriver provided). 3. Correctly insert 4 AAA Alkaline batteries (purchased separately) in the battery compartment. Be sure to observe battery polarity as imprinted. 4. Replace the battery compartment door and screw it back in place. Desk / Table Mounting 1.
3. Install two self-tapping screws (not supplied) at a distance of 86.5 mm apart from each other on a horizontal line. 4. Connect one end of the 8-inch phone cord to the line jack on the back of the base and connect the other end to a modular phone jack. 5. Holding the base slightly above the mounting screws on the wall jack, push the base against the mounting screws so they are hooked into the left and right keyhole slots on the back of the phone. Slowly slide the base down until it snaps into place. 6.
MENU NAVIGATION Screen Navigation MENU MAP – this identifies how the menu is displayed for navigation Main Menu Submenu I CID (Caller ID) Book (p. 32) Erase (p. 35) Erase all (p. 35) Store (p. 35-36) Set Display (p. 28) Set Language (p. 28) Set Contrast (p. 29) Level 1-7 Dim: X--->x (p. 29) ON or OFF Hour Format (p. 30) 12 hr or 24 hr clock Date Format (p. 30) MM/DD or DD/MM Set Phone (p. 22) Set Ring (p. 17) Date and Time (p. 30) Set Talk Call Waiting (p. 27) ON or OFF Set Flash (p.
To Access a MENU Option 1. To display the menu list, press the Menu soft key. 2. To scroll through menu options, press ▲ or ▼ repeatedly. The menu item that is currently selected will be highlighted. 3. When the desired menu item is highlighted, press the Select or Save soft key. To Exit from any MENU If you press the Back soft key or the Exit soft key from any menu, the phone returns to the previous screen. Continue to press the Back or Exit soft key to return to the main screen.
Please Note: The AMP key controls both the loudness & tone frequency of the handset. Using the Amplification Reset Override Switch (located on the underside of the base) The ClearSounds® CSC600D is designed with unique features to protect users from being exposed to dangerous sound levels. You are able to switch between automatic or manual amplification, and you should select the setting that best suits your needs.
example: Ringer LOW. You will also hear the audible ringer at each level you select. Method 2 (Volume and Custom Features): By using the Menu You can select your own ring tone and adjust the day and night volume. You can also adjust the volume to “OFF” in order to turn off the ringer. “Day volume” is 6 a.m. to 10 p.m. and “Night volume” is 10 p.m. to 6 a.m. 1. Press the Menu soft key to display the main menu list. 2. Press ▼ to scroll to Set Phone and then press the Select soft key. 3.
on the right side of the phone to increase or decrease the volume while the phone is ringing. Note: If you set the volume to “OFF”, when a call comes in, only the New Call information appears on the LCD and the phone will not ring. Other Ringer Alert Options: Strobe & Shaker / Only Shaker / Only Strobe (located on the rear of the base) Your telephone incorporates several options to alert you that the phone is ringing.
hearing aid “T-switch” to the “T” position. Make sure to hold the handset close to your T-coil. █ Using your Speakerphone For optimal speakerphone performance, avoid the following: • Areas with high background noise (The microphone might pick up these sounds and prevent the speakerphone from going into the receiving mode when you finish talking). • Surfaces affected by vibration. • Recessed areas such as in a corner, under a cupboard, or next to a cabinet, which can generate an echo effect.
█ Making a Call Using the Handset 1. To make a call, lift the handset and listen for a dial tone. 2. You can dial a number manually or press one of the memory dial keys once programmed. If you make a mistake while entering a number, press the Clear soft key to delete it or hang up and begin again. 3. Adjust your volume and tone settings if needed. 4. When finished, hang up the handset. Using the Speakerphone 1. Press the Speaker key on the base and listen for a dial tone. 2.
headphones, earbuds, silhouettes, cellular accessories and cochlear patchcords* (not included). *Caution: Before plugging any cord into your cochlear implant processor, you should consult your implant manufacturer. The Audio Neckloop/Headset Jack - the 3.5mm Audio Neckloop/Headset jack allows you to listen through your device while speaking into the handset or speakerphone. This jack is located on the rear side of the base. Telephone Headset Jack - the 2.
Dialing from Standby Mode You can enter the desired phone number in standby mode, which allows you to verify the number before dialing. If you have the TALKING DIALING function turned ON, the number will be announced as you dial (see page 23 for more information). Follow these steps: 1. Enter a telephone number (up to 32 digits) and verify it is correct. If you make a mistake while entering a number, press the Clear soft key to delete it. 2.
1. Press the Menu soft key to display the main menu list. 2. Press ▼ to scroll to Set Phone and then press the Select soft key. 3. Press ▲ or ▼ to scroll to Dialing Mode and then press the Select soft key. 4. Press ▲ or ▼ to select Tone or Pulse and then press the Save soft key. █ Menu Keys Tone Setting Your ClearSounds® CSC600D comes from the factory preset for menu Keypad Tones ON. This refers to having an audible tone when navigating the menu to verify a selection. To change this setting: 1.
█ Talking Review Function (Caller ID, Phonebook & Redial) Your ClearSounds® CSC600D comes from the factory preset for Talking Review set to ON. • When reviewing CID records, the phone will announce the number. • When reviewing phonebook entries, the phone will announce the number or recorded message. • When using the Redial function, the phone will announce the number or recorded message. To change this setting: 1. Press the Menu soft key to display the main menu list. 2.
Dialing from Memory Numbers 1. In standby mode, press one of the memory dial keys, the display will show the corresponding number. If you selected the wrong memory dial, either select the correct memory dial or press the Clear soft key repeatedly until you get back to the main screen. 2. Lift the handset or press the Speaker key and the phone will begin to dial. NOTE: Press and hold any memory key for two seconds and the speakerphone will turn on and automatically dial the programmed number.
█ Redial Function The Redial key is used to quickly redial the last number you dialed. 1. Lift the handset or press the Speaker key and listen for the dial tone. 2. Press the Redial key. The phone will redial up to 32 digits automatically. Dialing from the Redial List 1. Press the Redial key in standby mode. 2. Press ▲ or ▼ repeatedly until you find the number you want to dial. If you have the Talking Review Mode set to ON, the number for each record will be announced as you scroll through the Redial list.
█ Hold Function The display will show a Hold option once you have a call established. To put a call on hold: 1. Press the Hold soft key once. The “LCD will display “Call on hold”. Hanging up the handset will not disconnect the call. 2. To continue the conversation, simply pick up the handset or press the Unhold soft key. █ Call Waiting (Flash) Your ClearSounds® CSC600D comes from the factory preset for Flash Time to 600ms.
If you subscribe to Call Waiting service from your local phone provider, during a phone call you will hear a beep to indicate another call is waiting on the line. 1. To connect to the waiting call, press the Call Waiting key, and your original call is put on hold. 2. To switch between the two calls, press the Call Waiting key. Note: If you subscribe to Call Waiting on Caller ID, you will receive Caller ID information (if available) on Call Waiting calls (see page 34).
To go back to the English menu if you can’t read the current language displayed: 1. Press the Right soft key. 2. Press the Left soft key. 3. Press the Left soft key. 4. Press ▲ or ▼ to find “English” in the list of languages. 5. Press the Left soft key to save the setting. █ LCD Contrast Settings 1. Press the Menu soft key to display the main menu list. 2. Press the Select soft key to access Set Display. 3. Press ▼ to scroll to Set Contrast and then press the Select soft key. 4.
Hour Format Settings 1. Press the Menu soft key to display the main menu list. 2. Press the Select soft key to access Set Display. 3. Press ▲ or ▼ to scroll to Hour Format and then press the Select soft key. 4. Press ▲ or ▼ to choose between 12 hour clock and 24 hour clock and then press the Select soft key. Date Format Settings 1. Press the Menu soft key to display the main menu list. 2. Press the Select soft key to access Set Display. 3.
In standby mode, the large LCD display will show as below: If you forget to connect the phone line cord, “No line” will show on the screen. When you press the Menu soft key, the display will show the main menu. Use the ▲or ▼ key to scroll through the menu and select the desired oneand then press the Select soft key to confirm. When a new call comes in, the screen will display the caller’s phone number and/or name (provided that you subscribe to this service through your local telephone provider).
█ Reviewing Voice Mail Messages You must subscribe to Voice Mail from your phone service provider to use this feature. When a voice mail message is left, the screen will display “New voice mail” and the message will be saved as a call. If you have new messages, you will hear a stutter dial tone when you pick up the handset. The CSC600D has a message indicator light, which will blink when you have new messages and will continue to flash until the message has been retrieved.
This telephone automatically displays an incoming caller’s number/name along with the date and time of the call. It will record up to 30 calls of up to 15 digits and store the data into memory. █ Receiving CID Records When you receive a call, the Caller ID information is transmitted between the first and second ring. The Caller ID information appears on the display while the phone rings, giving you a chance to monitor the information and decide whether or not to answer the call.
Note: If you have stored a phone number in the phonebook and recorded the corresponding name, when an incoming call with this number comes in, the phone will announce the name associated with this number. See pages 37 & 38 for instructions on recording a phonebook name. █ Caller ID on Call Waiting When you subscribe to Call Waiting Caller ID service from your local phone provider, the phone will display the Caller ID information of the second call while you are on the first call. 1.
2. If you have stored the phone number in your phonebook, the name you have entered will appear, along with the phone number. 3. If you have the Talking Review Mode set to ON, the number for each CID record will be announced as you scroll through the entries. Dialing a Number from the Caller List Press ▲ or ▼ to locate the desired record. If you need to change the dialing format (7 digits, 10 digits or 11 digits), simply press the * key until you see the desired format of the number you would like to dial.
4. The display shows “Record Voice”. Press the Yes soft key to confirm or the No soft key to cancel. If you press Yes, you can start to record the name of this entry (up to 6 seconds). You can also press the End soft key to confirm and end the recording. Your recording will immediately play back for your confirmation. Number Stored will appear. PHONEBOOK OPERATION Reminder: Press the Back or Exit soft key from any menu to return to the previous screen.
Clarification: • • If you want to shift the case between upper and lower, between entering letters, press the * key. When entering the same letter twice or a different letter with same key, wait for a few seconds for the cursor to move automatically and then select the next letter. █ Adding Phonebook Entries Method 1: By using the Phonebook Menu 1. Press the PhoneBk soft key to enter the phonebook. 2. Press the Select soft key to choose (Add New Name). 3. The display shows “Name:”.
█ Viewing the Phonebook Entries 1. Press the PhoneBk soft key to enter the phonebook. 2. Press ▲ or ▼ repeatedly until the desired entry is highlighted. 3. Press the View soft key to view the details. Note: If you have activated the Talking Review feature, every time you press ▲ or ▼, the system will announce the number or name of the highlighted entry.
█ VIP Setting This feature allows you to assign one specific melody to everyone in your phonebook. You may choose from eleven different ring tones. NOTE: This feature ONLY works when you have subscribed to Caller ID service, the telephone information has been stored in the phonebook and the ringer is ON. 1. Press the Menu soft key to display the main menu list. 2. Press ▼ to scroll to Set Phone and then press the Select soft key 3. Press the Select soft key to access Set Ring. The display shows Day Volume.
No Strobe ringer and/or bed shaker will not activate 1. Make sure the strobe and/shaker switch is turned ON (page 18). 2. Make sure the bed shaker is plugged into the correct jack. 3. Make sure the bed shaker is plugged in all the way. No amplification 1. Check to see if Volume has been turned up (pages 15-16) 2. The AC adapter is required; make sure the AC adapter is plugged into the wall and into appropriate jack on the phone. Low handset or speaker volume 1.
TECHNICAL SPECIFICATIONS General Number: CSC600D Amplification: Up to 50 dB incoming Jack: Power Requirements AC power Adapter: Input: 100~240VAC 50/60Hz, 150mA Output: 7.5VDC, 500mA Weight (lb): Approx. 2 lbs. Dimensions (in.) Base: 7.75x7.5x1.75 3.5mm audio output 2.5mm headset 3.5mm shaker Features and Specifications subject to change without notice. Purchase accessories for Your ClearSounds Phone: Optional Neckloop: CS-CLA7V2 (connects easily to your phone’s 2.
you will be advised of your right to file a complaint with the FCC if you believe it is necessary. 3. The phone company may make changes in its facilities, equipment, operations or procedures that could affect the operation of the equipment. If this happens, the phone company will provide advance notice in order for you to make necessary modification to maintain uninterrupted service. 4.
INDUSTRY CANADA CS03 STATEMENT This product meets the applicable Industry Canada technical specification. This is confirmed by the registration number. The abbreviation, IC before the registration number signifies that registration was performed based on a Declaration of Conformity indicating that Industry Canada technical specifications were met. It does not imply that Industry Canada approved the equipment.
5. An alternative indication of the REN is the Load Number (LN); this number should be divided by 20 to approximate the equivalent REN. The REN Number of this unit is indicated on the bottom of your phone. If your home has specially wired alarm equipment connected to the phone line, ensure the installation of the CSC600D does not disable alarm equipment. If you have questions about what will disable alarm equipment, consult your phone provider or a qualified installer.
period (from original purchase date); whichever is longer. The warranty does not cover accidents, negligence or breakage to any parts. This includes shipping damage, failure to follow instructions, misuse, fire, floods, use of incompatible accessories, Acts of God or failure in your phone service carrier’s line service. The product must not be tampered with or taken apart by anyone who is not an authorized ClearSounds Communications® representative.
Service in United States and Canada, contact: ClearSounds Communications Attention: Repair Center 1743 Quincy Avenue, Suite 155 Naperville, IL 60540 USA 800-965-9043 Check our website www.clearsounds.com for additional information and to download additional manuals and information.
Manual de uso ClearSounds® CSC600D Amplified Freedom Phone™ con Full ClearDigital Power™ 1 – Español
ÍNDICE ANTES DE SU UTILIZACIÓN pág. 4 Felicitaciones pág. 4-6 Medidas de seguridad importantes pág. 7-8 Ubicación de los dispositivos de control pág. 9-10 Descripción de las teclas pág. 10-13 Procedimiento de instalación NAVEGACIÓN POR EL MENÚ pág. 14 Mapa de menús FUNCIONES TELEFÓNICAS BÁSICAS pág. 15-16 Amplificación pág. 16-17 Configuración del timbrado pág. 18 Luz indicadora pág. 18 Usuarios con prótesis auditivas e implantes cocleares pág. 19 Altoparlante pág. 19 Contestar una llamada pág.
IDENTIFICADOR DE LLAMADAS (CID) pág. 32 pág. 33 pág. 33-34 pág. 34 pág. 34-35 pág. 35 pág. 35 pág. 35 Información general Recibir y guardar registros del identificador de llamadas Identificación auditiva de llamadas Uso del identificador de llamadas con llamadas en espera Revisar el identificador de llamadas Hacer llamadas desde el identificador de llamadas Borrar el identificador de llamadas Guardar el identificador de llamadas DIRECTORIO TELEFÓNICO pág. 36 Información general pág.
ANTES DE SU UTILIZACIÓN ANTES DE SU UTILIZACIÓN Felicitaciones por la compra de su teléfono CSC600D de ClearSounds Communications®. Lea atentamente este manual de uso para lograr el mejor rendimiento de su nuevo teléfono. Este teléfono está diseñado para personas con pérdida auditiva leve a grave. Mantenga este manual cerca del teléfono para una consulta rápida. En nuestro sitio web www.clearsounds.
de baño, lavatorio, lavadero o tina de lavar ropa, en un sótano con humedad o cerca de una piscina), al bañarse en tina o ducha o cuando su cuerpo esté mojado. Si el teléfono cae dentro del agua, no trate de recuperarlo mientras no haya desconectado el adaptador de CA del tomacorriente y el cable de la línea de la roseta telefónica. No vuelva a conectar el teléfono mientras no se haya secado por completo. ADVERTENCIA: Trate de no utilizar el teléfono durante tormentas eléctricas.
ADVERTENCIA: Deje de usar el teléfono si éste se cae o si se daña. ADVERTENCIA: El volumen de timbrado es muy alto y puede dañar su audición. Nunca ponga el oído cerca de donde suena el timbrado. ADVERTENCIA: Preste atención a la polaridad de las baterías e inserte las baterías recargables según los símbolos de polaridad. Use sólo baterías identificadas como aceptables y nunca use baterías alcalinas ya que pueden causar lesiones personales o dañar la unidad.
█ UBICACIÓN DE LOS DISPOSITIVOS DE CONTROL 2 4 1 5 3 6 7 9 10 8 11 12 21 13 14 20 15 19 17 16 18 01. Lengüeta del mango del auricular 12. Tecla de programa 02. Pantalla amplia de cristal líquido/ Pantalla del identificador de llamadas 13. Tecla de discado de emergencia en un solo toque 03. Interruptor de llamada 14. Tecla de activación de la amplificación 04. Tecla blanda de avance a la izquierda 15. Tecla de modo manos libres 05. Avance hacia arriba/hacia abajo 16.
UBICACIÓN DE LOS DISPOSITIVOS DE CONTROL (continuación) PARTE POSTERIOR LADO IZQUIERDO LADO DERECHO 31 30 22 23 24 25 26 27 VISTA INFERIOR 28 32 36 29 33 34 35 PARTE POSTERIOR DE LA BASE 22. Audífono (3,5mm) / Adaptador de audio 23. Puerto para ClearSounds Bed Shaker (optativo) 24. Vibrador/Selección de timbrado con luz intermitente 25. Selector de activación/desactivación (ON/OFF) del bloqueo de reposición de amplificación 26. Terminal de conexión del adaptador de CA 27.
█ DESCRIPCIÓN DE TECLAS Realizar/contestar una llamada Activa el altoparlante si se presiona durante una llamada, como se describe en la página 19 Ingresar la lista de rediscado, como se describe en la página 26.
█ DESCRIPCIÓN DE LAS TECLAS (continuación) Para guardar números, como se describe en la página 24 Para finalizar una llamada y volver a establecer el tono de discado o para pasar a otra llamada si usa la función de llamada en espera, como se describe en las páginas 28 y 34 Teclas de discado en un solo toque –Almacene hasta 5 números para discado rápido en un solo toque, como se describe en la página 24 Para ajustar el volumen de timbrado y del altoparlante █ PROCEDIMIENTO DE INSTALACIÓN Es fácil instalar
1. LISTA DE VERIFICACIÓN DE PIEZAS Verifique el contenido de la caja -El CSC600D debe contener: Base del teléfono Auricular Adaptador de CA Manual de uso Cables telefónicos Placa adaptadora para montaje de pared 2. PRESELECCIONE LAS FUNCIONES AUXILIARES: Si planea montar su teléfono en la pared, posiblemente desee configurar el selector de bloqueo de reposición de amplificación (página 16) y el selector de timbrado (página 18). 3.
Para instalarlas: 1. Asegúrese de que el adaptador de CA y el cable telefónico estén desconectados. 2. Abra la tapa del compartimento de las baterías ubicado en la parte de abajo del teléfono desatornillándola y sacándola del teléfono (se suministra destornillador). 3. Coloque dentro del compartimento, en el sentido correcto, 4 baterías alcalinas tamaño AAA (no vienen con el aparato). Asegúrese de respetar la polaridad de las baterías impresa en el compartimento. 4.
Cabeza de tornillo Pared 13 – Español 8.0 cm 3. Instale dos tornillos autorroscantes (no se incluyen) con una separación de 86,5 mm entre sí y en línea horizontal. 4. Conecte un extremo del cable telefónico de 8 pulgadas en el terminal para línea telefónica de la parte posterior de la base y conecte el otro extremo a una roseta telefónica modular. 5.
NAVEGACIÓN POR EL MENÚ Navegación por pantalla MAPA DE MENÚS –esto identifica la forma en que se muestra el menú para navegación Submenú II Menú principal Submenú I Directorio del identificador de llamadas Erase (borrar): (pág. 35) (pág. 32) Set Display (Configurar pantalla) (pág. 28) Set Phone (Configurar teléfono) (pág. 22) Borrar todo (pág. 35) STORE( guardar) (pág. 35 y 36) CONTRASTE DE LA PANTALLA (pág. 28) Configurar el contraste (pág. 29) Nivel 1-7 DIM: X------x (pág.
Para tener acceso a una opción del MENU (menú) 1. Para ver la lista del menú, presione la tecla blanda Menu (menú). 2. Para desplazarse por las opciones del menú, presione ▲ o ▼ repetidas veces. La opción del menú que está seleccionada en ese momento aparece resaltada. 3. Una vez que la opción deseada está resaltada, presione la tecla blanda Select (seleccionar) o Save (guardar).
Nota: La tecla AMP (amplificar) controla la intensidad de volumen y la frecuencia de tonos del auricular. Uso del selector de bloqueo de reposición de amplificación (ubicado en la parte inferior de la base) El ClearSounds® CSC600D está diseñado con funciones exclusivas para proteger a los usuarios contra la exposición a niveles de sonido peligrosos. Puede alternar entre amplificación manual y automática, y debe seleccionar la configuración que se adapte mejor a sus necesidades.
Método 2 (volumen y funciones personalizadas): Usando el menú Puede seleccionar su propio tono de timbrado y ajustar el volumen de día y de noche. Puede también poner el volumen en “OFF” (apagado) a fin de apagar el timbrado. “Volumen de día” es de 6 a.m. a 10 p.m. y “Volumen de noche” es de 10 p.m. a 6 a.m. 1. Presione la tecla blanda Menu (menú) para ver la lista del menú principal. 2. Presione ▼ para avanzar hasta Set Phone (configurar teléfono) y luego presione la tecla blanda Select (seleccionar). 3.
Nota: Si configura el volumen en “OFF” (apagado), cuando ingresa una llamada, sólo aparece la información New Call (nueva llamada) en la pantalla de cristal líquido y el teléfono no sonará. Otras opciones de alerta de timbrado: Luz intermitente y vibrador / Sólo vibrador / Sólo luz intermitente (ubicadas en la parte posterior de la base) El teléfono ofrece varias opciones para indicar que está entrando una llamada.
█ Uso del altoparlante Para un rendimiento óptimo del altoparlante, evite lo siguiente: • Zonas con ruido de fondo (el micrófono podría captar estos sonidos y evitar que el altoparlante pase a modo de recepción una vez que usted termine de hablar). • Superficies afectadas por vibración. • Áreas abovedadas, como en un rincón, bajo armarios, o junto a un gabinete, que puedan generar un efecto de eco.
█ Realizar una llamada Uso del auricular 1. Para hacer una llamada, levante el auricular y espere escuchar un tono de discado. 2. Puede marcar un número en forma manual o presionar una de las teclas de discado en un solo toque. Si se equivoca al ingresar un número, presione la tecla blanda Clear (borrar) para borrarlo, o bien cuelgue y vuelva a comenzar. 3. De ser necesario, regule el volumen y el tono. 4. Cuando termine, cuelgue el auricular. Uso del altoparlante 1.
*Precaución: Consulte con el fabricante del implante antes de conectar un cable en el procesador de su implante coclear. Terminal para audífono/adaptador de audio - el terminal para audífono/adaptador de audio de 3,5 mm le permite escuchar por el dispositivo mientras habla por el auricular o el altoparlante. Este terminal está ubicado en la parte posterior de la base.
Discado desde modo de espera Puede ingresar el número que desea en modo de espera, lo que le permite verificar el número antes de marcarlo. Si tiene activada la función TALKING DIALING (discado audible), el número será anunciado cuando lo disque (ver más información en la páginas 23). Siga estos pasos: 1. Ingrese un número telefónico (de hasta 32 dígitos) y verifique que esté correcto. Si se equivoca al ingresar un número, presione la tecla Clear (borrar) para borrarlo. 2.
discado) y luego presione la tecla blanda Select (seleccionar). 4. Presione ▲ o ▼ para elegir entre Tone (tono) o Pulse (pulso) y luego presione la tecla blanda Save (guardar). █ Configuración del tono de las teclas del menú Su ClearSounds® CSC600D viene programado de fábrica con la opción de tonos de teclado activada. Esto se refiere a tener un tono audible cuando se navega por el menú para verificar una selección. Para cambiar esta configuración: 1.
█ Función Talking Review (revisión audible) (identificador de llamadas, directorio y rediscado) Su ClearSounds® CSC600D viene programado de fábrica con el modo Talking Review (revisión audible) activado. • Al revisar los registros del identificador de llamadas, el teléfono anunciará el número. • Al revisar las entradas del directorio telefónico, el teléfono anunciará el número o el mensaje grabado. • Al usar la función de rediscado, el teléfono anunciará el número o el mensaje grabado.
Discado de números de la memoria 1. En modo de espera, presione una de las teclas de discado en un solo toque. En pantalla aparecerá el número correspondiente. Si seleccionó el discado en un solo toque incorrecto, seleccione el discado en un solo toque correcto o presione la tecla blanda Clear (borrar) repetidas veces hasta que vuelva a la pantalla principal. 2. Levante el auricular o presione la tecla Speaker (altoparlante) y el teléfono comenzará a marcar.
█ Función de rediscado El botón Redial (rediscado) permite volver a marcar rápidamente el último número que se discó. 1. Levante el auricular o presione la tecla Speaker (altoparlante) y espere escuchar el tono de discado. 2. Presione la tecla Redial (rediscado). El teléfono volverá a discar hasta 32 dígitos en forma automática. Discado desde la lista de rediscado 1. Presione la tecla Redial (rediscado) en el modo de espera. 2. Presione ▲ o ▼ repetidas veces hasta encontrar el número que desee marcar.
█ Función de pausa La pantalla mostrará una opción de Hold (pausa) una vez que tenga establecida una llamada. Para poner una llamada en pausa: 1. Presione la tecla blanda Hold (pausa) una vez. La pantalla de cristal líquido mostrará “Call on hold” (llamada en pausa). Al colgar el auricular no se desconectará la llamada. 2. Para continuar la conversación, simplemente levante el auricular o presione la tecla blanda Unhold (desactivar pausa).
Si usted está suscrito al servicio de llamada en espera con su proveedor telefónico local, durante una llamada telefónica oirá un pitido que indica que otra llamada está esperando en línea. 1. Para conectar a la llamada en espera, presione la tecla Call Waiting (llamada en espera), tras lo cual su primera llamada se pone en pausa. 2. Para alternar entre las dos llamadas, presione la tecla Call Waiting (llamada en espera).
Para regresar al menú en inglés si no puede leer el idioma que se muestra: 1. Presione la tecla blanda Right (derecha). 2. Presione la tecla blanda Left (izquierda). 3. Presione la tecla blanda Left (izquierda). 4. Presione ▲ o ▼ hasta encontrar “English” (inglés) en la lista de idiomas. 5. Presione la tecla blanda Left (izquierda) para guardar la configuración. █ Pantalla de cristal líquido Configuración de contraste 1. Presione la tecla blanda Menu (menú) para ver la lista del menú principal. 2.
Configuración de formato de presentación de la hora 1. Presione la tecla blanda Menu (menú) para ver la lista del menú principal. 2. Presione la tecla blanda Select (seleccionar) para acceder a Set Display (configurar pantalla). 3. Presione ▲ o ▼ para avanzar hasta Hour Format (formato de hora) y luego presione la tecla blanda Select (seleccionar). 4. Presione ▲ o ▼ para elegir entre reloj de 12 horas y reloj de 24 horas y luego presione la tecla blanda Select (seleccionar).
En modo de espera, la pantalla de cristal líquido amplia mostrará lo siguiente: Si olvida conectar el cable de línea telefónica, aparecerá en pantalla el mensaje “No line” (no hay línea). Cuando presione la tecla blanda Menu (menú), en pantalla aparecerá el menú principal. Use la tecla ▲ o ▼ para desplazarse por el menú y seleccionar la opción deseada y luego presione la tecla blanda Select (seleccionar) para confirmar.
█ Revisar los mensajes del correo de voz Debe suscribirse a correo de voz de su proveedor de servicios telefónicos para usar esta función. Cuando se deje un mensaje en el correo de voz, en pantalla aparecerá “New voice mail” (nuevo mensaje en correo de voz) y el mensaje se guardará como llamada. Si tiene mensajes nuevos, escuchará un tono de discado entrecortado cuando levante el auricular.
█ Recepción de registros del identificador de llamadas Cuando recibe una llamada, la información del identificador de llamadas se transmite entre el primer y el segundo timbrado. La información del identificador de llamadas aparece en pantalla mientras suena el teléfono, lo que le da a usted la oportunidad de monitorear la información y decidir si desea o no contestar la llamada.
█ Uso del identificador de llamadas con llamadas en espera Cuando usted se suscribe al servicio del identificador de llamadas para llamadas en espera de su proveedor telefónico local, el teléfono mostrará la información del identificador de llamadas de la segunda llamada mientras esté en la primera llamada. 1. Cuando esté ocupado con una llamada, se emitirá un tono, y el identificador de llamadas mostrará la información de la llamada entrante. 2.
Discado de un número desde la lista de llamadas Presione ▲ o ▼ para encontrar el registro que desee. Si necesita cambiar el formato de discado (7 dígitos, 10 dígitos u 11 dígitos), presione simplemente la tecla * hasta que vea el formato del número que desee marcar. Por ejemplo, si el número original en la lista del identificador de llamadas era 800-965-9043, presione la tecla * repetidas veces para cambiarlo a 1-800-965-9043 o 965-9043.
FUNCIONAMIENTO DEL DIRECTORIO TELEFÓNICO Recuerde: Presione las teclas blandas Back (atrás) o Exit (salir) desde cualquier menú para regresar a la pantalla anterior. De lo contrario, el teléfono regresará automáticamente a la pantalla principal desde cualquier menú si no se presiona ninguna tecla en 60 segundos. El directorio telefónico incorporado le permite guardar números de uso frecuente para poder hacer una llamada fácilmente sin tener que recordar ni ingresar el número telefónico.
█ Agregar entradas al directorio telefónico Método 1: Uso del menú del directorio 1. Presione la tecla blanda PhoneBk (directorio telefónico) para ingresar al directorio telefónico. 2. Presione la tecla blanda Select (seleccionar) para elegir (add New Name) (añadir nombre nuevo). 3. La pantalla muestra “Name:” (nombre:). Ingrese el nombre que desea usar y luego presione la tecla blanda Save (guardar) para confirmar. La pantalla muestra “Number:” (número).
█ Visualización de las entradas del directorio telefónico 1. Presione la tecla blanda PhoneBk (directorio telefónico) para ingresar al directorio telefónico. 2. Presione ▲ o ▼ repetidas veces hasta que quede resaltada la entrada que busca. 3. Presione la tecla blanda View (ver) para ver los detalles. Nota: Si ha activado la función de Talking Review (revisión audible), cada vez que presione ▲ o ▼ , el sistema anunciará el número o el nombre de la entrada resaltada.
█ Configuración de VIP Esta función permite asignarle una melodía específica a todos los contactos que tenga en el directorio telefónico. Puede elegir entre once tonos de timbrado distintos. NOTA: Esta función está disponible ÚNICAMENTE si usted se ha suscrito al servicio del identificador de llamadas, la información telefónica se ha guardado en el directorio telefónico y el timbrado está encendido. 1. Presione la tecla blanda Menu (menú) para ver la lista del menú principal. 2.
La luz indicadora de llamadas o el vibrador despertador no funcionan 1. Asegúrese de haber activado la luz indicadora o el vibrador (página 18). 2. Verifique que el vibrador despertador esté conectado en el terminal de conexión correcto del teléfono. 3. Verifique que el vibrador despertador esté bien conectado. No hay amplificación. 1. Verifique si se ha subido el volumen (páginas 15 y 16). 2.
ESPECIFICACIONES TÉCNICAS Número general: Amplificación: CSC600D Hasta 50 de entrada Requisitos de energía Terminal: Salida de audio de 3,5mm Adaptador de CA: Audífono de 3,5mm Entrada: 100~240VAC, 50/60Hz 150mA Vibrador de 3,5mm Salida: 7,5VDC, 500mA Peso (libras): Aproximadamente 2 libras Dimensiones de la base (pulgadas): 7,75x7,5x1,75 Funciones y especificaciones sujetas a cambio sin previo aviso.
3. La compañía telefónica puede hacer cambios en sus instalaciones, equipo, operaciones o procedimientos que podrían afectar el funcionamiento del aparato. Si esto sucede, la compañía telefónica le avisará con anticipación para que usted realice las modificaciones necesarias y evitar la interrupción del servicio. 4. Si tiene problemas con este aparato telefónico, desconéctese de la red hasta que se haya solucionado el problema o hasta estar seguro de que el equipo no está funcionando mal. 5.
DECLARACIÓN CS303 DE INDUSTRY CANADA Este aparato cumple las especificaciones técnicas aplicables establecidas por la entidad reguladora canadiense (Industry Canada). Esto se confirma mediante el número de registro. La abreviatura IC ubicada delante del número de registro indica que el registro se realizó de acuerdo con una declaración de conformidad que señala que se cumplieron las especificaciones técnicas de Industry Canada. No implica que Industry Canada aprobó este equipo.
Si su hogar cuenta con un sistema de alarma con cableado especial conectado a la línea telefónica, asegúrese de que éste no sea desactivado por la instalación del teléfono CSC600D. Si tiene preguntas acerca de lo que podría desactivar su sistema de alarma, consulte a la compañía telefónica o a un especialista en instalaciones. Esta aparato digital de clase B cumple con la norma canadiense ICES-003.
Si se produce un defecto cubierto por esta garantía, póngase en contacto cuanto antes con un representante de servicio al cliente por teléfono o visite www.clearsounds.com para conseguir un número de autorización para devolución de artículos (Return Merchandise Authorization, RMA) y las instrucciones de envíos, antes de enviarnos el producto. Todo envío sin número de autorización de devolución de artículos (RMA) será rechazado y le será devuelto con gastos pagados por usted.
Para servicio en los Estados Unidos y Canadá, póngase en contacto con: ClearSounds Communications Attention: Repair Center [Atención: centro de reparaciones] 1743 Quincy Avenue, Suite 155 Naperville, IL 60540 USA +1 800-965-9043 Visite nuestro sitio web www.clearsounds.com para obtener información adicional y descargar manuales e información adicional.
Manuel d’utilisation ClearSounds® CSC600D Amplified Freedom PhoneMC avec Full ClearDigital PowerMC 1 – Français
TABLE DES MATIÈRES AVANT L’UTILISATION P. 4 P. 4-6 P. 7-8 P. 9-10 P. 10-13 Félicitations Consignes de sécurité importantes Emplacement des commandes Description des touches Étapes d’installation UTILISATION DES MENUS P. 14 Carte des menus FONCTIONS DE BASE DU TÉLÉPHONE P. 15-16 Amplification P. 16-17 Réglage de la sonnerie P. 18 Indicateur visuel P. 18 Utilisateurs de prothèses auditives et d’implants cochléaires P. 19 Haut-parleur P. 19 Répondre à un appel P. 20 Faire un appel P.
Identification de l’appelant (ILA) P. 32 Informations générales P. 33 Recevoir et enregistrer les informations d’identification de l’appelant P. 33-34 Identification parlante de l’appelant P. 34 Identification de l’appelant en mode appel en attente P. 34-35 Consulter l’identification de l’appelant P. 35 Composer un numéro à l’aide de l’identification de l’appelant P. 35 Supprimer l’identification de l’appelant P. 35 Enregistrer l’identification de l’appelant RÉPERTOIRE TÉLÉPHONIQUE P.
AVANT UTILISATION AVANT UTILISATION Félicitations pour l’achat du téléphone CSC600D de ClearSounds Communications®. Lisez attentivement ce Manuel de l’utilisateur, qui vous permettra de tirer le maximum de votre téléphone. Ce téléphone est conçu pour les personnes souffrant d’une perte auditive légère à grave. Conservez ce manuel près du téléphone pour pouvoir le consulter facilement. Consultez notre site Web à l’adresse www.clearsounds.
douche, ou lorsque vous êtes mouillé. Si le téléphone est immergé dans l’eau, ne tentez pas de le récupérer tant que vous n’avez pas débranché l’adaptateur c.a. de la prise murale et le cordon téléphonique de la prise modulaire murale. Laissez sécher l’appareil complètement avant de le brancher de nouveau. MISE EN GARDE : Évitez d’utiliser le téléphone durant les orages. La foudre peut représenter un faible risque d’électrocution.
MISE EN GARDE : Assurez-vous de respecter la polarité des piles et à insérer les piles rechargeables conformément aux symboles de polarité. N’utilisez que des piles identifiées comme acceptables et n’utilisez jamais de piles alcalines, qui peuvent non seulement provoquer des blessures, mais également endommager l’appareil. Compatibilité avec les prothèses auditives Ce téléphone est conforme aux normes FCC de compatibilité avec les prothèses auditives.
█ EMPLACEMENT DES COMMANDES 2 4 1 5 3 6 7 9 10 8 11 12 21 13 14 20 15 19 17 16 18 01. Languette de raccrochage du combiné 12. Touche de programmation 02. Grand écran à cristaux liquides/ d’identification de l’appelant 13. Touche Emergency (Urgence) 03. Crochet interrupteur 14. Touche d’amplification 04. Touche programmable gauche 15. Prise de casque mains libres 05. Défilement Haut/Bas 16. Touche Speaker (Haut-parleur) 06. Touche programmable droite 17.
EMPLACEMENT DES COMMANDES (suite) ARRIÈRE CÔTÉ GAUCHE CÔTÉ DROIT 31 30 22 23 24 25 26 27 DESSOUS 28 32 36 29 33 34 35 ARRIÈRE DE LA BASE 22. Prise audio (3,5 mm) pour casque / collier 23. Port pour vibreur ClearSounds (en option) 24. Vibreur/Sélection de la fonction de sonnerie avec stroboscope 25. Bouton d’annulation du rétablissement de l’amplification (ON/OFF) 26. Prise pour adaptateur de courant alternatif 27. Prise téléphonique CÔTÉ GAUCHE 28. Prise de cordon du combiné 29.
█ DESCRIPTION DES TOUCHES Passer un appel ou répondre à un appel Active le haut-parleur si vous l’utilisez pendant que vous êtes au téléphone, comme décrit à la page 19 Ouvre la liste de recomposition, comme décrite à la page 26 Permet d’insérer une pause lors de la précomposition d’un numéro ou de l’enregistrement d’une touche mémoire, comme décrit à la page 24 Permet de mettre en surbrillance ou de faire défiler les listes et les options de menu.
█ DESCRIPTION DES TOUCHES (suite) Permet d’enregistrer des numéros, comme décrits à la page 24 Permet de déconnecter un appel et de rétablir la tonalité de composition ou de passer à un autre appel si vous utilisez la fonction d’appel en attente, comme décrit aux pages 28 et 34 Touches de mémoire – Chaque touche de mémoire peut contenir jusqu’à 5 numéros, comme décrit à la page 24.
1. LISTE DE CONTRÔLE DES PIÈCES Vérifiez le contenu de la boîte. Le CSC600D doit inclure : Un socle Un adaptateur de courant alternatif Un combiné Un Manuel de l’utilisateur Des cordons téléphoniques Un adaptateur de plaque murale 2. PRÉSÉLECTION DES FONCTIONS AUXILIAIRES : Si vous prévoyez d’installer votre téléphone au mur, vous devrez peut-être configurer la commande d’annulation de l’amplification (page 16) et la commande de sonnerie (page 18). 3.
Installation : 1. Assurez-vous que l’adaptateur c.a. et le cordon téléphonique sont débranchés. 2. Ouvrez le couvercle du compartiment à piles situé sous le téléphone en le dévissant et en le retirant du téléphone (tournevis compris). 3. Insérez correctement 4 piles alcalines AAA (vendues séparément) dans le compartiment à piles. Assurez-vous de respecter la polarité des piles comme indiqué à l’intérieur du compartiment. 4. Refermez le couvercle du compartiment à piles et vissez-le en place.
Tête de vis Mur 13 – Français 8.0 cm 3. Insérez deux vis autotaraudeuses (non comprises) espacées de 86,5 mm sur une ligne horizontale. 4. Branchez une extrémité du cordon téléphonique de 20 cm dans la prise de ligne située à l’arrière de la base, puis branchez l’autre extrémité sur une prise téléphonique modulaire. 5.
UTILISATION DES MENUS Navigation à l’écran CARTE DES MENUS – ceci détermine l’affichage du menu pour la navigation Sous-menu II Menu principal Sous-menu I CID (Caller ID) Book (Répertoire d’identification des appelants) Erase (Effacer) : (p. 35) Erase all (Tout effacer) (p. 35) STORE (Enregistrer) (p. 35-36) (p. 32) RÉGLAGE DU CONTRASTE DE L’ÉCRAN (p. 28) Set Contrast (Réglage du contraste) (p. 29) Level 1-7 (Niveau 1 à 7) DIM : X------x (p. 29) Set Display (Régler l’affichage) (p.
Pour accéder à une option de MENU 1. Pour afficher la liste des menus, appuyez sur la touche Menu. 2. Pour faire défiler les options de menu, appuyez à plusieurs reprises sur la touche ▲ ou ▼. L’élément de menu sélectionné est mis en surbrillance. 3. Lorsque l’élément voulu est mis en surbrillance, appuyez sur la touche programmable Select (Sélectionner) ou Save (Sauvegarder).
Remarque : La touche AMP commande à la fois le niveau sonore et la tonalité du combiné. Utilisation de la commande d’annulation du rétablissement de l’amplification (situé sous la base) Le téléphone ClearSounds® CSC600D est doté de fonctionnalités uniques qui évitent aux utilisateurs d’être exposés à des niveaux sonores dangereux. Vous pouvez choisir l’amplification automatique ou manuelle, en fonction de vos préférences. Interrupteur ON – la fonction est activée à chaque appel.
Méthode 2 (volume et fonctions personnalisées) : En utilisant le menu Vous pouvez sélectionner votre propre sonnerie et régler le volume de jour et de nuit. Vous pouvez également régler le volume sur OFF pour désactiver la sonnerie. L’option Day volume (Volume de jour) s’applique de 6h00 à 22h00 et le Night volume (Volume de nuit) s’applique de 22h00 à 6h00. 1. Appuyez sur la touche Menu pour afficher la liste du menu principal. 2.
Remarque : Si vous choisissez de couper le volume, lorsqu’un appel entre, seule l’information New Call (Nouvel appel) s’affiche à l’écran et le téléphone ne sonne pas. Autres options d’alerte de sonnerie : Stroboscope et vibreur / Vibreur seul / Stroboscope seul (située à l’arrière de la base) Votre téléphone offre plusieurs options pour vous avertir de la réception d’un appel.
█ Utilisation du haut-parleur Pour une performance optimale du haut-parleur, évitez les zones suivantes : • Zones présentant un bruit de fond important (le micro risque de capter ces sons et d’empêcher le haut-parleur de passer en mode réception lorsque vous avez fini de parler). • Surfaces subissant des vibrations. • Renfoncements, comme un coin, le dessous d’une armoire ou près d’un cabinet, qui risquent de générer un effet d’écho.
█ Faire un appel Utilisation du combiné 1. Pour faire un appel, décrochez le combiné et attendez la tonalité. 2. Vous pouvez composer un numéro manuellement ou appuyer sur une des touches de mémoire une fois programmées. Si vous faites une erreur en entrant un chiffre, appuyez sur la touche Clear (Effacer) pour le supprimer ou raccrochez et recommencez. 3. Réglez le volume et la tonalité de votre appareil au besoin. 4. Lorsque vous avez terminé, raccrochez le combiné. Utilisation du haut-parleur 1.
*Attention : Avant de brancher un cordon dans votre implant cochléaire, vous devez consulter le fabricant de votre implant. Prise audio pour collier ou casque : la prise de 3,5 mm vous permet d’entendre par l’intermédiaire de votre appareil, tout en parlant dans le combiné ou le haut-parleur. Cette prise se situe à l’arrière de la base. Prise téléphonique pour casque - la prise téléphonique de 2,5 mm est adaptée à la plupart des casques à mains libres.
Composition d’un numéro à partir du mode veille Vous pouvez précomposer un numéro de téléphone en mode veille, ce qui vous permet de le vérifier avant de le composer. Si la fonction TALKING DIALING (Composition parlante) est activée, le numéro est annoncé lorsque vous le composez (voir page 23 pour plus d’informations). Suivez ces étapes : 1. Composez un numéro de téléphone (jusqu’à 32 chiffres) et vérifiez qu’il est exact.
3. Appuyez sur ▲ ou ▼ pour passer à l’option Dialing Mode (Mode de composition), puis appuyez sur la touche Select (Sélectionner). 4. Appuyez sur ▲ ou ▼ pour sélectionner Tone (Tonalité) ou Pulse (Impulsion), puis appuyez sru la touche programmable Save (Sauvegarder). █ Réglage de la tonalité des touches de menu À la livraison de votre téléphone ClearSounds® CSC600D, la fonction de tonalités du clavier est réglée sur ON.
█ Fonction de consultation parlante (Identification de l’appelant, répertoire téléphonique et recomposition) À la livraison de votre téléphone ClearSounds® CSC600D, la fonction de consultation parlante est réglée sur ON. • Lorsque vous consultez des enregistrements ILA, le téléphone annonce le numéro. • Lorsque vous consultez des entrées du répertoire, le téléphone annonce le numéro ou le message enregistré.
Composition d’un numéro en mémoire 1. En mode veille, appuyez sur l’une des touches de mémoire, l’affichage indique alors le numéro correspondant. Si vous n’avez pas appuyé sur la bonne touche, vous pouvez soit appuyer sur une autre touche, soit appuyer sur Clear à plusieurs reprises, jusqu’à ce que vous reveniez à l’écran principal. 2. Décrochez le combiné ou appuyez sur la touche Speaker pour composer le numéro.
█ Fonction de recomposition La touche Redial (Recomposition) sert à recomposer rapidement le dernier numéro que vous avez composé. 1. Décrochez le combiné ou appuyez sur la touche Speaker et attendez la tonalité. 2. Appuyez sur la touche Redial (Recomposition). Le téléphone permet de recomposer automatiquement jusqu’à 32 chiffres. Composition d’un numéro à partir de la liste de recomposition 1. En mode veille, appuyez sur la touche Redial (Recomposition). 2.
█ Fonction de mise en attente L’écran affichera l’option Hold (Mise en attente) lorsque la communication sera établie. Pour mettre un appel en attente 1. Appuyez une fois sur la touche Hold (Mise en attente). L’écran affiche alors Call on hold (Appel en attente). Le fait de raccrocher le combiné ne mettra pas fin à l’appel. 2. Pour poursuivre la conversation, décrochez le combiné ou appuyez sur la touche Unhold (Annuler la mise en attente).
Si vous êtes abonné(e) au service d’appel en attente auprès de votre fournisseur de services téléphoniques, vous entendrez un bip indiquant qu’un autre appel est en attente lorsque vous êtes au téléphone. 1. Pour prendre l’appel en attente, appuyez sur la touche Call Waiting et votre appel initial sera mis en attente. 2. Pour passer d’un appel à l’autre, appuyez sur la touche Call Waiting.
Pour revenir au menu anglais si vous ne connaissez pas la langue qui s’affiche : 1. Appuyez sur la touche programmable Droite. 2. Appuyez sur la touche programmable Gauche. 3. Appuyez sur la touche programmable Gauche. 4. Appuyez sur ▲ ou ▼ pour rechercher « English » dans la liste des langues. 5. Appuyez sur la touche programmable Gauche pour sauvegarder le réglage. █ Écran à cristaux liquides Paramètres de contraste 1. Appuyez sur la touche Menu pour afficher la liste du menu principal. 2.
Paramètres de format de l’heure 1. Appuyez sur la touche Menu pour afficher la liste du menu principal. 2. Appuyez sur la touche Select pour accéder à l’option Set Display. 3. Appuyez sur ▲ ou ▼ pour passer à l’option Hour Format (Format de l’heure), puis appuyez sur la touche Select (Sélectionner). 4. Appuyez sur ▲ ou ▼ pour sélectionner le format 12 heures ou 24 heures, puis appuyez sur la touche Select. Paramètres de format de la date 1.
En mode veille, l’affichage se présente comme suit : Si vous oubliez de brancher le cordon téléphonique, l’écran indiquera « No line » (Pas de ligne). Lorsque vous appuyez sur la touche Menu, le menu principal s’affiche. Utilisez la touche ▲ ou ▼ pour parcourir le menu et en sélectionner un, puis appuyez sur la touche Select (Sélectionner) pour confirmer votre choix. Lorsque vous recevez un appel, l’affichage indique le numéro de téléphone et le nom de l’appelant (si vous êtes abonné à ce service).
█ Écoute de la messagerie vocale Vous devez être abonné au service de messagerie vocale de votre fournisseur de services téléphoniques pour pouvoir utiliser cette fonction. Lorsque vous avez reçu un message vocal, l’écran indique « New voice mail » (Nouveau message vocal) et le message est enregistré comme un appel. Si vous avez de nouveaux messages, vous entendrez une tonalité saccadée en décrochant le combiné.
Ce téléphone affiche automatiquement le nom et le numéro d’un appelant, ainsi que la date et l’heure de l’appel. Il peut enregistrer jusqu’à 30 appels de numéros contenant jusqu’à 15 chiffres et sauvegarder les données en mémoire. █ Réception d’informations ILA Lorsque vous recevez un appel, les informations d’identification de l’appelant sont transmises entre la première et la deuxième sonnerie.
Remarque : Si vous avez enregistré dans le répertoire un numéro de téléphone et le nom correspondant, lorsque vous recevez un appel provenant de ce numéro, le téléphone annoncera le nom associé au numéro. Reportez-vous aux pages 37 et 38 pour savoir comment enregistrer un nom dans le répertoire.
2. Si vous avez enregistré le numéro de téléphone dans votre répertoire, le nom que vous avez indiqué s’affiche en plus du numéro de téléphone. 3. Si le mode de consultation parlante est activé, le numéro de chaque enregistrement ILA est annoncé au fur et à mesure que vous faites défiler la liste. Composition d’un numéro à partir de la liste des appelants Appuyez sur ▲ ou ▼ pour localiser le numéro souhaité.
4. L’affichage indique « Record Voice » (Enregistrement vocal). Appuyez sur la touche Yes (Oui) pour confirmer ou sur No (Non) pour annuler. Si vous appuyez sur Yes, vous pouvez commencer à enregistrer le nom de cette entrée (jusqu’à 6 secondes). Vous pouvez également appuyer sur la touche End (Fin) pour confirmer et arrêter l’enregistrement. Votre enregistrement est immédiatement répété pour que vous puissiez le vérifier. Number Stored (Numéro stocké) s’affiche.
Clarification : • • Pour basculer entre les majuscules et les minuscules pendant la saisie, appuyez sur la touche *. Pour écrire la même lettre deux fois ou une autre lettre sur la même touche, attendez quelques secondes que le curseur se déplace automatiquement, puis sélectionnez la lettre suivante. █ Ajout d’entrées dans le répertoire Méthode 1 : En utilisant le menu du répertoire 1. Appuyez sur la touche PhoneBk pour ouvrir le répertoire. 2.
█ Consultation du répertoire 1. Appuyez sur la touche PhoneBk pour ouvrir le répertoire. 2. Appuyez sur ▲ ou ▼ à plusieurs reprises pour afficher l’entrée souhaitée. 3. Appuyez sur la touche View (Afficher) pour en consulter les détails. Remarque : Si vous avez activé la fonction Talking Review (Consultation parlante), chaque fois que vous appuyez sur ▲ ou ▼, le système annonce le nom de l’entrée en surbrillance.
█ Fonction VIP Cette fonctionnalité vous permet d’associer une mélodie particulière à chaque entrée de votre répertoire. Vous avez le choix entre 11 sonneries. REMARQUE : Cette fonctionnalité est disponible UNIQUEMENT si vous êtes abonné au service d’identification de l’appelant, si les coordonnées téléphoniques ont été enregistrées dans le répertoire et si la sonnerie est activée. 1. Appuyez sur la touche Menu pour afficher la liste du menu principal. 2.
Pas de sonnerie avec stroboscope ou le vibreur ne fonctionne pas 1. Assurez-vous que le sélecteur de sonnerie ou de vibreur est activé (ON) (page 18). 2. Assurez-vous que le vibreur est branché dans la bonne prise. 3. Assurez-vous que le vibreur est bien branché jusqu’au fond. Pas d’amplification 1. Assurez-vous que le volume est monté (page 15 et 16). 2. Assurez-vous que l’adaptateur c.a., qui est indispensable, est branché dans la prise murale et dans la bonne prise du téléphone.
CARACTÉRISTIQUES TECHNIQUES Numéro général : Amplification : CSC600D Jusqu’à 50 dB en entrant Sortie : audio 3,5 mm Alimentation Casque 2,5 mm Adaptateur de courant alternatif : Vibreur 3,5 mm Entrée: 100~240 , 50/60Hz, 150mA Sortie : 7,5VAC, 500mA Poids (kg) : Environ 0,90 kg Dimensions de la base (cm) : 19,69 cm x 19,69 cm x 4,44 cm Les fonctionnalités et caractéristiques sont susceptibles de changer sans notification préalable.
problématique, la compagnie de téléphone avertira l’abonné le plus tôt possible. De plus, vous serez avisé de votre droit de déposer une plainte auprès du FCC, si vous estimez qu’une plainte s’impose. 3. La compagnie de téléphone peut modifier ses installations, son matériel, son fonctionnement ou ses procédures, ce qui peut avoir une incidence sur le fonctionnement de votre équipement.
ÉNONCÉ CS03 D’INDUSTRIE CANADA Ce produit respecte les spécifications techniques d’Industrie Canada. Le numéro d’enregistrement atteste cette conformité. Le sigle « IC » devant le numéro d’enregistrement signifie que l’enregistrement s’est effectué conformément à la déclaration de conformité indiquant que les spécifications techniques d’Industrie Canada ont été respectées. Il n’implique pas qu’Industrie Canada a approuvé l’équipement.
Si votre résidence est dotée d’un système d’alarme à câblage spécial relié à la ligne téléphonique, assurez-vous que l’installation du CSC600D ne neutralise pas votre dispositif d’alarme. Si vous avez des questions à ce sujet, consultez votre fournisseur de services téléphoniques ou un installateur qualifié. Cet appareil numérique de classe B est conforme à la norme canadienne ICES-003.
En cas de panne couverte par la garantie, contactez rapidement un représentant du service à la clientèle par téléphone ou connectez-vous à www.clearsounds.com pour obtenir un numéro d’autorisation de retour et des instructions concernant l’expédition avant de nous renvoyer le produit. Tout envoi reçu sans numéro d’autorisation de retour sera refusé et vous sera renvoyé à vos frais.
Pour un dépannage aux États-Unis et au Canada, contactez : ClearSounds Communications Attention: Repair Center 1743 Quincy Avenue, Suite 155 Naperville, IL 60540 USA +1 800-965-9043 Consultez notre site Web à l’adresse www.clearsounds.com pour obtenir de plus amples renseignements et pour télécharger des manuels et des renseignements supplémentaires.