ENGLISH ESPAÑOL FRANÇAIS Operating Manual ClearSounds® CSC1000 Amplified Freedom Phone™ with Full ClearDigital Power™ 1 – ENGLISH
TABLE OF CONTENTS PRIOR TO USE Congratulations.......................................................... pg. 4 Important Safety Instructions ............................... pg. 4-6 Location of Controls ............................................... pg. 7-9 Keys Descriptions ....................................................pg. 10 Installation Steps .............................................. pg. 11-14 BASIC TELEPHONE FUNCTIONS Amplification ..................................................... pg.
CALLER ID General Information.................................................pg. 34 Receiving & Storing Caller ID Records ............... pg. 34-35 Talking Caller ID.......................................................pg. 35 Caller ID on Call Waiting ..........................................pg. 36 Review Caller ID.......................................................pg. 36 Dial from Caller ID ...................................................pg. 37 Delete Caller ID ...................................
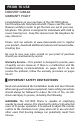
PRIOR TO USE INDUSTRY CANADA WARRANTY POLICY Congratulations on your purchase of the CSC1000 phone from ClearSounds Communications®. Please read this User Manual carefully in order to get the best use out of your new telephone. This phone is designed for individuals with mild to severe hearing loss. Keep this manual near the telephone for easy reference. Please visit our website at www.clearsounds.com to register your product, download additional manuals and review troubleshooting tips.
WARNING: Use only the power supply indicated in the User’s Manual. WARNING: To avoid the possibility of electrical shock, do not use this product near water (For example, near a bathtub, wash basin, kitchen sink or laundry tub, in a wet basement or near a swimming pool) while in the bathtub or shower or when you are wet. If the phone becomes submerged in water, do not attempt to retrieve it until after you have unplugged the AC adapter from the electrical outlet and the line cord from the modular wall jack.
WARNING: Never push any object through the slots in the telephone. They can touch dangerous voltage points or short out parts that could results in risk of fire or electrical shock. WARNING: Do not cover slots and opening on the units, they are needed for ventilation and protection against overheating. WARNING: Stop using the telephone if dropped or if it becomes damaged.
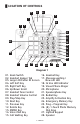
█ LOCATION OF CONTROLS 4 3 6 5 7 8 1 2 9 10 11 27 12 13 14 15 28 16 21 26 25 24 23 22 20 18 19 17 Diagram 1 01. Hook Switch 02. Handset Hanger Tab 03. Large LCD/Caller ID Screen 04. Left Soft Key 05. Right Soft Key 06. Up/Down Scroll 07. Handset Tone Control 08. Handset Volume Control 09. Play/Stop Key 10. Next Key 11. Previous Key 12. Delete Key 13. MEMO Key 14. Voice Mail Key 15. Call Waiting Key 16. Headset Key 17. Message waiting / New call LED 18. In Use LED Indicator 19.
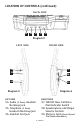
LOCATION OF CONTROLS (continued) BACK SIDE 29 30 31 32 33 Diagram 2 LEFT SIDE RIGHT SIDE 34 37 35 38 36 39 Diagram 4 Diagram 3 LEFT SIDE RIGHT SIDE 34. Audio (3.5mm) Headset/ Neckloop Jack 35. Telephone (2.5mm) Headset / Neckloop Jack 36. Handset Cord Jack 37. ON/OFF New Call/Voice Mail Indicator Switch 38. Speakerphone and Ringer Volume Controls 39.
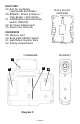
BACK SIDE 29. Port for (optional) ClearSounds Bed Shaker 30. RINGER - Strobe & Shaker / Only Shaker / Only Strobe 31. Amplification Reset Override Switch (ON/OFF) 32. AC Power Adapter Jack 33. Phone Line Cord Jack WALL PLATE ADAPTER UNDERSIDE 39. Memory Card 40. Back Light ON/OFF Switch 41. Wall Mount Keyhole Slots 42.
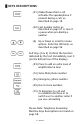
█ KEYS DESCRIPTIONS (21) Make/Answer/End a call Activates the speakerphone if pressed during a call, as described on page 18 (22) Last number redial, as described on page 27 or insert a pause when pre-dialing a number (6) Up or Down or scroll for menu options. Enter the CID book, as described on page 36 Soft Keys (4 & 5) Perform the function indicated by the text immediately over it (on the bottom line of the display).
█ INSTALLATION STEPS Installation of your ClearSounds® CSC1000 Amplified Freedom Phone™ with Full ClearDigital™ Power is easy. There are some basic steps you need to take when you set-up your phone for the first time. 1. Check parts list 2. Pre-select auxiliary features: a. AMPLIFICATION: Amplify Override ON / OFF b. RINGER: Strobe & Shaker / Only Shaker / Only Strobe 3.
potential interference, the phone should not be located near electronic equipment, such as personal computers, television or microwave ovens. Begin by removing the clear plastic Caller ID protective tab. This film tab is only for display and to protect your Caller ID display during shipping. Desk / Table Mounting 1. Plug the AC power adapter into the jack on the back of the telephone. Wait until the phone is completely setup before plugging the AC adapter into the electrical outlet or surge protector.
Screw head Wall Diagram 9 Diagram 10 1. Slide the handset hanger tab out and reverse its position (rotate it 180 degrees). Slide it back into place so that the hook points up (see Diagram 6). This will keep the handset from falling out of the cradle when it is mounted on the wall. 2. Plug the AC power adapter into the jack on the back of the telephone. Wait until the phone is completely setup before plugging the AC adapter into the electrical outlet or surge protector.
6. Holding the phone slightly above the mounting screws on the wall jack, push the phone against the mounting screws so they are hooked into upper and lower keyhole slots on the back of the phone. Slowly slide the phone down until it snaps into place (see Diagram 8). 7. When mounting the phone on dry wall without a standard telephone wall plate, install 2 self-tapping screws (not supplied) at a distance of 167.5 mm (6½ inches) from each other and located on a vertical line.
provides up to 15 dB of volume before the Amplify key is activated. Once the Amplify key activated, the phone will provide up to 55 dB of amplification and tone adjustment. Please Note: The Amplify key controls both the loudness & tone frequency of the handset. Using the Amplification Reset Override Switch (#31) The ClearSounds® CSC1000 is designed with unique features to protect users from being exposed to dangerous sound levels.
█ Ringer Setting You can adjust the ringer of your phone as high as +95 dB. There are 2 methods to set this feature. Method 1 (Volume Only): By adjusting volume on the right side of the phone In standby mode, you can adjust the ringer volume by using the Volume Control V- or V+ on the right side of the phone. The display will show the current level. For example: Ringer LOW. You will also hear the audible ringer at each level you select.
from Standard, Wilhelm Tel, Small world, Prelude, Love is blue, Ashita, NO4, NO5, NO1, NO2, Fuga. Each time you press the Change soft key, the phone rings with the selected ring tone. Press the Save soft key or press ▼ to set the VIP tone. 6. If you set the VIP (Very Important Person) tone, when a new call comes in, and the caller’s number has already been stored in the phonebook, the phone will ring with the VIP tone selected. Use the same method as you set the Ringer Tone.
█ Using your Visual Indicator The red flashing visual indicator on the base will flash to alert you to new calls received or if you have a voice mail message waiting from your service provider. To turn this feature OFF, see page 34. █ Using your Phone with Hearing Aids and Cochlear Implants Your phone can be used with hearing aids and cochlear implants equipped with a telecoil (T-coil). Adjust your hearing aid “Tswitch” to the “T” position. Make sure to hold the handset close to your T-coil.
2. Adjust your volume by using the volume control V- or V+ located on right side of the phone. 3. To end the call, press the Speaker key again on the base. Using a Headset or Neckloop (see page 20) █ Making a Call Using the Handset 1. To make a call, lift the handset and listen for a dial tone. 2. You can dial a number manually or press one of the memory dial keys once programmed. If you make a mistake while entering a number, press the Clear soft key to delete it or hang up and begin again. 3.
5. To change back from speakerphone to handset use, simply pick up the handset to disable the speakerphone. The speakerphone indicator turns OFF. 6. To change back from handset to speakerphone, simply press the Speaker key and then hang up the handset. The speakerphone indicator turns ON and the handset is disabled. Using Audio and Telephone Neckloop/Headset Jacks Your phone is equipped with both Audio and Telephone Headset jacks, providing total flexibility and multi-functionality.
into the handset, lift the handset, listen for dial tone and dial the number. Speak into the handset and adjust your volume. To end the call, replace the handset to the base. 3. If you are using the 3.5mm Audio jack and want to speak into the speakerphone, press the Speaker key, listen for dial tone and dial the number. Speak into speakerphone (the conversation will be heard through both your audio equipment and over the speakerphone) and adjust your volume.
MENU NAVIGATION / TELEPHONE SETTING █ MENU To Access a MENU Option 1. To display the menu list, press the Menu soft key. 2. To scroll through menu options, press ▲ or ▼ repeatedly. 3. To select a menu item, Press the Select soft key when the desired menu item appears on the display. 4. Repeat if necessary. To Exit from any MENU If you press the Back soft key or the Exit soft key, the phone returns to the previous screen.
█ Dialing Mode Setting Your ClearSounds® CSC1000 comes from the factory preset for touch-tone service. Should you need to change this setting based on the type of telephone service you have, use Tone for touch-tone service or Pulse for rotary dialing. NOTE: If you are not sure which dialing mode to select, please contact your local phone service provider. 1. Press the Menu soft key to display the main menu list. 2. Press ▼ to move to Set Phone and then press the Select soft key. 3.
5. Press the Change soft key to set the keypad tones. You can choose from ON, OFF and Link to Ringer. The Link to Ringer means that your keypad setting will match your ringer setting selection. 6. Press the Save soft key to confirm. 7. To exit, press the Back soft key to return to the previous screen and then press the Exit soft key to return to the main screen. Otherwise, after 1 minute, the display will automatically return to the main screen.
• When reviewing CID records, the phone will announce the number. • When reviewing phonebook entries, the phone will announce the number or recorded message. • When using the Redial function, the phone will announce the number or recorded message. To change this setting: 1. Press the Menu soft key to display the main menu list. 2. Press ▼ to move to Set Talk and then press the Select soft key. 3. Press ▼ to move to REVIEW TALKING and then press the Select soft key. 4.
2. Press the Prog key, the display will show “--->?” 3. Press one of the Memory dial keys, the display will show “Saved”. 4. Repeat for each Memory dial key you want to use. After storing the 8 Photo Memory Numbers, you may want to utilize the Memory Card to write down the name or phone number that corresponds with each Photo Key. The Memory Card is located on the right side of the phone. Dialing from Memory Numbers 1.
█ Inserting Photos In Memory Buttons 1. Cut your photo using the template provided as a guide. 2. Remove the transparent cover of the memory key and insert the photo and replace the cover or slide the photo in the top slot of the cover. █ Mute Setting During a conversation, you can temporarily switch your phone’s microphone off to have a private, off-line conversation by using the MUTE feature. The party on the telephone cannot hear you but you can hear them.
Dialing from the Redial List 1. Press the Redial key in standby mode. 2. Press ▲ or ▼ repeatedly until you find the number you want to dial. If you have the Talking Review Mode set to ON, the number for each record will be announced as you scroll through the Redial list. 3. Pick up the handset or press the Speaker key to dial. Clearing the Redial List 1. Press the Redial key in standby mode. 2.
4. Press ▲ or ▼ to choose between ON/OFF to activate/ deactivate the call waiting function and then press the Select soft key to confirm. 5. To exit, press the Back soft key to return to the previous screen and then press the Exit soft key to return to the main screen. Otherwise, after 1 minute, the display will automatically return to the main screen. Your ClearSounds® CSC1000 comes from the factory preset for Flash Time to 600ms. To change this setting: 1.
DISPLAY SETTINGS Use this feature to customize the display settings according to your needs. █ LCD Contrast Settings 1. Press the Menu soft key to display the main menu list. 2. Press the Select soft key to access Set Display. 3. Press ▼ to move to Set Contrast and then press the Select soft key. 4. Press ▲ or ▼ repeatedly to choose from the 8 available contrast levels and then press the Select soft key to confirm. 5.
If you have Caller ID service, the date and hour will be automatically set when you receive your first call. If you currently do not have Caller ID service through your phone company, please follow the directions below. You can change the format of the time and date to your preference. Hour Format Settings 1. Press the Menu soft key to display the main menu list. 2. Press the Select soft key to access Set Display. 3. Press ▼ to move to Hour Format and then press the Select soft key. 4.
Setting Time, Date and Day of the Week 1. Press the Menu soft key to display the main menu list. 2. Press ▼ to move to Date and Time and then press the Select soft key. 3. Enter the current time using the numeric keypad and use the ▲ to select AM/PM and then press the Save soft key. 4. Enter the current date using the numeric keypad and then press the Save soft key. 5. Press ▲ or ▼ key repeatedly to select the correct weekday and then press the Save soft key. 6.
If you forget to connect the phone line cord, “No line” will show on the screen. When you press the Menu soft key, the display will show the main menu. Use the ▲or ▼key to scroll through the menu and select the desired one and then press the Select soft key to confirm. When a new call comes in, the screen will display the caller’s phone number and/or name (provided that you subscribe to this service through your local telephone provider). Shows the total and new calls to be reviewed.
When a voice mail message is left, the screen will display “New voice mail” and the message will be saved as a call. If you have new messages, you will hear a stutter dial tone when you pick up the handset. The CSC1000 has a message indicator light, which will blink when you have new messages and will continue to flash until the message has been retrieved. You can utilize the one-touch voice mail button if you have programmed your voice mail access phone number.
█ Storing CID Records Your telephone’s Caller ID memory stores the data for the 30 most recent calls received. When the 31st call is received, the oldest Caller ID record (1st call) is automatically deleted. You may review the stored information at any time. Calls received since your last review show as NEW in the display. Calls that have not been previously reviewed but were received from the same number more than once show as REPT in the display.
█ Caller ID on Call Waiting When you subscribe to Call Waiting Caller ID service from your local telephone provider, the telephone will display the Caller ID information of the second call while you are on the first call. Caller ID info displayed Caller two’s information is displayed 1. When you are on existing call, a tone will emit, and the Caller ID displays the incoming caller’s information. 2. Press the Call Waiting key to put the current call on hold and answer the second caller. 3.
Dialing a Number from the Caller List Use ▲ or ▼ to locate the desired record. If you need to change the dialing format (7 digits, 10 digits or 11 digits), simply press the * key until you see the desired format of the number you would like to dial. For example, if the original number in the Caller ID list was 800-965-9043, press the * key repeatedly to change it to 1-800-965-9043 or 965-9043. Pick up the handset or press the Speaker key to dial that number. Deleting a Single Caller List Record 1.
and end the recording. Your recording will immediately play back for your confirmation. Number Stored will appear. 5. To exit, press the Exit soft key once to return to the main screen. Otherwise, after 1 minute, the display will automatically return to the main screen. TELEPHONE ANSWERING MACHINE (TAM) OPERATION The answering machine will hold up to 10 minutes of messages. The telephone answering machine can be accessed from the base or remote location.
To Turn the Answering Machine ON/OFF 1. Press the Menu soft key to display the main menu list. 2. Press ▲ or ▼ to move to TAM setup and then press the Select soft key. 3. Press the Select soft key to choose TAM ON/OFF. 4. Press ▲ or ▼ to ON or OFF and then press the Save soft key. 5. To exit, press the Back soft key to return to the previous screen and then press the Exit soft key to return to the main screen. Otherwise, after 1 minute, the display will automatically return to the main screen.
5. Press ▼ to choose Record OGM and then press the Select soft key. Speak clearly into the microphone, which is located below the Redial button. 6. The display will show Record OGM?. Press Yes to confirm or press No to cancel. 7. You can record your OGM after the tone. Recording will stop automatically after 2 minutes. You can also confirm and end the recording by pressing the End soft key. The new OGM will be played after the recording. 8.
5. The current OGM will be played. During the process the display will show Playing OGM. You can press the Exit soft key to stop and exit. 6. If you do not like your message, record your message again or restore it to the default one. To Restore the Outgoing Message To delete the recorded OGM and restore it to the default one: 1. Press the Menu soft key to display the main menu list. 2. Press ▼ to move to TAM setup and then press the Select soft key. 3.
and held during the whole process. 2. Release the MEMO key to end the recording. Screening Calls 1. When the answering machine answers the call, listen while the caller leaves a message. 2. To speak to the caller, pick up the handset or press the Speaker key. The answering machine automatically stops recording when you activate the handset or speakerphone. TIP: Make sure the volume on the phone is set loud enough to hear your incoming calls.
Press the [ ►►▌] key once to play the next message. Press the [ ►▌■ ] key once or the Exit soft key to stop playing and exit. Please Note: If you would like to listen to the message(s) through your handset, simply pick up the handset and press the Start Message key [►▌■] and then you will also be able to perform any other message function key. Please note: You can not switch between speakerphone and handset while listening to messages.
1. Press the Menu soft key to display the main menu list. 2. Press ▼ to move to TAM setup and then press the Select soft key. 3. Press ▼ to choose Ring number and then press the Select soft key. 4. Press ▲ or ▼ to choose the answer rings (3-6 Rings or toll saver) and then press the Save soft key. 5. To exit, press the Exit soft key twice to return to the main screen. Otherwise, after 1 minute, the display will automatically return to the main screen.
1. Dial your telephone number from any touch tone telephone. 2. When the outgoing message starts to play, you may enter the remote access mode by inputting the security ID. 3. After you enter the security ID, the system will play the menu of commands. You can then follow the commands to operate. Play messages 2X Stop playing messages Erase current messages Review Skip Switch the answering machine on/off Repeat menu again Reminder: Your answering machine must be turned ON in order to use remote access.
Character Map To enter a specific alphanumeric character, press the relevant key one or more times for the required character according to the following table: once for the first character, twice for the second and so on. Clarification: • If you want to shift the case between upper and lower, between entering letters, press the * key. • When entering the same letter twice or a different letter with same key, wait for a few seconds for the cursor to move automatically and then select the next letter.
4. The display shows “Record Voice”. Press the Yes soft key to confirm or the No soft key to cancel. If you press Yes, you can start to record the name of this entry (up to 6 seconds). You can also press the End soft key to confirm and end the recording. Your recording will immediately play back for your confirmation. 5. Repeat if necessary. 6. To exit, press the Exit soft key once to return to the main screen. Otherwise, after 1 minute, the display will automatically return to the main screen.
█ Viewing the Phonebook Entries 1. Press the PhoneBk soft key to enter the phonebook. 2. Press ▲ or ▼ repeatedly until the desired entry is highlighted. 3. Press the View soft key to view the details. 4. To exit, press the Exit soft twice to return to the main screen. Otherwise, after 1 minute, the display will automatically return to the main screen. Note: If you have activated the Review Talking feature, every time you press ▲ or ▼, the system will announce the number or name of the highlighted entry.
• Edit: allows you to edit the selected entry. • Erase: allows you to delete the selected entry. Note: After editing the name, you need to press the ▼ to edit the number. █ VIP Setting This feature allows you to assign one specific melody to everyone in your phonebook. You may choose from eleven different ring tones. NOTE: This feature ONLY works when you have subscribed to Caller ID service, the telephone information has been stored in the phonebook and the ringer is ON. 1.
TROUBLESHOOTING No dial tone 1. Check that all phone cord connections (including the curly cord) and AC adapter are security plugged into the telephone and wall jack. 2. Check that the phone is in the correct dialing mode: tone or pulse (page 23). 3. Plug another phone into the wall jack to make sure your phone service is working. No audible ringer 1. Make sure the ringer is not turned off (pages 16-17). 2. Check the volume level of the ringer (pages 16-17). 3.
Can’t be heard by other party 1. Check that all phone cord connections are securely plugged into the telephone and wall jack. 2. Make sure extension phones are on the hook at the same time you’re using the phone. It is normal for the volume to drop when additional extension phones are used at the same time. Noise, Static, Interference while using the phone 1. A filter may be required for home with DSL line or near Radio towers. 2.
TECHNICAL SPECIFICATIONS General Number: CSC1000 Amplification: Up to 55 dB incoming Power Requirements AC power Adapter: Input: 120~240VAC 50/60Hz 150mA Output: 7.5VDC 500mA Jacks: 3.5mm audio output 2.5mm headset 3.5mm shaker Features and Specifications subject to change without notice. Purchase accessories for Your Clearsounds Phone: Optional Shaker: ClearSounds CS-SHK (connects easily to your phone to signal incoming calls. Optional Neckloop: CS-CLA7V2 (connects easily to your phone’s 2.
FCC WANTS YOU TO KNOW 1. This equipment complies with Part 68 of the FCC rules and the requirements adopted by the ACTA. On the bottom of this equipment is a label that contains, among other information, a product identifier of [US: CLSTE12BCSC1000]. If requested, this number must be provided to the telephone company. 2.
most areas, the sum of the RENs of all devices on any one line should not exceed five (5.0). If too many devices are attached, they may not ring properly. Service Requirements In the event of equipment malfunction, all repairs should be performed by our Company or an authorized agent. It is the responsibility of users requiring service to report the need for service to our Company or to one of our authorized agents. Service can be facilitated through our office at: ClearSounds Communications, Inc.
repairs or alterations made by the user of this equipment, or equipment malfunctions, may give the telecommunication company cause to request the user to disconnect the equipment. WARNING! Users should not attempt to make such connections themselves, but should contact the appropriate electric inspection authority, or an electrician, as appropriate.
LIMITED ONE-YEAR WARRANTY The product is warranted by ClearSounds against manufacturing defect in material and workmanship under normal use for one (1) year from the date of purchase. Should you experience a problem, contact our customer service department or visit our website at www.clearsounds.com. Be sure to save your sale receipt as proof of purchase date should you need warranty service. Your CSC1000 Phone comes with a (1) year limited warranty from the date of purchase.
Authorization number and shipping instructions before shipping the product to us. Any shipment without a (RMA) Return Merchandise Authorization number will not be accepted and will be returned to you at your expense. All authorized returned products must be accompanied with proof of purchase and a brief explanation of the problem. For out of warranty repairs and service, please contact our Customer Service Department for directions. The repair shall be warranted for 90 days.
– ENGLISH
– ENGLISH
Service in United States and Canada, contact: ClearSounds Communications Attention: Repair Center 1743 Quincy Avenue, Suite 155 Naperville, IL 60540 USA 800-965-9043 Check our website www.clearsounds.com for additional information and to download additional manuals and information.