ENGLISH ESpAñoL FRANÇAIS CSC48 Operating Manual Clearsounds® A1600E DECT 6.0 Expandable Handset™ *Requires use of the A1600 Amplified Cordless Freedom Deluxe Phone™ This manual is intended to be a brief overview of key features. For complete operating instructions, please refer to the ClearSounds A1600 Operating Manual.
PRIOR TO USE Congratulations on your purchase of the A1600E phone from ClearSounds Communications®. Please read this User Manual carefully in order to get the best use out of your new phone. This phone is designed for individuals with mild to severe hearing loss. Keep this manual near the phone for easy reference. Please visit our website at www.clearsounds.com to register your product, download additional manuals and review troubleshooting tips.
wash basin, kitchen sink or laundry tub, in a wet basement or near a swimming pool) while in the bathtub or shower or when you are wet. If the phone becomes submerged in water, do not attempt to retrieve it until after you have unplugged the AC adapter from the electrical outlet and the line cord from the modular wall jack. Do not plug the phone back in until it has dried completely. WARNING: Avoid using the phone during electrical storms. There may be a remote risk of electric shock from lightning.
polarity symbols. Use only batteries identified as acceptable and never use alkaline batteries, which can cause personal injury as well as damage to the unit. Hearing Aid Compatibility (HAC) This phone meets the FCC standards for Hearing Aid Compatibility. IMPORTANT: YOUR RECEIPT IS PART OF YOUR WARRANTY AND MUST BE RETAINED AND PRODUCED IN THE EVENT OF A WARRANTY CLAIM.
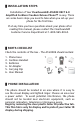
█ INSTALLATION STEPS Installation of Your ClearSounds® A1600E DECT 6.0 Amplified Cordless Freedom Deluxe Phone™ is easy. There are some basic steps you need to take when you set-up your phone for the first time. If at any time you have questions about your phone after reading this manual, please contact the ClearSounds® Customer Service Department at 1-800-965-9043. █ PARTS CHECKLIST Check the contents of the box - The A16000E should contain: 1. 2. 3. 4. 5. 6.
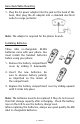
Base Desk/Table Mounting 1. Plug the AC power adapter into the jack on the back of the base, then plug the AC adapter into a standard electrical outlet or surge protector. Note: The adapter is required for the phone to work. Installing Batteries Three AAA re-chargeable Ni-MH batteries come with your phone. You must install the handset batteries before using your phone. 1. Remove the battery compartment cover by sliding it downwards. 2. Insert the new batteries.
Charging the Handset 1. Place the handset into the base. The LCD screen will light up and you will hear a beep to indicate charging has begun. 2. Important: Before initial operation, you should fully charge the handset for at least 15 hours. 3. After the batteries are fully charged, begin the registration process as described on page 9. When battery power is very low and you place the handset on the base, the display will show  . Check the battery icon on the LCD to see the battery charge level.
MENU NAVIGATION Screen Navigation If you press  under the word Back on the screen from any menu, the phone returns to the previous screen. To return to the main screen at any time, press  . The phone will automatically return to the main screen from any menu if no key is pressed for 30 seconds. “Standby” can mean that you are at the main screen or can also mean that you are not on a live call and do not have dial tone engaged. To Access a MENU Option 1.
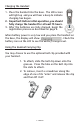
BASIC PHONE FUNCTIONS █ Registering the Handset Up to 4 additional A1600E handsets can be registered to the base. 1. Before registering an additional handset to the base, you should press and hold the page key  , which is located on the main base, for about 5 seconds and then release it. 2. Press  under the word Menu on the screen of the handset you are registering to display the main menu list. 3. Press up or down to scroll to Registration and then press  under the word Select. 4.
█ Turning the Handset “Power On/Off” Mode The A1600E handset can be turned to “Power Off” mode, which can be a convenient way to prevent the phone from ringing without having to change the ringer setting. When you turn the handset to “Power Off” mode, calls can’t be made or received until you turn the power back “On”. In Standby Mode (not during a live call): 1. To turn the handset “Off”, simply press and hold  until the display turns off. 2. To turn the handset “On”, you can either: 3.
PHONE HANDSET SETTINGS █ Handset Name This feature allows you to give each registered handset a name in order to easily recognize each handset if you have more than one registered to the base. To set the handset name: 1. Press  under the word Menu on the screen to display the main menu list. 2. Press up or down  to scroll to HS Settings and then press  under the word Select. 3. Press up or down  to scroll to Rename HS and then press  under the word Select. 4.
If successful, the handset settings will be reset to the initial factory settings, otherwise the settings will remain. After resetting, the handset will return to standby mode. █ Base Selection This function allows you to select a base from those already registered to the handset. To select a base: 1. Press  under the word Menu on the screen to display the main menu list. 2. Press up or down to scroll to HS Settings and then press  under the word Select. 3.
TROUBLESHOOTING No dial tone 1. Check that all phone cord connections and AC adapter are securely plugged into the phone, wall jack and electric outlet of the main base. 2. Check that the AC adapter is securely plugged into the A1600E base and electric outlet. 3. Check that the handset batteries are installed properly and are in full power (page 6-7). 4. Check that the handset has been properly registered to the main base (page 9). 5. Check that the phone is in the correct dialing mode: tone or pulse. 6.
TECHNICAL SPECIFICATIONS General Number: Amplification: A1600E 125dB SPL Power Requirements: Base Input: Handset Input: Charging Time: 7.5V, 500mA Ni-MH 1.2V x 3, 600mAh 15 hours Jack: 2.5 mm headset 3.5 mm audio Features and Specifications subject to change without notice. Purchase accessories for Your Clearsounds Phone: Optional Neckloop: CS-CLA7V2 (connects easily to your phone’s 2.5mm Phone Headset jack for hands-free conversations).
FCC WANTS YOU TO KNOW 1. This equipment complies with Part 68 of the FCC rules and the requirements adopted by the ACTA. On the bottom of this equipment is a label that contains, among other information, a product identifier of [US: CLSTE12B]. If requested, this number must be provided to the phone company. 2. If the ClearSounds® A1600E DECT 6.
7. If the phone company requests information on what equipment is connected to their lines, inform them of: a) The phone number that this unit is connected to, b) The ringer equivalence number [1.2B] c) The USOC jack required [RJ11C], and d) The FCC Registration Number [US:] Items (b) and (d) are indicated on the label. The ringer equivalence number (REN) is used to determine how many devices can be connected to your phone line.
INDUSTRY CANADA CS03 STATEMENT This product meets the applicable Industry Canada technical specification. This is confirmed by the registration number. The abbreviation, IC before the registration number signifies that registration was performed based on a Declaration of Conformity indicating that Industry Canada technical specifications were met. It does not imply that Industry Canada approved the equipment.
LIMITED ONE-YEAR WARRANTY The product is warranted by ClearSounds against manufacturing defect in material and workmanship under normal use for one (1) year from the date of purchase. Should you experience a problem, contact our customer service department or visit our website at www.clearsounds.com. Be sure to save your sale receipt as the proof of purchase date should you need warranty service. Your A1600E comes with a (1) year limited warranty from the date of purchase.
Authorization number and shipping instructions before shipping the product to us. Any shipment without a (RMA) Return Merchandise Authorization number will not be accepted and will be returned to you at your expense. All authorized returned products must be accompanied with proof of purchase and a brief explanation of the problem. For out of warranty repairs and service, please contact our Customer Service Department for instructions. The repair shall be warranted for 90 days.