
User Manual

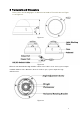
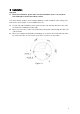


Table Of Contents

5
Figure 3-2
Step 1
Take the installation position map from the accessories bag and then put it on the surface of
the ceiling or the wall according to the cable exit position. Dig three holes according to the
installation position map and then take three expansion bolts from the accessories bag and put
them to the holes you just dug.
Step 2
Use inner hex wrench to remove the three case locking screws and then remove the dome
enclosure.
Step 3
Adjust the pedestal position according to the cable exit mode (ceiling/side). Pull the cable
through the cable side exit at the installation surface and the pedestal (Please skip this step if
you want to use ceiling exit mode). Line up the screw holes at the bottom of the pedestal to the
expansion bolts in the installation surface. Put three self-tapping screws to expansion bolts and
then secure firmly. Now the pedestal is on the installation surface.
Step 4
Connect the video output port of the device cable to the HDAVS DVR, and connect the power
port of the device cable to the power. After the image is shown on the HDAVS DVR, control
the interface by HDAVS series DVR PTZ, adjust lens zoom by using coaxial control, and the
camera will auto focus to the best position.