HDAVS Camera User’s Manual Version 1.0.
Table of Contents 1 General Introduction .................................................................................................................. 1 1.1 Overview ........................................................................................................................ 1 1.2 Features ......................................................................................................................... 1 2 Framework and Dimensions ................................................
Welcome Thank you for purchasing our HDAVS camera! This user’s manual is designed to be a reference tool for your system. Please read the following safeguard and warnings carefully before you use this series product! Please keep this user’s manual well for future reference! Important Safeguards and Warnings Electrical safety • • All installation and operation here should conform to your local electrical safety codes.
Statement • • Please refer to the actual product for more details; the manual is just for reference. The manual will be regularly upgraded according to the product update; the upgraded content will be added in the manual without prior announcement. • • • Please contact the customer service for the latest procedure and supplementary documentation. The company is not liable for any loss caused by the operation which is not followed by the manual.
1 General Introduction 1.1 Overview This series megapixel HD camera conforms to the HDAVS standard. It supports video signal high-speed long distance transmission without any delay. It can be controlled by the HAVR conforming to the HDAVS 1.2 Features High-performance CMOS image sensor, megapixel definition. Support HD video and control signal coaxial transmission. Support 75-3 coaxial cable transmission without any loss.
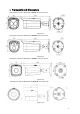
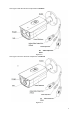
2 Framework and Dimensions See Figure 2-1 for the dimension of model A. The unit is mm. Figure 2-1 See Figure 2-2 for the dimension of model B. The unit is mm. Figure 2-2 See Figure 2-3 for the dimension of model C. The unit is mm. Figure 2-3 See Figure 2-4 for the dimension of model D. The unit is mm.
See Figure 2-5for the structure components of model A. Figure 2-5 See Figure 2-6 for the structure components of model B.
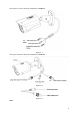
See Figure 2-7 for the structure components of model C. Figure 2-7 See Figure 2-8 for the structure components of model D.
There is only one video port for some cameras, which is shown in Figure 2-9, it outputs HD video signal by default, it needs to enable self-adaptation function in the OSD menu to switch to standard definition video signal.
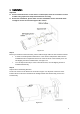
3 Installation Important Please install the device in time after it is taken apart, which is to avoid the camera module being exposed to damp environment for too long. Before the installation, please make sure the installation surface should be thick enough to sustain at least 3X weight of the camera. Figure 3-1 Step 1 Before you install the camera bracket, pull the cable through cable exit of the bracket chassis.
Note: The installation steps above can be applied to model A, B, C and D.
4 Menu 4.1 HAVR Settings 4.1.1 Control Coaxial Device This HDAVS camera series can adjust OSD menu via coaxial control. After connected the camera to the HDAVS series HAVR, from Main Menu->Setting->System->PTZ, you need to select the channel number for access and set control mode as HDAVS and the protocol as HD-AVS. Click “Save” button to save current setup. See Figure 4-1. Figure 4-1 4.1.
Figure 4-2 4.2 Menu Operation Click the right mouse button and select “PTZ Control”, then you will see the “PTZ Setup” menu, which is as shown in Figure 4-3 and Figure 4-4.
Figure 4-4 See Sheet 4-1 for the details of button functions. Button Function Open menu 、 Select menu item 、 Select menu value Adjust lens zoom and auto trigger focus Adjust lens focus Auto focus under current zoom rate Note: Some of the buttons can only be applied for the motorized vari-focal camera. Lens reset Sheet 4-1 If there is “ ”, click the “Confirm” button in “Menu Operation” interface to go to the 2nd menu. Click “Return” button to go back to the previous menu interface.
Appendix Maintenance Attention: Please maintain the device according to the following instructions in order to ensure the image effect and long-term stable operation of the device.
Note • This manual is for reference only. Slight difference may be found in the user interface. • All the designs and software here are subject to change without prior written notice. • All trademarks and registered trademarks mentioned are the properties of their respective owners. • If there is any uncertainty or controversy, please refer to the final explanation of us. • Please visit our website or contact your local service engineer for more information.