
User Manual Chapter 3


Chapter 3 - 6
IDU Configuration:
Local configuration of each IDU will give each IDU sufficient information to establish a session with a Master Unit. Each
IDU must be configured with the proper IDU IP Address, Subnet Mask, Server, Cell ID, and Maintenance Mode setting.
This can be accomplished either before installation or on site. On site programming of the unit will use a PC running the
Java Ethernet Terminal (JET) emulation application.
Once a session is established, all configurations can be done remotely from the network manager.
NOTE: JET will only work with software releases B13x in Gen1 and S230 in Gen2 and greater. Therefore, before
going any further, ensure that you are running a release that meets this requirement. Also confirm that the radio
is functioning correctly and is in run-time mode.
Establishing a connection to the IDU:
• IDU installation should be completed and the unit should be in the run-time mode at this time.
• Use of NAT should be established at this time.
• If the PC being used has previously been used to communicate with the IDU, start up JET and then reboot
the radio (this can be done by cycling power on the IDU). Every time the radio is booted, it will attempt to
establish a connection with the Java Ethernet Terminal, based on the data that is contained within the JET.INI
file. This file will contain both the IP address of the PC running JET and the port that it will be listening for
radios to connect on. In this method the radio will establish a connection with JET just prior to displaying the
Device Parameter Menu. As soon as the connection is established, the radio will redirect I/O to the socket
and this will allow for the handling of all I/O by JET.
Or
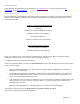
• If the PC has not been used to previously communicate with the IDU, or if the unit is to be used with NAT,
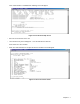
start up JET and use the Control à Connect to… option provided in JET. Enter the IP address of the radio
you are trying to connect to, in the text field labeled “IP Address” on the Connect to Client screen. The IP
Address will be in dotted decimal notation, for example 192.168.100.5. After doing so, press the connect
button to start the process. This prompts JET to send a message to the radio, indicating that there is a JET
up and running, and it is looking to connect to it. The radio must be on the same sub-network as the PC. (If
the subnet is unknown, try setting the PC IP address to one above or one below that of the IDU.)