
User Manual Chapter 3


Chapter 3 - 4
• Ground the RF cable at the bottom of the tower.
• Cadwelds underground.
• Double lug compression above ground. Bolts must be stainless steel.
• Kopr-Shield all mechanical interfaces.
• 2-Point grounding to inside of building.
• Halo ground installed at least 18 in. below grade.
• Halo comprised of #2 AWG tinned solid copper wire.
• Test the grounding system to prove system less than 10 ohms.
• All grounds should "flow downstream" with minimum bend radius (6 in. for #6, 12 in. for #2).
• Halo must have 10 ft. ground rods driven down approximately every 10 ft. Rods must be 5/8 in. steel clad
with pure copper not less than 0.0012 in.
For all antenna locations, point the antenna towards the designated cell site identified by the Network Manager. Use the
methods described in the Site Survey section of Chapter 2 of this manual to maximize performance and minumize
interference.
5. RF Cable Run:
• Run RF cable from antenna to IDU location, again keeping aesthetics in mind. Make it as unobtrusive as possible.
• Form a drip loop close to where the cable enters the building. Caulk and seal around the entrance.
• Connect the RF cable to the ODU and weatherproof the connection.
IDU INSTALLATION:
Once the antenna assembly is installed and the RF cable is run, install the IDU as follows.
1. Connect the RF cable to the IDU RF connector.
2. Plug the subscriber Ethernet LAN connector into the IDU LAN port. When connecting to the LAN via a hub, use a
straight through cable (standard). When connecting directly to a PC, use a crossover cable.
3. Connect the power supply output to the IDU DC PWR connector.
4. Plug the power supply into an AC outlet to power up the IDU. Check the IDU front panel LEDs. The PWR and
CPU LEDs should be lit, and both FAULT LEDs should be off. If all three RADIO status LEDs (RX, TX and LINK)
are lit, the link is good. (Note: The equipment may require a few moments to establish the link.)
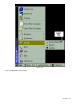
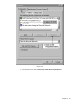
5. Configure the IDU with the proper IDU IP Address and Ethernet Host Address (if entering new code) in
accordance with the procedure below.
6. Once a link is established, contact the network manager to confirm the link and complete the IDU configuration.