
User Manual Chapter 3


Chapter 3 - 6
• At the [VxWorks Boot] prompt, enter "@" to reboot with the changed parameters.
• At the Press any key to change device parameters prompt, press any key to advance to the Security Log-On.
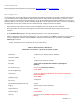
Enter the appropriate Account Name and password to advance to the Device Parameters Menu. Table 2-4 shows the
Device Parameters Menu.
Table 2-4. Device Parameters Menu
1. Maintenance Mode
Set to DISABLED for normal operation.
2. GPS Pulse Fakeout
Set to DISABLED for normal operation.
3. Server Assign Sector 000 Server 0 (appropriate primary or backup sector)
4. Cell ID 0 (appropriate cell number)
5. Tx Frequency Channel
6 (enter transmit frequency channel and press ENTER)
6. Rx Frequency Channel
6 (enter frequency channel and press ENTER)
7. Subnet Mask 255.255.255.240 (enter the subnet mask HEX value)
8. User Print Mask 0x0000 (do not change)
9. Performance Test Vars.
10. Frequency Hopping Off
11. Frequency Hopping Halted
12. Frequency Hopping 0
13. Change Password
14. Quit
• In the Device Parameters Menu screen, press the appropriate number to change each parameter. For each
Subscriber Unit, the TX Frequency Channel must match the RX Frequency Channel of its Master Unit. Likewise, the
Subscriber Unit's RX Frequency Channel must match the TX Frequency Channel of its Master Unit.
• Press 14 to quit when done.
PC Configuration:
Each participating PC on the subscriber LAN must be properly configured for connection to the Internet using Clearwire
TM
Wireless. Table 3-3 lists the information you’ll need before configuring each PC. Obtain this information from your ISP
Direct network manager.
Table 3-3. PC Configuration Information
Site Name
IP Address of Clearwire
TM
ISP Direct (Gateway)
Available IP range for this site
IP Address of DNS server